HP c3700 hp Visualize b2000 UNIX workstation service handbook (a5983-90039) - Page 94
Tightening the Bracket Screws, Plugging in the Audio, ATAPI, and Power
 |
View all HP c3700 manuals
Add to My Manuals
Save this manual to your list of manuals |
Page 94 highlights
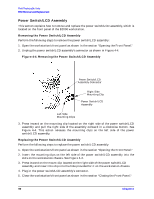
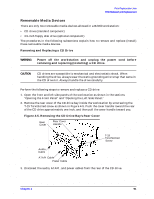
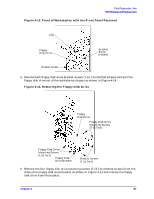
Field Replaceable Units FRU Removal and Replacement 10.Tighten the two CD drive bracket screws as shown in Figure 4-9. Figure 4-9. Tightening the Bracket Screws Bracket Screw Bracket Screw (hidden) 11.Rotate the workstation around until you see the open, left side of the workstation. Plug the audio, ATAPI, and power cables into their appropriate connectors on the rear of the CD drive, as shown in Figure 4-10. Note that the connectors are keyed for proper insertion, and that you should connect the audio cable first. NOTE The red striped side of the ATAPI cable should be positioned next to the power cable. Figure 4-10. Plugging in the Audio, ATAPI, and Power Cables Audio Cable Ferrite Bead ATAPI Cable Power Cable 94 Chapter 4
-
 1
1 -
2
-
3
-
4
-
5
-
6
-
7
-
8
-
9
-
10
-
11
-
12
-
13
-
14
-
15
-
16
-
17
-
18
-
19
-
20
-
21
-
22
-
23
-
24
-
25
-
26
-
27
-
28
-
29
-
30
-
31
-
32
-
33
-
34
-
35
-
36
-
37
-
38
-
39
-
40
-
41
-
42
-
43
-
44
-
45
-
46
-
47
-
48
-
49
-
50
-
51
-
52
-
53
-
54
-
55
-
56
-
57
-
58
-
59
-
60
-
61
-
62
-
63
-
64
-
65
-
66
-
67
-
68
-
69
-
70
-
71
-
72
-
73
-
74
-
75
-
76
-
77
-
78
-
79
-
80
-
81
-
82
-
83
-
84
-
85
-
86
-
87
-
88
-
 89
89 -
 90
90 -
 91
91 -
 92
92 -
 93
93 -
 94
94 -
 95
95 -
 96
96 -
 97
97 -
 98
98 -
 99
99 -
100
-
101
-
102
-
103
-
104
-
105
-
106
-
107
-
108
-
109
-
110
-
111
-
112
-
113
-
114
-
115
-
116
-
117
-
118
-
119
-
120
-
121
-
122
-
123
-
124
-
125
-
126
-
127
-
128
-
129
-
130
-
131
-
132
-
133
-
134
-
135
-
136
-
137
-
138
-
139
-
140
-
141
-
142
-
143
-
144
-
145
-
146
-
147
-
148
-
149
-
150
-
151
-
152
-
153
-
154
-
155
-
156
-
157
-
158
-
159
-
160
-
161
-
162
-
163
-
164
-
165
-
166
-
167
-
168
-
169
-
170
-
171
-
172
-
173
-
174
-
175
-
176
-
177
-
178
-
179
-
180
-
181
-
182
-
183
-
184
-
185
-
186
-
187
-
188
-
189
-
190
-
191
-
192
-
193
-
194
-
195
-
196
-
197
-
198
-
199
-
200
-
201
-
202
-
203
-
204
 |
 |

94
Chapter 4
Field Replaceable Units
FRU Removal and Replacement
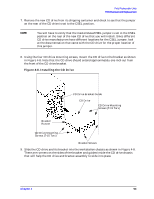
10.Tighten the two CD drive bracket screws as shown in Figure 4-9.
Figure 4-9. Tightening the Bracket Screws
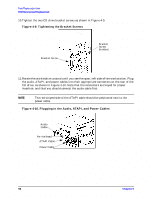
11.Rotate the workstation around until you see the open, left side of the workstation. Plug
the audio, ATAPI, and power cables into their appropriate connectors on the rear of the
CD drive, as shown in Figure 4-10. Note that the connectors are keyed for proper
insertion, and that you should connect the audio cable first.
NOTE
The red striped side of the ATAPI cable should be positioned next to the
power cable.
Figure 4-10. Plugging in the Audio, ATAPI, and Power Cables
Bracket
Screw
(hidden)
Bracket Screw
Power Cable
ATAPI Cable
Audio
Cable
Ferrite Bead