HP c3700 hp Visualize b2000 UNIX workstation service handbook (a5983-90039) - Page 152
Setting the Monitor Type with SAM
 |
View all HP c3700 manuals
Add to My Manuals
Save this manual to your list of manuals |
Page 152 highlights
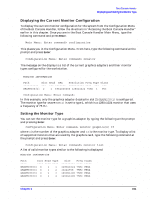
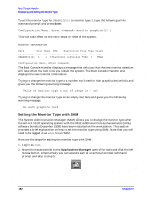
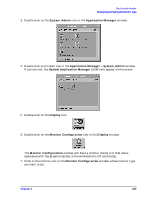
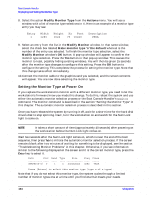
Boot Console Handler Displaying and Setting the Monitor Type To set the monitor type for GRAPHICS(2) to monitor type 1, type the following at the command prompt and press Enter: Configuration Menu: Enter command> monitor graphics(2) 1 This will take effect on the next reboot or reset of the system. MONITOR INFORMATION Path Slot Head HPA Resolution Freq Type Class GRAPHICS(0) 0 1 fffa000000 1280x1024 75Hz 1 VESA Configuration Menu: Enter command> The Boot Console Handler displays a message that tells you that the new monitor selection will take effect the next time you reboot the system. The Boot Console Handler also displays the new monitor information. Trying to change the monitor type to a number not listed for that graphics device fails and gives you the following warning message: Value of monitor type n out of range (n - nn) Trying to change the monitor type on an empty slot fails and gives you the following warning message: No such graphics card. Setting the Monitor Type with SAM The System Administration Manager (SAM) allows you to change the monitor type after the HP-UX 10.20 operating system with the 9912 Additional Core Enhancements (ACE) software bundle (December 1999) have been installed on the workstation. This section provides a brief explanation on how to set the monitor type using SAM. Note that you will need to be logged in as root to run SAM. Here are the steps for setting the monitor type with SAM: 1. Log in as root. 2. Move the mouse pointer to the Application Manager control for tools and click the left mouse button. Alternatively you can execute sam at a terminal window command prompt and skip to step 5. 152 Chapter 6
-
 1
1 -
2
-
3
-
4
-
5
-
6
-
7
-
8
-
9
-
10
-
11
-
12
-
13
-
14
-
15
-
16
-
17
-
18
-
19
-
20
-
21
-
22
-
23
-
24
-
25
-
26
-
27
-
28
-
29
-
30
-
31
-
32
-
33
-
34
-
35
-
36
-
37
-
38
-
39
-
40
-
41
-
42
-
43
-
44
-
45
-
46
-
47
-
48
-
49
-
50
-
51
-
52
-
53
-
54
-
55
-
56
-
57
-
58
-
59
-
60
-
61
-
62
-
63
-
64
-
65
-
66
-
67
-
68
-
69
-
70
-
71
-
72
-
73
-
74
-
75
-
76
-
77
-
78
-
79
-
80
-
81
-
82
-
83
-
84
-
85
-
86
-
87
-
88
-
89
-
90
-
91
-
92
-
93
-
94
-
95
-
96
-
97
-
98
-
99
-
100
-
101
-
102
-
103
-
104
-
105
-
106
-
107
-
108
-
109
-
110
-
111
-
112
-
113
-
114
-
115
-
116
-
117
-
118
-
119
-
120
-
121
-
122
-
123
-
124
-
125
-
126
-
127
-
128
-
129
-
130
-
131
-
132
-
133
-
134
-
135
-
136
-
137
-
138
-
139
-
140
-
141
-
142
-
143
-
144
-
145
-
146
-
 147
147 -
 148
148 -
 149
149 -
 150
150 -
 151
151 -
 152
152 -
 153
153 -
 154
154 -
 155
155 -
 156
156 -
 157
157 -
158
-
159
-
160
-
161
-
162
-
163
-
164
-
165
-
166
-
167
-
168
-
169
-
170
-
171
-
172
-
173
-
174
-
175
-
176
-
177
-
178
-
179
-
180
-
181
-
182
-
183
-
184
-
185
-
186
-
187
-
188
-
189
-
190
-
191
-
192
-
193
-
194
-
195
-
196
-
197
-
198
-
199
-
200
-
201
-
202
-
203
-
204
 |
 |
