HP c3700 hp Visualize b2000 UNIX workstation service handbook (a5983-90039) - Page 91
Removable Media Devices
 |
View all HP c3700 manuals
Add to My Manuals
Save this manual to your list of manuals |
Page 91 highlights
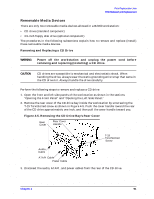
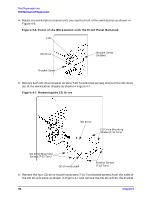
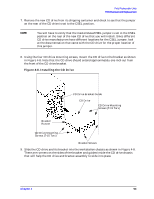
Field Replaceable Units FRU Removal and Replacement Removable Media Devices There are only two removable media devices allowed in a B2000 workstation: • CD drive (standard component) • 3.5-inch floppy disk drive (optional component) The procedures in the following subsections explain how to remove and replace (install) these removable media devices. Removing and Replacing a CD Drive WARNING Power off the workstation and unplug the power cord before removing and replacing (installing) a CD drive. CAUTION CD drives are susceptible to mechanical and electrostatic shock. When handling the drive, always wear the static-grounding wrist strap that came in the CD drive kit. Always handle the drive carefully. Perform the following steps to remove and replace a CD drive: 1. Open the front and left side panels of the workstation as shown in the sections "Opening the Front Panel" and "Opening the Left Side Panel." 2. Remove the rear cover of the CD drive bay inside the workstation by unscrewing the T-15 Torx/slotted screw as shown in Figure 4-5. Push the cover handle toward the rear of the CD drive approximately one inch, and then pull the cover handle toward you. Figure 4-5. Removing the CD Drive Bay's Rear Cover Rear Cover Rear Cover Handle T-15 Torx/Slotted Screw Audio Cable ATAPI Cable Power Cable 3. Disconect the audio, ATAPI, and power cables from the rear of the CD drive. Chapter 4 91
-
 1
1 -
2
-
3
-
4
-
5
-
6
-
7
-
8
-
9
-
10
-
11
-
12
-
13
-
14
-
15
-
16
-
17
-
18
-
19
-
20
-
21
-
22
-
23
-
24
-
25
-
26
-
27
-
28
-
29
-
30
-
31
-
32
-
33
-
34
-
35
-
36
-
37
-
38
-
39
-
40
-
41
-
42
-
43
-
44
-
45
-
46
-
47
-
48
-
49
-
50
-
51
-
52
-
53
-
54
-
55
-
56
-
57
-
58
-
59
-
60
-
61
-
62
-
63
-
64
-
65
-
66
-
67
-
68
-
69
-
70
-
71
-
72
-
73
-
74
-
75
-
76
-
77
-
78
-
79
-
80
-
81
-
82
-
83
-
84
-
85
-
 86
86 -
 87
87 -
 88
88 -
 89
89 -
 90
90 -
 91
91 -
 92
92 -
 93
93 -
 94
94 -
 95
95 -
 96
96 -
97
-
98
-
99
-
100
-
101
-
102
-
103
-
104
-
105
-
106
-
107
-
108
-
109
-
110
-
111
-
112
-
113
-
114
-
115
-
116
-
117
-
118
-
119
-
120
-
121
-
122
-
123
-
124
-
125
-
126
-
127
-
128
-
129
-
130
-
131
-
132
-
133
-
134
-
135
-
136
-
137
-
138
-
139
-
140
-
141
-
142
-
143
-
144
-
145
-
146
-
147
-
148
-
149
-
150
-
151
-
152
-
153
-
154
-
155
-
156
-
157
-
158
-
159
-
160
-
161
-
162
-
163
-
164
-
165
-
166
-
167
-
168
-
169
-
170
-
171
-
172
-
173
-
174
-
175
-
176
-
177
-
178
-
179
-
180
-
181
-
182
-
183
-
184
-
185
-
186
-
187
-
188
-
189
-
190
-
191
-
192
-
193
-
194
-
195
-
196
-
197
-
198
-
199
-
200
-
201
-
202
-
203
-
204
 |
 |
