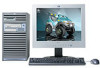
HP c3700 hp Visualize b2000 UNIX workstation service handbook (a5983-90039) - Page 93
Installing the CD Drive
 |
View all HP c3700 manuals
Add to My Manuals
Save this manual to your list of manuals |
Page 93 highlights
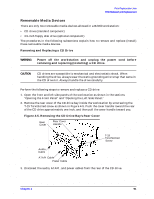
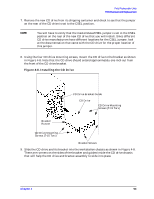
Field Replaceable Units FRU Removal and Replacement 7. Remove the new CD drive from its shipping container and check to see that the jumper on the rear of the CD drive is set to the CSEL position. NOTE You will have to verify that the master/slave/CSEL jumper is set in the CSEL position on the rear of the new CD drive that you will install. Since different CD drive manufacturers have different locations for the CSEL jumper, look at the documentation that came with the CD drive for the proper location of this jumper. 8. Using the four CD drive mounting screws, mount the CD drive to the bracket as shown in Figure 4-8. Note that the CD drive should extend approximately one inch out from the front of the CD drive bracket. Figure 4-8. Installing the CD Drive CD Drive Bracket Guide CD Drive CD Drive Mounting Screws (T-15 Torx) Bracket Runner CD Drive Mounting Screws (T-15 Torx) Bracket Screws 9. Slide the CD drive and its bracket into the workstation chassis as shown in Figure 4-8. There are runners on the sides of the bracket and guides inside the CD drive chassis that will help the CD drive and bracket assembly to slide into place. Chapter 4 93
-
 1
1 -
2
-
3
-
4
-
5
-
6
-
7
-
8
-
9
-
10
-
11
-
12
-
13
-
14
-
15
-
16
-
17
-
18
-
19
-
20
-
21
-
22
-
23
-
24
-
25
-
26
-
27
-
28
-
29
-
30
-
31
-
32
-
33
-
34
-
35
-
36
-
37
-
38
-
39
-
40
-
41
-
42
-
43
-
44
-
45
-
46
-
47
-
48
-
49
-
50
-
51
-
52
-
53
-
54
-
55
-
56
-
57
-
58
-
59
-
60
-
61
-
62
-
63
-
64
-
65
-
66
-
67
-
68
-
69
-
70
-
71
-
72
-
73
-
74
-
75
-
76
-
77
-
78
-
79
-
80
-
81
-
82
-
83
-
84
-
85
-
86
-
87
-
 88
88 -
 89
89 -
 90
90 -
 91
91 -
 92
92 -
 93
93 -
 94
94 -
 95
95 -
 96
96 -
 97
97 -
 98
98 -
99
-
100
-
101
-
102
-
103
-
104
-
105
-
106
-
107
-
108
-
109
-
110
-
111
-
112
-
113
-
114
-
115
-
116
-
117
-
118
-
119
-
120
-
121
-
122
-
123
-
124
-
125
-
126
-
127
-
128
-
129
-
130
-
131
-
132
-
133
-
134
-
135
-
136
-
137
-
138
-
139
-
140
-
141
-
142
-
143
-
144
-
145
-
146
-
147
-
148
-
149
-
150
-
151
-
152
-
153
-
154
-
155
-
156
-
157
-
158
-
159
-
160
-
161
-
162
-
163
-
164
-
165
-
166
-
167
-
168
-
169
-
170
-
171
-
172
-
173
-
174
-
175
-
176
-
177
-
178
-
179
-
180
-
181
-
182
-
183
-
184
-
185
-
186
-
187
-
188
-
189
-
190
-
191
-
192
-
193
-
194
-
195
-
196
-
197
-
198
-
199
-
200
-
201
-
202
-
203
-
204
 |
 |
