HP dx2310 Service Reference Guide: HP Compaq dx2310 MT/dx2318 MT Business PCs, - Page 54
screws to install a new drive., slide the hard disk drive out of the hard disk drive cage
 |
View all HP dx2310 manuals
Add to My Manuals
Save this manual to your list of manuals |
Page 54 highlights
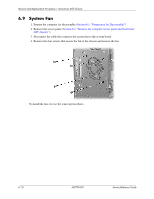
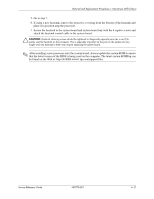
Removal and Replacement Procedures- Microtower (MT) Chassis 9. Remove the four screws that secure the hard disk drive to the hard disk drive cage 1, then slide the hard disk drive out of the hard disk drive cage 2. Removing the Hard Drive 10. Remove one guide screws (Floppy Drive only) from the old drive. You will need these screws to install a new drive. Å WARNING: There may be sharp edges on the insides of the bay opening after the shield has been removed. 6-16 490778-001 Service Reference Guide
-
 1
1 -
2
-
3
-
4
-
5
-
6
-
7
-
8
-
9
-
10
-
11
-
12
-
13
-
14
-
15
-
16
-
17
-
18
-
19
-
20
-
21
-
22
-
23
-
24
-
25
-
26
-
27
-
28
-
29
-
30
-
31
-
32
-
33
-
34
-
35
-
36
-
37
-
38
-
39
-
40
-
41
-
42
-
43
-
44
-
45
-
46
-
47
-
48
-
 49
49 -
 50
50 -
 51
51 -
 52
52 -
 53
53 -
 54
54 -
 55
55 -
 56
56 -
 57
57 -
 58
58 -
 59
59 -
60
-
61
-
62
-
63
-
64
-
65
-
66
-
67
-
68
-
69
-
70
-
71
-
72
-
73
-
74
-
75
-
76
-
77
-
78
-
79
-
80
-
81
-
82
-
83
-
84
-
85
-
86
-
87
-
88
-
89
-
90
-
91
-
92
-
93
-
94
-
95
-
96
-
97
 |
 |

6–16
490778-001
Service Reference Guide
Removal and Replacement Procedures— Microtower (MT) Chassis
9. Remove the four screws that secure the hard disk drive to the hard disk drive cage
1
, then
slide the hard disk drive out of the hard disk drive cage
2
.
Removing the Hard Drive
10. Remove one guide screws (Floppy Drive only) from the old drive. You will need these
screws to install a new drive.
Å
WARNING:
There may be sharp edges on the insides of the bay opening after the shield has been
removed.