HP xp8000 HP xp8000 series digital projector - (English) Reference Guide - Page 34
Configuring the Projector, To change settings using the on-screen menu
 |
View all HP xp8000 manuals
Add to My Manuals
Save this manual to your list of manuals |
Page 34 highlights
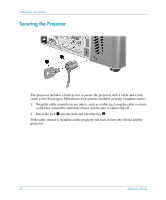
Installation and Setup Configuring the Projector To change settings using the on-screen menu You can change the on-screen menu settings with either the buttons on the projector or the remote control buttons. 1. Press enter on the projector or the remote control to open the on-screen menu. 2. Press up or down to highlight the desired menu, and press enter to select the highlighted option. 3. Press up or down to highlight the desired parameter, and press enter to select the highlighted option. 4. Press left or right or press up or down to select the desired setting. For certain parameters, you see a different display while making the change. 5. Press enter to return to the menu. 6. To go to a different menu, press the back button, and select the menu. 7. To close the on-screen menu, press the back button one or more times as needed. If nothing occurs for a period of time, the on-screen menu closes. To change the amount of time until the on-screen menu closes, open the on-screen menu and select setup > Timeout. See "Using the On-Screen Menu" on page 61 for a list of all on-screen menu selections. 34 Reference Guide
-
 1
1 -
2
-
3
-
4
-
5
-
6
-
7
-
8
-
9
-
10
-
11
-
12
-
13
-
14
-
15
-
16
-
17
-
18
-
19
-
20
-
21
-
22
-
23
-
24
-
25
-
26
-
27
-
28
-
 29
29 -
 30
30 -
 31
31 -
 32
32 -
 33
33 -
 34
34 -
 35
35 -
 36
36 -
 37
37 -
 38
38 -
 39
39 -
40
-
41
-
42
-
43
-
44
-
45
-
46
-
47
-
48
-
49
-
50
-
51
-
52
-
53
-
54
-
55
-
56
-
57
-
58
-
59
-
60
-
61
-
62
-
63
-
64
-
65
-
66
-
67
-
68
-
69
-
70
-
71
-
72
-
73
-
74
-
75
-
76
-
77
-
78
-
79
-
80
-
81
-
82
-
83
-
84
-
85
-
86
-
87
-
88
-
89
-
90
-
91
-
92
-
93
-
94
-
95
-
96
-
97
-
98
 |
 |
