HP xp8000 HP xp8000 series digital projector - (English) Reference Guide - Page 59
To change the connectivity module, on the faceplate of the connectivity module at the back
 |
View all HP xp8000 manuals
Add to My Manuals
Save this manual to your list of manuals |
Page 59 highlights
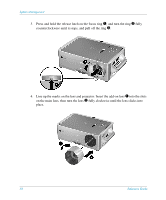
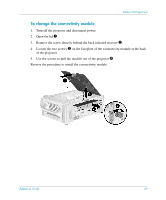
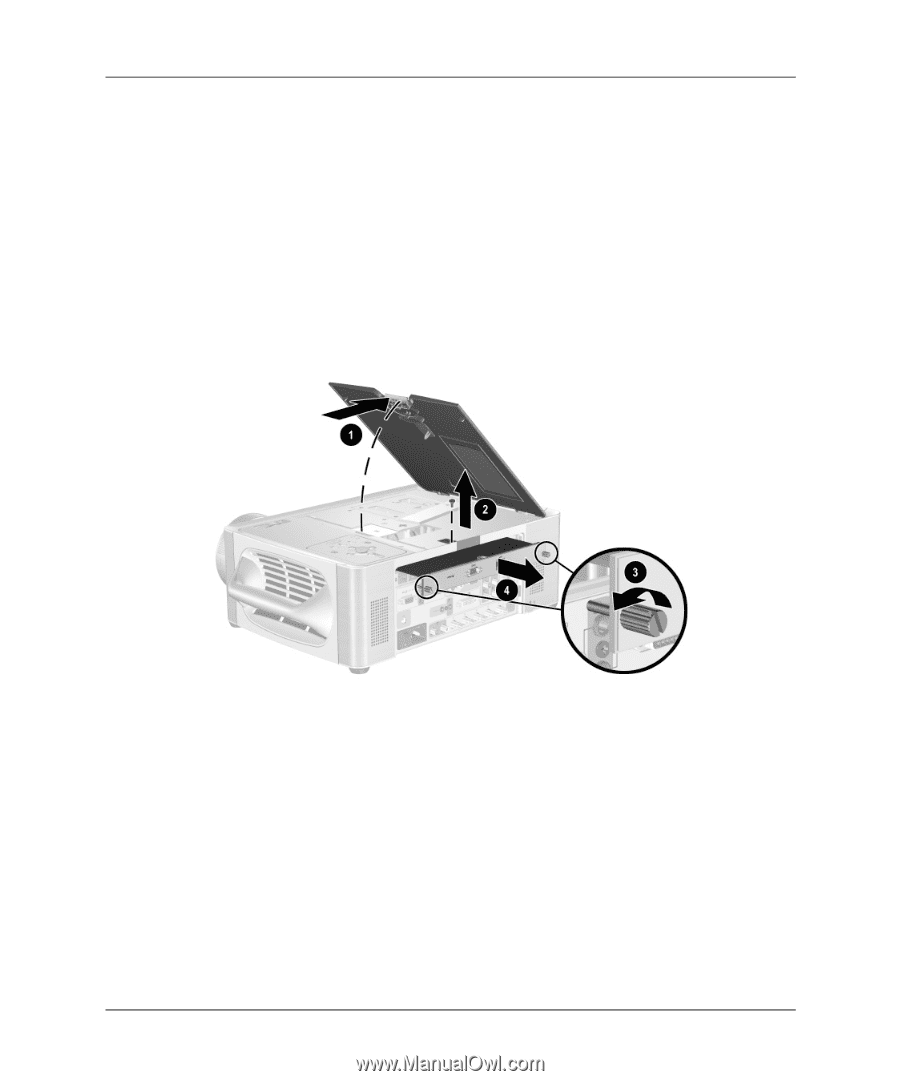
System Management To change the connectivity module 1. Turn off the projector and disconnect power. 2. Open the lid 1. 3. Remove the screw directly behind the back infrared receiver 2. 4. Loosen the two screws 3 on the faceplate of the connectivity module at the back of the projector. 5. Use the screws to pull the module out of the projector 4. Reverse the procedure to install the connectivity module. Reference Guide 59
-
 1
1 -
2
-
3
-
4
-
5
-
6
-
7
-
8
-
9
-
10
-
11
-
12
-
13
-
14
-
15
-
16
-
17
-
18
-
19
-
20
-
21
-
22
-
23
-
24
-
25
-
26
-
27
-
28
-
29
-
30
-
31
-
32
-
33
-
34
-
35
-
36
-
37
-
38
-
39
-
40
-
41
-
42
-
43
-
44
-
45
-
46
-
47
-
48
-
49
-
50
-
51
-
52
-
53
-
 54
54 -
 55
55 -
 56
56 -
 57
57 -
 58
58 -
 59
59 -
 60
60 -
 61
61 -
 62
62 -
 63
63 -
 64
64 -
65
-
66
-
67
-
68
-
69
-
70
-
71
-
72
-
73
-
74
-
75
-
76
-
77
-
78
-
79
-
80
-
81
-
82
-
83
-
84
-
85
-
86
-
87
-
88
-
89
-
90
-
91
-
92
-
93
-
94
-
95
-
96
-
97
-
98
 |
 |
Reference Guide
59
System Management
To change the connectivity module
1.
Turn off the projector and disconnect power.
2.
Open the lid
1
.
3.
Remove the screw directly behind the back infrared receiver
2
.
4.
Loosen the two screws
3
on the faceplate of the connectivity module at the back
of the projector.
5.
Use the screws to pull the module out of the projector
4
.
Reverse the procedure to install the connectivity module.