Hitachi DV-PF35U Owners Guide - Page 9
Front & Rear Terminals, Connection to an Audio System
 |
View all Hitachi DV-PF35U manuals
Add to My Manuals
Save this manual to your list of manuals |
Page 9 highlights
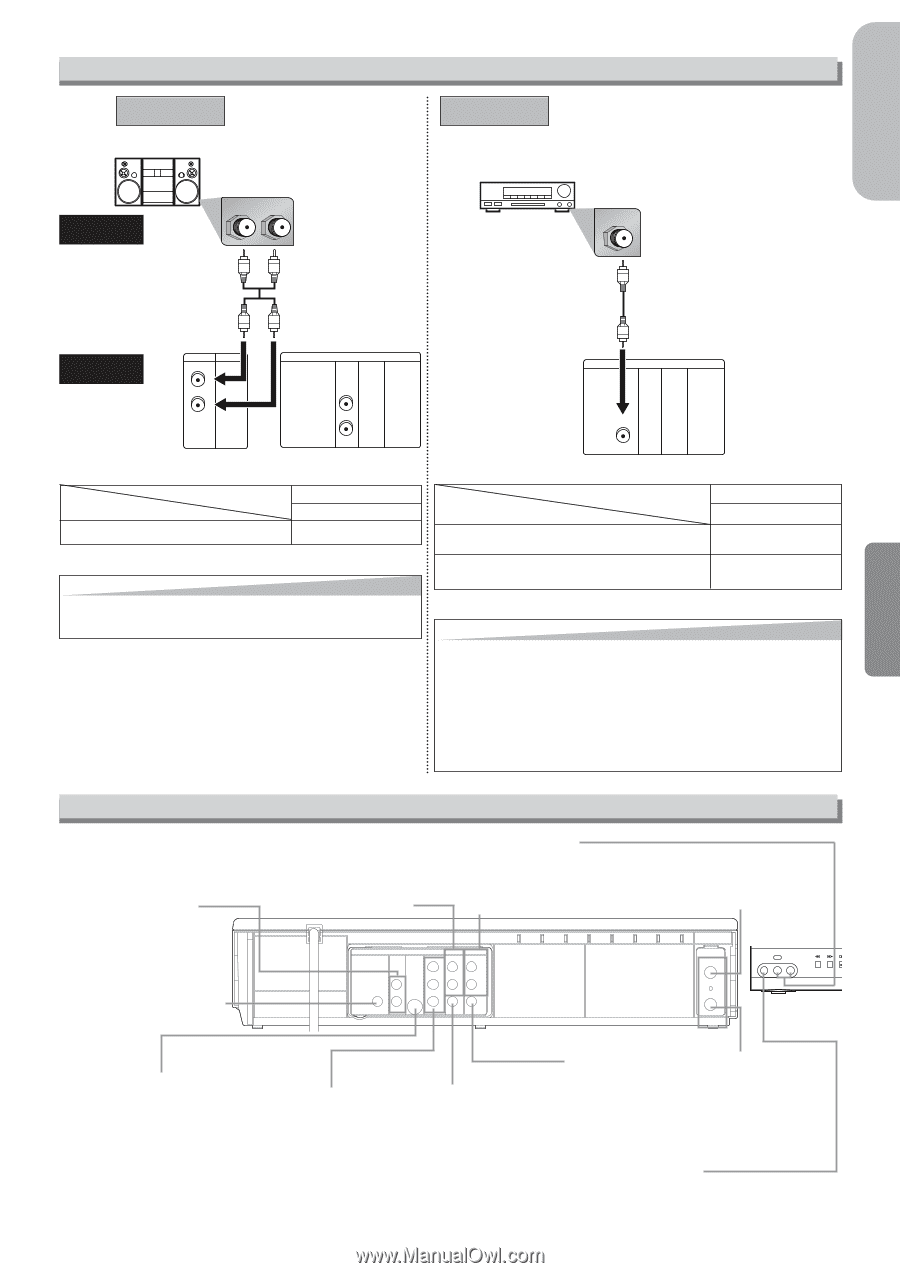
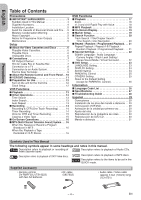
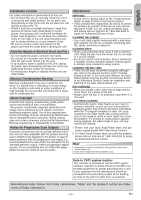
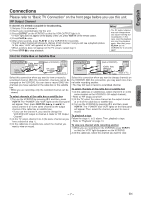
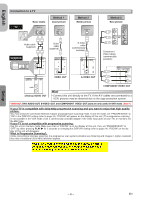
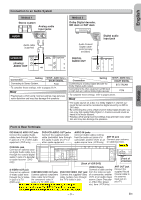
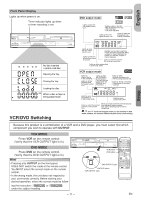
English Connection to an Audio System Method 1 Stereo system Analog audio input jacks AUDIO L R Audio cable (supplied) VCR/DVD DVD/VCR VCR AUDIO OUT AUDIO IN L L DIGITAL AUDIO OUT DVD AUDIO OUT S-VIDEO OUT COMPONENT VIDEO OUT Y L (Analog) R R CB/ AUDIO OUT VIDEO OUT VIDEO IN or COAXIAL R PB CR/ PR Method 2 Dolby Digital decoder, MD deck or DAT deck COAXIAL Audio Coaxial Digital cable (commercially available) Digital audio input jack DIGITAL AUDIO OUT DIGITAL AUDIO OUT DVD AUDIO OUT S-VIDEO OUT COMPONENT VIDEO OUT Y L CB/ COAXIAL PB R CR/ PR Setup Connection Setting Connecting to Stereo System. SETUP > AUDIO menu > DOLBY DIGITAL PCM * To complete these settings, refer to pages 23-24. Hint • Playing back a DVD using incorrect settings may generate noise distortion and may also damage the speakers. Connection Setting Connecting to a Dolby Digital decoder for Dolby Digital audio output. Connecting to the other equipment (an MD deck or DAT deck etc.) without Dolby Digital decoder. SETUP > AUDIO menu > DOLBY DIGITAL BITSTREAM PCM * To complete these settings, refer to pages 23-24. Hint • The audio source on a disc in a Dolby Digital 5.1 channel surround format cannot be recorded as digital sound by an MD or DAT deck. • By connecting this unit to a Multi-channel Dolby Digital decoder, you can enjoy high-quality Dolby Digital 5.1 channel surround sound as heard in the movie theaters. • Playing a DVD using incorrect settings may generate noise distortion and may also damage the speakers. Front & Rear Terminals DVD ANALOG AUDIO OUT jacks Connect the supplied Audio cables here through the Audio In jacks of a TV or other audio equipment. (DVD only) DVD/VCR AUDIO OUT jacks Connect the supplied Audio cable (red/white) here through the audio In jacks of a TV or other audio equipment. AUDIO IN jacks Connect Audio cables coming from the audio out jacks of a ANT IN jack camcorder, another VCR, or an Connect your antenna audio source here. (VCR only) or cable box here. COAXIAL jack Connect an optional coaxial digital Audio cable here through the coaxial digital audio in jack of a decoder or audio receiver. (DVD only) DIGITAL AUDIO OUT DVD AUDIO OUT S-VIDEO OUT COMPONENT VIDEO OUT Y DVD/VCR VCR AUDIO OUT AUDIO IN L L L COAXIAL R CB/ PB R R VIDEO OUT VIDEO IN CR/ PR 0VM204468 [Back of VCR/DVD] A N T- I N ANT-OUT (Note 2) VIDEO IN LINE2 L (mono) AUDIO IN R REW F.FWD STOP/E [Front of VCR/DVD] VIDEO IN jack S-VIDEO OUT jack Connect a cable coming Connect an optional COMPONENT VIDEO OUT jacks DVD/VCR VIDEO OUT jack from the video out jack S-Video cable here Connect optional component Connect the supplied Video of a camcorder, another through the S-Video Video cable here through cable (yellow) here through VCR, or an audio-visual in jack of a TV. the component video in the TV's video in jack. source (Laser Disc play- (DVD only) jacks of a TV. (DVD only) er, Video Disc player, Note 2 - No antenna switching is available; at any given etc.) here. (VCR only) time, you must use ANT or CATV. To switch, you must re-autoprogram to change from ANT to CATV, or vice versa. ANT OUT jack Connect the supplied Round Coaxial cable to the antenna input jack on your TV. -9- EN
-
 1
1 -
2
-
3
-
 4
4 -
 5
5 -
 6
6 -
 7
7 -
 8
8 -
 9
9 -
 10
10 -
 11
11 -
 12
12 -
 13
13 -
 14
14 -
15
-
16
-
17
-
18
-
19
-
20
-
21
-
22
-
23
-
24
-
25
-
26
-
27
-
28
-
29
-
30
-
31
-
32
-
33
-
34
-
35
-
36
-
37
-
38
-
39
-
40
-
41
-
42
-
43
-
44
-
45
-
46
-
47
-
48
-
49
-
50
-
51
-
52
-
53
-
54
-
55
-
56
-
57
-
58
-
59
-
60
-
61
-
62
-
63
-
64
-
65
-
66
-
67
-
68
 |
 |