IBM 17011RS Maintenance Manual - Page 51
Installing, removing, bezel, DS300, model
 |
UPC - 000435304971
View all IBM 17011RS manuals
Add to My Manuals
Save this manual to your list of manuals |
Page 51 highlights
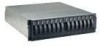
3. Rotate the top of the bezel toward the storage subsystem until the two tabs on the top of the bezel snap into place. 4. To remove the bezel: a. Press in on the blue tab on the top outside edge of both sides of the bezel, and pull the top of the bezel slightly away from the storage subsystem. b. Pull the bezel up to release the three tabs at the bottom edge of the bezel. Store the bezel in a safe place. Installing and removing the bezel on the DS300 type 1701 (model 1RL) Note: Before installing the bezel on the storage subsystem, install it in the rack. For more information, see the Rack Mounting Instructions that come with the storage subsystem. Complete the following steps to install the storage subsystem bezel: 1. Make sure that the EMI panel on the left side of the storage subsystem remains in place for proper cooling. EMI panel 7-disk drive cover orientation tabs Figure 19. Installing the bezel on the DS300 model 1RL 2. Place the 7-hard disk drive cover insert into the left side of the bezel. Make sure that the cover insert tabs are flush with the bezel frame. 3. Position the bezel directly in front of the storage subsystem. 4. Insert the three tabs on the bottom of the bezel into the matching holes on the storage subsystem chassis. 5. Rotate the top of the bezel toward the storage subsystem until the two tabs at the top of the bezel snap into place. 6. To remove the bezel: a. Press in on the blue tab on the top outside edge on both sides of the bezel, and pull the top of the bezel slightly away from the storage subsystem. b. Pull the bezel up to release the three tabs at the bottom edge of the bezel. Store the bezel in a safe place. Appendix A. Installing and replacing components 37
-
 1
1 -
2
-
3
-
4
-
5
-
6
-
7
-
8
-
9
-
10
-
11
-
12
-
13
-
14
-
15
-
16
-
17
-
18
-
19
-
20
-
21
-
22
-
23
-
24
-
25
-
26
-
27
-
28
-
29
-
30
-
31
-
32
-
33
-
34
-
35
-
36
-
37
-
38
-
39
-
40
-
41
-
42
-
43
-
44
-
45
-
 46
46 -
 47
47 -
 48
48 -
 49
49 -
 50
50 -
 51
51 -
 52
52 -
 53
53 -
 54
54 -
 55
55 -
 56
56 -
57
-
58
-
59
-
60
-
61
-
62
-
63
-
64
-
65
-
66
-
67
-
68
-
69
-
70
-
71
-
72
-
73
-
74
-
75
-
76
-
77
-
78
-
79
-
80
-
81
-
82
 |
 |
