IBM 865263Y Handbook - Page 64
Create, Delete, Grant, User ID, Revoke, field type the user ID that will be permitted to access
 |
View all IBM 865263Y manuals
Add to My Manuals
Save this manual to your list of manuals |
Page 64 highlights
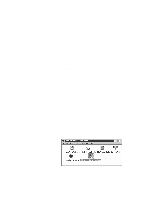
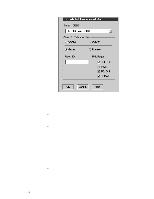
Figure 4. The Netfinity Database Administrator window 3. To create the Netfinity Manager table groups within the database, click Create and then click OK to open the Database Server window. The following table actions are also available: Delete To remove the Netfinity Manager table groups from the database, click Delete and then click OK to open the Database Server window. Grant Permits access to a database for a specified user ID. To grant access: a. Click Grant. b. In the User ID field type the user ID that will be permitted to access the database. c. Select privileges for this ID. All privileges (Insert, Delete, Select, and Update) are selected by default. A user ID must have all of these privileges to export data to the database. d. Click OK to open the Database Server window. Revoke Disables access to a database for a specified user ID. To revoke access: a. Click Revoke. b. In the User ID field type the user ID that will have access to the database revoked. 54 Netfinity® 4000R User's Handbook
-
 1
1 -
2
-
3
-
4
-
5
-
6
-
7
-
8
-
9
-
10
-
11
-
12
-
13
-
14
-
15
-
16
-
17
-
18
-
19
-
20
-
21
-
22
-
23
-
24
-
25
-
26
-
27
-
28
-
29
-
30
-
31
-
32
-
33
-
34
-
35
-
36
-
37
-
38
-
39
-
40
-
41
-
42
-
43
-
44
-
45
-
46
-
47
-
48
-
49
-
50
-
51
-
52
-
53
-
54
-
55
-
56
-
57
-
58
-
 59
59 -
 60
60 -
 61
61 -
 62
62 -
 63
63 -
 64
64 -
 65
65 -
 66
66 -
 67
67 -
 68
68 -
 69
69 -
70
-
71
-
72
-
73
-
74
-
75
-
76
-
77
-
78
-
79
-
80
-
81
-
82
-
83
-
84
-
85
-
86
-
87
-
88
-
89
-
90
-
91
-
92
-
93
-
94
-
95
-
96
-
97
-
98
-
99
-
100
-
101
-
102
 |
 |
