IBM SAN40B-4 User Guide - Page 57
Managing, switch - snmp
 |
UPC - 883436031479
View all IBM SAN40B-4 manuals
Add to My Manuals
Save this manual to your list of manuals |
Page 57 highlights
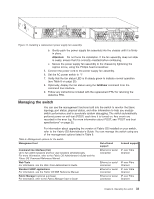
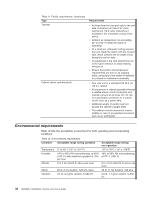
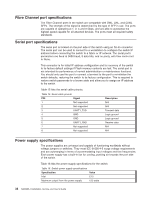
Figure 14. Installing a replacement power supply fan assembly b. Gently push the power supply fan assembly into the chassis until it is firmly in place. Attention: Do not force the installation. If the fan assembly does not slide in easily, ensure that it is correctly oriented before continuing. c. Secure the power supply fan assembly to the chassis by tightening the captive screw, using the Phillips-head screwdriver. 5. Connect the power cord to the power supply fan assembly. 6. Set the AC power switch to ″|″ 7. Verify that the fan status LED is lit steady green to indicate normal operation (see Table 8 on page 25) 8. Optionally, display the fan status using the fanShow command from the command line interface. 9. Follow any instructions included with the replacement FRU for returning the defective FRU. Managing the switch You can use the management functions built into the switch to monitor the fabric topology, port status, physical status, and other information to help you analyze switch performance and to accelerate system debugging. The switch automatically performs power-on-self-test (POST) each time it is turned on. Any errors are recorded in the error log. For more information about POST, see "POST and boot specifications" on page 25. For information about upgrading the version of Fabric OS installed on your switch, refer to the Fabric OS Administrator's Guide. You can manage the switch using any of the management options listed in Table 9. Table 9. Management options for the switch Management tool Command line interface (CLI) Up to two admin sessions and four user sessions simultaneously. For more information, refer to the Fabric OS Administrator's Guide and the Fabric OS Command Reference Manual. Web Tools For information, see the Web Tools Administrator's Guide. Standard SNMP applications For information, see the Fabric OS MIB Reference Manual. Fabric Manager (optional purchase) For information, refer to the Fabric Manager User's Guide. Out-of-band support Ethernet or serial connection In-band support IP over Fibre Channel Ethernet or serial connection Ethernet or serial connection Ethernet or serial connection IP over Fibre Channel IP over Fibre Channel IP over Fibre Channel Chapter 3. Operating the switch 33
-
 1
1 -
2
-
3
-
4
-
5
-
6
-
7
-
8
-
9
-
10
-
11
-
12
-
13
-
14
-
15
-
16
-
17
-
18
-
19
-
20
-
21
-
22
-
23
-
24
-
25
-
26
-
27
-
28
-
29
-
30
-
31
-
32
-
33
-
34
-
35
-
36
-
37
-
38
-
39
-
40
-
41
-
42
-
43
-
44
-
45
-
46
-
47
-
48
-
49
-
50
-
51
-
 52
52 -
 53
53 -
 54
54 -
 55
55 -
 56
56 -
 57
57 -
 58
58 -
 59
59 -
 60
60 -
 61
61 -
 62
62 -
63
-
64
-
65
-
66
-
67
-
68
-
69
-
70
-
71
-
72
-
73
-
74
-
75
-
76
-
77
-
78
-
79
 |
 |
