Intel S5520SC Service Guide - Page 38
Installing Processor Heatsinks
 |
UPC - 735858207522
View all Intel S5520SC manuals
Add to My Manuals
Save this manual to your list of manuals |
Page 38 highlights
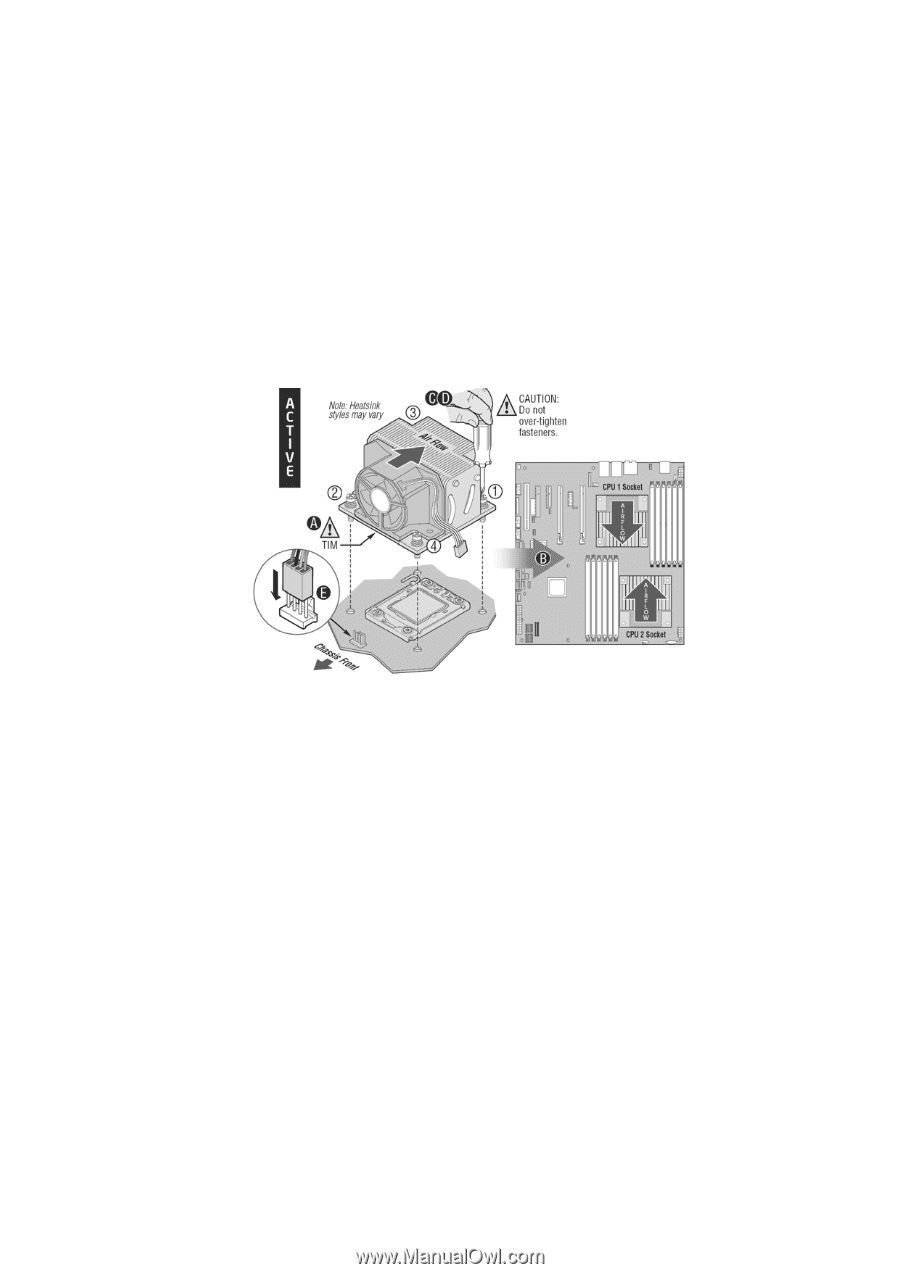
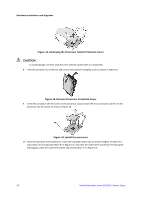
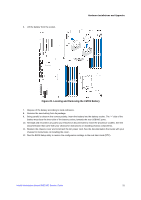
Hardware Installations and Upgrades Installing Processor Heatsink(s) To install processor heatsink(s) in the Intel® Server Chassis, follow these instructions: 1. Observe the safety and ESD precautions at the beginning of this book. For more information, see "Safety Information". 2. Turn off all peripheral devices connected to the workstation and turn off the workstation. 3. Disconnect the AC power cord from the workstation. Remove the workstation's cover and locate the processor socket. Refer to the document that came with your workstation chassis for instructions on removing the workstation's cover. 4. If a protective film covers the thermal interface material (TIM) on the underside of the heatsink, remove the protective film (Step "A" in Figure 18). Figure 18. Installing Processor Heatsink(s) 5. Align active heatsinks in the Intel® Server Chassis SC5650 and Intel® Server Chassis SC5600 (excluding Intel® Server Chassis SC5600LX) to let airflow go through to the center of the board (Step "B" for active heatsink in Figure 18). Align the passive tower heatsinks (FXXRGTHSINK) fins to fit the Intel® Server Chassis SC5600LX air duct (Step "B" for passive heatsink in Figure 18). 6. Using a #2 Philips* screwdriver to tighten each fastener diagonally according to the white, circled numbers in Figure 18. (Step "C" in Figure 18). 7. Securely re-tighten each fastener again in the same order as performed in Step 6. (Step "D" in Figure 18.) 28 Intel® Workstation Board S5520SC Service Guide
-
 1
1 -
2
-
3
-
4
-
5
-
6
-
7
-
8
-
9
-
10
-
11
-
12
-
13
-
14
-
15
-
16
-
17
-
18
-
19
-
20
-
21
-
22
-
23
-
24
-
25
-
26
-
27
-
28
-
29
-
30
-
31
-
32
-
 33
33 -
 34
34 -
 35
35 -
 36
36 -
 37
37 -
 38
38 -
 39
39 -
 40
40 -
 41
41 -
 42
42 -
 43
43 -
44
-
45
-
46
-
47
-
48
-
49
-
50
-
51
-
52
-
53
-
54
-
55
-
56
-
57
-
58
-
59
-
60
-
61
-
62
-
63
 |
 |