Invacare MVPS Owners Manual - Page 29
Heel Loop Replacement, Front Riggings, Heel Loop Replacement
 |
View all Invacare MVPS manuals
Add to My Manuals
Save this manual to your list of manuals |
Page 29 highlights
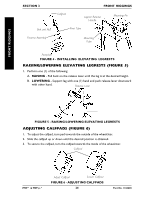
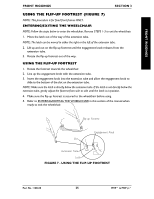
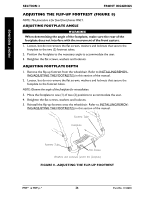
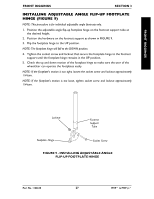
FRONT RIGGINGS FRONT RIGGINGS FRONT RIGGINGS SECTION 3 HEEL LOOP REPLACEMENT (FIGURE 11) 1. Remove the hex screw and coved washer that secures the lower half of the footrest to the swingaway footrest assembly. 2. Remove the lower footrest assembly. 3. Remove the phillips screw and locknut that secure the heel loop to the footrest. 4. Slide heel loop over slide tube of footrest assembly. 5. Replace heel loop. 6. Reverse STEPS 1-5 to reassemble. NOTE: When securing the heel loop to the footrest assembly, tighten the phillips screw and locknut until the spacer is secure. COMPOSITE/ALUMINUM/ TUBULAR FOOTPLATES Hex Screw/Coved Washer Phillips Screw Spacer Locknut FIGURE 11 - HEEL LOOP REPLACEMENT Part No. 1106638 29 MVP™ & MVP jr.™
-
 1
1 -
2
-
3
-
4
-
5
-
6
-
7
-
8
-
9
-
10
-
11
-
12
-
13
-
14
-
15
-
16
-
17
-
18
-
19
-
20
-
21
-
22
-
23
-
 24
24 -
 25
25 -
 26
26 -
 27
27 -
 28
28 -
 29
29 -
 30
30 -
 31
31 -
 32
32 -
 33
33 -
 34
34 -
35
-
36
-
37
-
38
-
39
-
40
-
41
-
42
-
43
-
44
-
45
-
46
-
47
-
48
-
49
-
50
-
51
-
52
-
53
-
54
-
55
-
56
-
57
-
58
-
59
-
60
 |
 |

Part No² 1106638
29
MVP± & MVP jr²±
FRONT RIGGINGS
SECTION 3
FRONT RIGGINGS
FRONT RIGGINGS
Hex Screw/Coved Washer
Phillips Screw
Spacer
Locknut
FIGURE 11 - HEEL LOOP REPLACEMENT
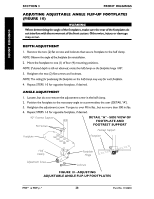
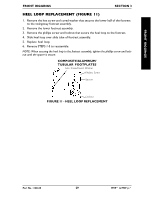
HEEL LOOP REPLACEMENT (FIGURE 11)
1±
Remove the hex screw and coved washer that secures the lower half of the footrest
to the swingaway footrest assembly±
2±
Remove the lower footrest assembly±
3±
Remove the phillips screw and locknut that secure the heel loop to the footrest±
4±
Slide heel loop over slide tube of footrest assembly±
5±
Replace heel loop±
6±
Reverse STEPS 1-5 to reassemble±
NOTE: When securing the heel loop to the footrest assembly, tighten the phillips screw and lock-
nut until the spacer is secure±
COMPOSITE/ALUMINUM/
TUBULAR
FOOTPLATES