Invacare MVPS Owners Manual - Page 58
Adjusting The Anti-tipper Height, Wheel Lock/anti-tippers
 |
View all Invacare MVPS manuals
Add to My Manuals
Save this manual to your list of manuals |
Page 58 highlights
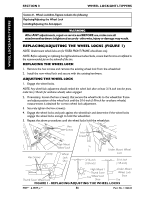
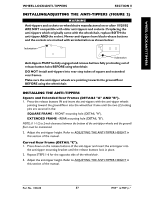
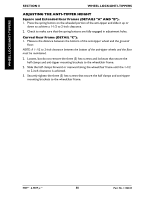
WHEEL LOCKS/ANTI-TIPPERS SECTION 8 WHEEL LOCK/ANTI-TIPPERS ADJUSTING THE ANTI-TIPPER HEIGHT Square and Extended Rear Frames (DETAILS "A" AND "B"). 1. Press the spring button on the wheeled portion of the anti-tipper and slide it up or down to achieve a 1-1/2 to 2-inch clearance. 2. Check to make sure that the spring buttons are fully engaged in adjustment holes. Curved Rear Frame (DETAIL "C"). 1. Measure the distance between the bottom of the anti-tipper wheel and the ground/ floor. NOTE: A 1-1/2 to 2-inch clearance between the bottom of the anti-tipper wheels and the floor must be maintained. 2. Loosen, but do not remove the three (3) hex screws and locknuts that secure the half clamps and anti-tipper mounting brackets to the wheelchair frame. 2. Slide the half clamps forward or rearward along the wheelchair frame until the 1-1/2 to 2-inch clearance is achieved. 3. Securely tighten the three (3) hex screws that secure the half clamps and anti-tipper mounting brackets to the wheelchair frame. MVP™ & MVP jr.™ 58 Part No. 1106638
-
 1
1 -
2
-
3
-
4
-
5
-
6
-
7
-
8
-
9
-
10
-
11
-
12
-
13
-
14
-
15
-
16
-
17
-
18
-
19
-
20
-
21
-
22
-
23
-
24
-
25
-
26
-
27
-
28
-
29
-
30
-
31
-
32
-
33
-
34
-
35
-
36
-
37
-
38
-
39
-
40
-
41
-
42
-
43
-
44
-
45
-
46
-
47
-
48
-
49
-
50
-
51
-
52
-
 53
53 -
 54
54 -
 55
55 -
 56
56 -
 57
57 -
 58
58 -
 59
59 -
 60
60
 |
 |
