Invacare MVPS Owners Manual - Page 30
installing IMPACT GUARDS/CALF STRAP
 |
View all Invacare MVPS manuals
Add to My Manuals
Save this manual to your list of manuals |
Page 30 highlights
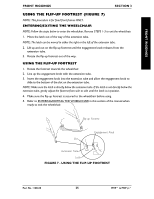
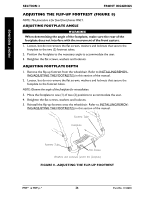
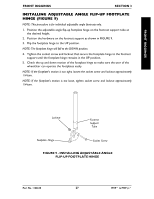
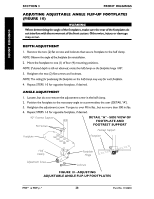
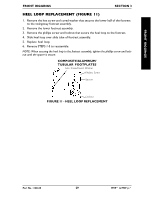
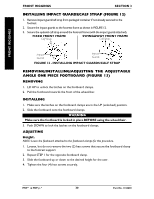
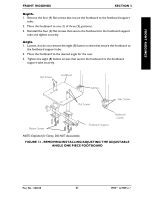
FRONT RIGGINGS FRONT RIGGINGS FRONT RIGGINGS SECTION 3 INSTALLING IMPACT GUARDS/CALF STRAP (FIGURE 12) 1. Remove impact guard/calf strap from packaged container if not already secured to the footrest. 2. Secure the impact guards to the footrest frame as shown in FIGURE 12. 3. Secure the optional calf strap around the footrest frame (with the impact guards attached). FIXED FRONT FRAME Calf Strap SWINGAWAY FRONT FRAME Calf Strap Impact Guards Impact Guards FIGURE 12 - INSTALLING IMPACT GUARDS/CALF STRAP REMOVING/INSTALLING/ADJUSTING THE ADJUSTABLE ANGLE ONE PIECE FOOTBOARD (FIGURE 13) REMOVING 1. Lift UP to unlock the latches on the footboard clamps. 2. Pull the footboard towards the front of the wheelchair. INSTALLING 1. Make sure the latches on the footboard clamps are in the UP (unlocked) position. 2. Slide the footboard onto the footboard clamps. WARNING Make sure the footboard is locked in place BEFORE using the wheelchair. 3. Push DOWN to lock the latches on the footboard clamps. ADJUSTING Height. NOTE: Leave the footboard attached to the footboard clamps for this procedure. 1. Loosen, but do not remove the two (2) hex screws that secure the footboard clamp to the footrest support. 2. Repeat STEP 1 for the opposite footboard clamp. 3. Slide the footboard up or down to the desired height for the user. 4. Tighten the four (4) hex screws securely. MVP™ & MVP jr.™ 30 Part No. 1106638
-
 1
1 -
2
-
3
-
4
-
5
-
6
-
7
-
8
-
9
-
10
-
11
-
12
-
13
-
14
-
15
-
16
-
17
-
18
-
19
-
20
-
21
-
22
-
23
-
24
-
 25
25 -
 26
26 -
 27
27 -
 28
28 -
 29
29 -
 30
30 -
 31
31 -
 32
32 -
 33
33 -
 34
34 -
 35
35 -
36
-
37
-
38
-
39
-
40
-
41
-
42
-
43
-
44
-
45
-
46
-
47
-
48
-
49
-
50
-
51
-
52
-
53
-
54
-
55
-
56
-
57
-
58
-
59
-
60
 |
 |
