Invacare MVPS Owners Manual - Page 42
Installing The Half Arm, Arms, Curved Rear Frame Detail
 |
View all Invacare MVPS manuals
Add to My Manuals
Save this manual to your list of manuals |
Page 42 highlights
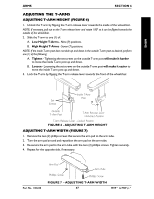
SECTION 6 ARMS ARMS Section 6 - Arms includes the following: Installing the Half Arm Adjusting Half Arm Height Using/Adjusting Dual Point Arms Replacing Dual Point Arm Pad Replacing Dual Point Arm Clothing Guards Installing/Removing T-Arms Adjusting the T-Arms Adjusting T-Arm Transfer Assists and/or Side Guards Using/Installing/Adjusting Cantilever Arms Cantilever Arm Pad Adjustment/Replacement WARNING After ANY adjustments, repair or service and BEFORE use, make sure all attachment hardware is tightened securely - otherwise, injury or damage may result. DO NOT attempt to lift or tilt a wheelchair by using any removable (detachable) parts. Lifting by means of any removable (detachable) parts of a wheelchair may result in injury to the user or damage to the wheelchair. INSTALLING THE HALF ARM (FIGURE 1) CURVED REAR FRAME (DETAIL "A") 1. Remove the locknut and washer that secure the rear of the axle mounting bracket to the wheelchair frame. 2. Position the bottom coved washer between the arm socket and the wheelchair frame. 3. Position arm socket in line with the hex screw and mounting holes on the wheelchair frame making sure the arm socket is towards the inside of the wheelchair frame. NOTE: The slot in the arm socket is used with either the top or the bottom mounting holes in the arm socket depending on the half arm height desired. 4. Reinstall the washer and locknut onto hex screw that secures the axle mounting bracket to the wheelchair frame. Loosely tighten. 5. Slide the arm socket up and/or down until the top mounting hole in the arm socket is in line with the desired mounting hole in the wheelchair frame. 6. Position the top coved washer between the arm socket and the wheelchair frame. 7. Install top hex screw through the washer, coved washer, wheelchair frame, coved washer, arm socket, washer and securely tighten with locknut. 8. Securely tighten the bottom hex screw that secures the arm socket and axle mounting bracket to the wheelchair frame. 9. Repeat STEPS 1-8 for the opposite arm socket. MVP™ & MVP jr.™ 42 Part No. 1106638
-
 1
1 -
2
-
3
-
4
-
5
-
6
-
7
-
8
-
9
-
10
-
11
-
12
-
13
-
14
-
15
-
16
-
17
-
18
-
19
-
20
-
21
-
22
-
23
-
24
-
25
-
26
-
27
-
28
-
29
-
30
-
31
-
32
-
33
-
34
-
35
-
36
-
 37
37 -
 38
38 -
 39
39 -
 40
40 -
 41
41 -
 42
42 -
 43
43 -
 44
44 -
 45
45 -
 46
46 -
 47
47 -
48
-
49
-
50
-
51
-
52
-
53
-
54
-
55
-
56
-
57
-
58
-
59
-
60
 |
 |
