JVC DR-HD100-80 User Guide - Page 100
Delete Clip
 |
View all JVC DR-HD100-80 manuals
Add to My Manuals
Save this manual to your list of manuals |
Page 100 highlights
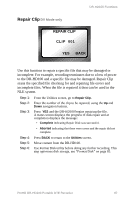
DR-HD100 Functions Delete Clip DELETE CLIP CLIP 001 YES BACK Use this item to delete a selected clip. Step 1: Step 2: Step 3: Step 4: From the Utilities screen, go to the DELETE CLIP screen. Enter the number of the clip to be deleted using the Up and Down navigation buttons. Press the YES function key. The selected clip is deleted. Press BACK to return to the Utilities screen. When a clip is deleted, the DR-HD100 re-organizes and displays the remaining clips in sequence. For instance, if there are three clips on the disk: 1-001, 1-002, 1-003. If clip 1-002 is deleted, the remaining clips are reorganized and clip 1-003 becomes clip 1-002. However the base file names are not affected. Use Delete Clip Sparingly Using the delete clip can cause disk fragmentation that reduces disk drive performance and can impact both Playback and Record. To defragment the disk or if more disk space is needed: • Transfer all content from the DR-HD100. • Perform the FORMAT utility, see "Format Disk" on page 85. 84 ProHD DR-HD100 Portable DTE Recorder
-
 1
1 -
2
-
3
-
4
-
5
-
6
-
7
-
8
-
9
-
10
-
11
-
12
-
13
-
14
-
15
-
16
-
17
-
18
-
19
-
20
-
21
-
22
-
23
-
24
-
25
-
26
-
27
-
28
-
29
-
30
-
31
-
32
-
33
-
34
-
35
-
36
-
37
-
38
-
39
-
40
-
41
-
42
-
43
-
44
-
45
-
46
-
47
-
48
-
49
-
50
-
51
-
52
-
53
-
54
-
55
-
56
-
57
-
58
-
59
-
60
-
61
-
62
-
63
-
64
-
65
-
66
-
67
-
68
-
69
-
70
-
71
-
72
-
73
-
74
-
75
-
76
-
77
-
78
-
79
-
80
-
81
-
82
-
83
-
84
-
85
-
86
-
87
-
88
-
89
-
90
-
91
-
92
-
93
-
94
-
 95
95 -
 96
96 -
 97
97 -
 98
98 -
 99
99 -
 100
100 -
 101
101 -
 102
102 -
 103
103 -
 104
104 -
 105
105 -
106
-
107
-
108
-
109
-
110
-
111
-
112
-
113
-
114
-
115
-
116
-
117
-
118
-
119
-
120
-
121
-
122
-
123
-
124
 |
 |
