JVC DR-HD100-80 User Guide - Page 39
Connecting a DR-HD100 to a DV/HD Camcorder - manuale
 |
View all JVC DR-HD100-80 manuals
Add to My Manuals
Save this manual to your list of manuals |
Page 39 highlights
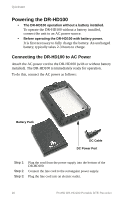
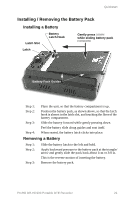
Quickstart Connecting a DR-HD100 to a DV/HD Camcorder Before performing this procedure, make sure you have installed and charged the battery, see "Installing / Removing the Battery Pack" on page 21. Step 1: Connect the supplied Firewire cable to the "DV I/O" connector on the top of the DR-HD100. Step 2: Locate the FireWire/DV/iLink (or similar) connector on your video camera. It is located in different places depending upon the brand of camera. If you are unclear of its location, consult your video camera manual. DR-HD100 Supplied with 6-pin to 6-pin FireWire Cable A 6-pin to 6-pin FireWire, 1394, cable is provided with the DR-HD100. GY-HD FireWire Connector The FireWire connector on the GY-HD cameras is located on the right side of the camera, behind the tape transport. For more information, refer to the GY-HD documentation. Step 3: Step 4: Step 5: Connect the other end of the FireWire, 1394, cable to your video camera. Turn on the video camera. Turn on the DR-HD100. ProHD DR-HD100 Portable DTE Recorder 23
-
 1
1 -
2
-
3
-
4
-
5
-
6
-
7
-
8
-
9
-
10
-
11
-
12
-
13
-
14
-
15
-
16
-
17
-
18
-
19
-
20
-
21
-
22
-
23
-
24
-
25
-
26
-
27
-
28
-
29
-
30
-
31
-
32
-
33
-
 34
34 -
 35
35 -
 36
36 -
 37
37 -
 38
38 -
 39
39 -
 40
40 -
 41
41 -
 42
42 -
 43
43 -
 44
44 -
45
-
46
-
47
-
48
-
49
-
50
-
51
-
52
-
53
-
54
-
55
-
56
-
57
-
58
-
59
-
60
-
61
-
62
-
63
-
64
-
65
-
66
-
67
-
68
-
69
-
70
-
71
-
72
-
73
-
74
-
75
-
76
-
77
-
78
-
79
-
80
-
81
-
82
-
83
-
84
-
85
-
86
-
87
-
88
-
89
-
90
-
91
-
92
-
93
-
94
-
95
-
96
-
97
-
98
-
99
-
100
-
101
-
102
-
103
-
104
-
105
-
106
-
107
-
108
-
109
-
110
-
111
-
112
-
113
-
114
-
115
-
116
-
117
-
118
-
119
-
120
-
121
-
122
-
123
-
124
 |
 |
