JVC DR-HD100-80 User Guide - Page 48
Jvc Gy-hd, Control, Local, Syncro Slave, Av / C
 |
View all JVC DR-HD100-80 manuals
Add to My Manuals
Save this manual to your list of manuals |
Page 48 highlights
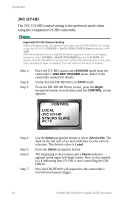
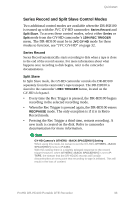
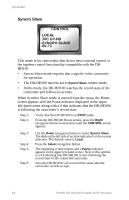
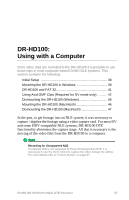
Quickstart JVC GY-HD The JVC GY-HD control setting is the preferred mode when using the companion GY-HD camcorder. Important GY-HD Camera Setting When simultaneously recording to both tape and the DR-HD100, be certain to set the GY-HD's OTHERS→ BACK SPACE [HDV] Menu selection to P1394. With this setting there is a slightly delayed response to the record trigger. However, when OTHERs→BACK SPACE[HDV] is set to P-TAPE, the stream that the DR-HD100 records will contain discontinuities at every point that recording to tape is initiated. This will result in the loss of content. Step 1: Step 2: Step 3: Place the GY-HD camera into SYNCRO mode from the camcorder's 1394 REC TRIGGER menu. Refer to the camcorder manual for details. Verify that the DR-HD100 is in STOP mode. From the DR-HD100 Home screen, press the Right navigation button several times until the CONTROL screen appears: CONTROL LOCAL -JVC GY-HD SYNCRO SLAVE AV / C Step 4: Step 5: Step 6: Step 7: Use the Down navigation button to select JVC GY-HD. The dash on the left side of an item indicates it is the current selection. The default value is Local. Press the Select navigation button. The beginning screen returns and a Pause indicator appears in the upper left-hand corner. Next to this symbol, is a J indicating that GY-HD is now controlling the DRHD100. Now the DR-HD100 will respond to the camcorder's record/record-pause trigger. 32 ProHD DR-HD100 Portable DTE Recorder
-
 1
1 -
2
-
3
-
4
-
5
-
6
-
7
-
8
-
9
-
10
-
11
-
12
-
13
-
14
-
15
-
16
-
17
-
18
-
19
-
20
-
21
-
22
-
23
-
24
-
25
-
26
-
27
-
28
-
29
-
30
-
31
-
32
-
33
-
34
-
35
-
36
-
37
-
38
-
39
-
40
-
41
-
42
-
 43
43 -
 44
44 -
 45
45 -
 46
46 -
 47
47 -
 48
48 -
 49
49 -
 50
50 -
 51
51 -
 52
52 -
 53
53 -
54
-
55
-
56
-
57
-
58
-
59
-
60
-
61
-
62
-
63
-
64
-
65
-
66
-
67
-
68
-
69
-
70
-
71
-
72
-
73
-
74
-
75
-
76
-
77
-
78
-
79
-
80
-
81
-
82
-
83
-
84
-
85
-
86
-
87
-
88
-
89
-
90
-
91
-
92
-
93
-
94
-
95
-
96
-
97
-
98
-
99
-
100
-
101
-
102
-
103
-
104
-
105
-
106
-
107
-
108
-
109
-
110
-
111
-
112
-
113
-
114
-
115
-
116
-
117
-
118
-
119
-
120
-
121
-
122
-
123
-
124
 |
 |