JVC GRDA30US Instructions - Page 11
Power - battery
 |
UPC - 046838032004
View all JVC GRDA30US manuals
Add to My Manuals
Save this manual to your list of manuals |
Page 11 highlights
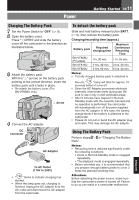
Power Getting Started EN 11 Charging The Battery Pack 1 Set the Power Switch to "OFF" (੬ 9). 2 Open the battery cover. Press "w OPEN" and slide the battery cover off the camcorder in the direction as illustrated below. 3 Attach the battery pack. With the "r" (arrow) on the battery pack pointing at the correct direction, insert the battery pack until it locks in place. • Re-attach the battery cover. (For BN-VF808U only) r Arrow AV DC 4 Connect the AC adapter. DC connector AC Adapter To AC Outlet (110V to 240V) • " " blinks to indicate charging has started. • When the lamp goes out, charging is finished. Unplug the AC adapter from the AC outlet and disconnect the AC adapter from the camcorder. To detach the battery pack Slide and hold battery release button BATT. (੬ 9), then remove the battery pack. Charging/recording time (approx.) Battery pack BN-VF808U (Provided) BN-VF815U BN-VF823U Required charging time Maximum Continuous Recording Time 1hr. 30 min. 1 hr. 55 min. 2 hrs. 40 min. 3 hrs. 45 min. 3 hrs. 50 min. 5 hrs. 40 min. Notes: • If a fully charged battery pack is attached to the unit, " " lamp will blink for approx. 10 seconds before it turns off. • Since the AC Adapter processes electricity internally, it becomes warm during use. Be sure to use it only in well-ventilated areas. • After 5 minutes have elapsed in RecordStandby mode with the cassette inserted and no operation is performed, the camcorder will automatically turn off its power supplied from the AC adapter. In this case, the battery charge starts if the battery is attached to the camcorder. • Please do not pull or bend the AC adapter plug and cable. This may damage the AC adapter. Using The Battery Pack Perform steps 2 - 3 in "Charging The Battery Pack". Notes: • Recording time is reduced significantly under the following conditions: • Zoom or Record-Standby mode is engaged repeatedly. • The playback mode is engaged repeatedly. • Before extended use, it is recommended that you prepare enough battery packs to cover 3 times the planned shooting time. Attention: Before detaching the power source, make sure that the camcorder's power is turned off. Failure to do so can result in a camcorder malfunction. ENGLISH
-
 1
1 -
2
-
3
-
4
-
5
-
 6
6 -
 7
7 -
 8
8 -
 9
9 -
 10
10 -
 11
11 -
 12
12 -
 13
13 -
 14
14 -
 15
15 -
 16
16 -
17
-
18
-
19
-
20
-
21
-
22
-
23
-
24
-
25
-
26
-
27
-
28
-
29
-
30
-
31
-
32
-
33
-
34
-
35
-
36
-
37
-
38
-
39
-
40
-
41
-
42
-
43
-
44
-
45
-
46
-
47
-
48
-
49
-
50
-
51
-
52
-
53
-
54
-
55
-
56
-
57
-
58
-
59
-
60
-
61
-
62
-
63
-
64
-
65
-
66
-
67
-
68
-
69
-
70
-
71
-
72
-
73
-
74
-
75
-
76
 |
 |
