JVC GRDA30US Instructions - Page 32
Problem, Possible Cause, Remedy, Warning Indication, Meaning / Remedy
 |
UPC - 046838032004
View all JVC GRDA30US manuals
Add to My Manuals
Save this manual to your list of manuals |
Page 32 highlights
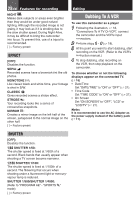
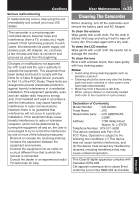
32 EN Troubleshooting Problem Possible Cause Remedy The tape is moving, but there is no picture. • Your TV has AV input terminals, «Set the TV to the mode or channel but is not set to its VIDEO mode. appropriate for video playback. (੬ 18) • The cassette holder cover is open. «Close the cassette holder cover. (੬ 13) Blocks of noise appear during playback, or there is no playback picture and the screen becomes blue. «Clean the video heads with an optional cleaning cassette. (੬ 2) Data battery status does not appear. • The AC Adapter is connected to the camcorder. • The camcorder turned off automatically. «Disconnect the AC adapter from the camcorder. «Turn the camcorder off, then on again. Warning Indication Meaning / Remedy High Exhausted • Displays the battery remaining power. • As the battery power comes close to nil, the battery remaining power indicator blinks. When the battery power is exhausted, power turns off automatically. SET TO MANUAL MODE • Appears when you attempt to change "Menu Settings", "Backlight Compensation" or "Manual Focus" while in AUTO mode A. (੬ 9) TAPE END • Appears when the tape ends during recording or playback. LENS CAP • Appears for 5 seconds after power is turned on if the lens cap is attached or when it is dark. SET DATE/TIME! • Appears when the date/time is not set. (੬ 12). • The built-in clock battery has run out and the previously set date/time has been erased. Consult your nearest JVC dealer for replacement. • Appears if a tape is loaded while the Power Switch is set to "REC". • Blinks when no tape is loaded. CHECK TAPE'S • Appears when the erase protection tab is set to "SAVE" while the Power ERASE PROTECTION Switch is set to "REC". TAB UNIT IN SAFEGUARD MODE REMOVE AND REATTACH BATTERY OR DC PLUG • Error indications 01, 02 or 06. Remedy: Remove and reattach the power supply or battery.* UNIT IN SAFEGUARD • Error indications 03 or 04. MODE EJECT AND Remedy: Eject the cassette and reinsert.* REINSERT TAPE * The camcorder turns off automatically. Re-check if the indication clears. When it does, you can resume using the camcorder. If the indication remains, consult your nearest JVC dealer.
-
 1
1 -
2
-
3
-
4
-
5
-
6
-
7
-
8
-
9
-
10
-
11
-
12
-
13
-
14
-
15
-
16
-
17
-
18
-
19
-
20
-
21
-
22
-
23
-
24
-
25
-
26
-
 27
27 -
 28
28 -
 29
29 -
 30
30 -
 31
31 -
 32
32 -
 33
33 -
 34
34 -
 35
35 -
 36
36 -
 37
37 -
38
-
39
-
40
-
41
-
42
-
43
-
44
-
45
-
46
-
47
-
48
-
49
-
50
-
51
-
52
-
53
-
54
-
55
-
56
-
57
-
58
-
59
-
60
-
61
-
62
-
63
-
64
-
65
-
66
-
67
-
68
-
69
-
70
-
71
-
72
-
73
-
74
-
75
-
76
 |
 |