JVC GY-HMZ1U GY-HMZ1U ProHD 3D Camcorder 138-page user guide - Page 18
Using the Remote Control, Using the Remote Control for the First Time, Reinserting the Battery
 |
View all JVC GY-HMZ1U manuals
Add to My Manuals
Save this manual to your list of manuals |
Page 18 highlights
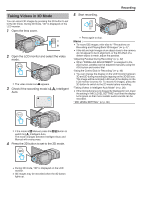
Getting Started Using the Remote Control You can operate this unit from a distance away using the supplied remote control. Remote Sensor Operation Buttons on Remote Control Unit 1 START /STOP SNAP SHOT 2 3 4 5 INFO INDEX 6 . . .. Memo : 0 Point the remote control toward the sensor directly and use it within 5 m from this unit. 0 The transmitted beam may not be effective or may cause incorrect operation when the sensor is directly exposed to sunlight or powerful lighting. Preparing the Remote Control Using the Remote Control for the First Time Pull out the insulation sheet 0 A button battery (CR2025) is included inside the remote control at the time of purchase. Remove the insulation sheet before use. Reinserting the Battery Button Battery Lock Tab 0 Pull out the battery holder by pressing the lock tab. 0 Insert the button battery with the + side facing upward. 18 1 Recording Start/Stop Button 0 Starts/stops video recording. 2 Still Image Button 0 Takes a still image. 3 Zoom Button 0 T: Zooms in 0 W: Zooms out 4 Basic Playback Operations Operation Buttons Description Playback/Pause 0 Starts/pauses playback of videos or Button slideshows. d / e Left Button j 0 Moves the cursor to the left. 0 Performs reverse search during playback. Right Button i 0 Moves the cursor to the right. 0 Performs forward search during playback. T Button N 0 Zooms in. (during pause) 0 Turns up (+) the volume during video playback. W Button O 0 Zooms out. (during pause) 0 Turns down (-) the volume during video playback. 5 Index Button 0 Stops playback and returns to thumbnail display. 6 Info Button 0 Recording: Displays the remaining time (for video only) and battery power. 0 Playback: Displays file information such as recording date.
-
 1
1 -
2
-
3
-
4
-
5
-
6
-
7
-
8
-
9
-
10
-
11
-
12
-
 13
13 -
 14
14 -
 15
15 -
 16
16 -
 17
17 -
 18
18 -
 19
19 -
 20
20 -
 21
21 -
 22
22 -
 23
23 -
24
-
25
-
26
-
27
-
28
-
29
-
30
-
31
-
32
-
33
-
34
-
35
-
36
-
37
-
38
-
39
-
40
-
41
-
42
-
43
-
44
-
45
-
46
-
47
-
48
-
49
-
50
-
51
-
52
-
53
-
54
-
55
-
56
-
57
-
58
-
59
-
60
-
61
-
62
-
63
-
64
-
65
-
66
-
67
-
68
-
69
-
70
-
71
-
72
-
73
-
74
-
75
-
76
-
77
-
78
-
79
-
80
-
81
-
82
-
83
-
84
-
85
-
86
-
87
-
88
-
89
-
90
-
91
-
92
-
93
-
94
-
95
-
96
-
97
-
98
-
99
-
100
-
101
-
102
-
103
-
104
-
105
-
106
-
107
-
108
-
109
-
110
-
111
-
112
-
113
-
114
-
115
-
116
-
117
-
118
-
119
-
120
-
121
-
122
-
123
-
124
-
125
-
126
-
127
-
128
-
129
-
130
-
131
-
132
-
133
-
134
-
135
-
136
-
137
-
138
 |
 |
