JVC GY-HMZ1U GY-HMZ1U ProHD 3D Camcorder 138-page user guide - Page 23
Recording, Taking Videos in 3D Mode - lens
 |
View all JVC GY-HMZ1U manuals
Add to My Manuals
Save this manual to your list of manuals |
Page 23 highlights
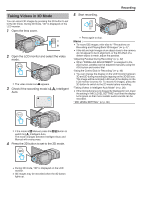
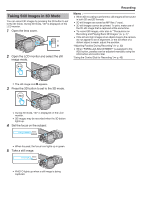
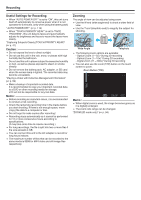
. . . .. Recording Taking Videos in 3D Mode You can record 3D images by pressing the 3D button to set to the 3D mode. During 3D mode, "3D" is displayed on the LCD monitor. 1 Open the lens cover. 5 Start recording. 2 Open the LCD monitor and select the video mode. 0 The video mode icon A appears. 3 Check if the recording mode is P Intelligent Auto. 0 Press again to stop. Memo : 0 To record 3D images, refer also to ""Precautions on Recording and Playing Back 3D Images" (A p. 4) ". 0 If the left and right images of an object close to the camera do not appear to be in alignment, or the 3D effect of a distant object is weak, adjust the parallax. "Adjusting Parallax During Recording" (A p. 32) 0 When "PARALLAX ADJUSTMENT" is assigned to the ADJ button, parallax can be adjusted manually using the ADJ button and control dial. "Using the Control Dial for Recording" (A p. 45) 0 You can change the display on the LCD monitor between 3D and 2D during recording by tapping on the 3D/2D icon. The image will be recorded in 3D even if the display on the LCD monitor is set to 2D. To record 2D images, press the 3D button to switch to the 2D mode before recording. "Taking Videos in Intelligent Auto Mode" (A p. 26) 0 If the microphone level is frequently displayed in red, lower the setting in "MIC LEVEL SETTING" such that the display turns green so that more realistic audio sounds can be recorded. " MIC LEVEL SETTING " (A p. 96) 0 If the mode is H Manual, press the H/T button to switch to P Intelligent Auto. The mode changes between Intelligent Auto and Manual with every press. 4 Press the 3D button to set to the 3D mode. 0 During 3D mode, "3D" is displayed on the LCD monitor. 0 3D images may be recorded when the 3D button lights up. 23
-
 1
1 -
2
-
3
-
4
-
5
-
6
-
7
-
8
-
9
-
10
-
11
-
12
-
13
-
14
-
15
-
16
-
17
-
 18
18 -
 19
19 -
 20
20 -
 21
21 -
 22
22 -
 23
23 -
 24
24 -
 25
25 -
 26
26 -
 27
27 -
 28
28 -
29
-
30
-
31
-
32
-
33
-
34
-
35
-
36
-
37
-
38
-
39
-
40
-
41
-
42
-
43
-
44
-
45
-
46
-
47
-
48
-
49
-
50
-
51
-
52
-
53
-
54
-
55
-
56
-
57
-
58
-
59
-
60
-
61
-
62
-
63
-
64
-
65
-
66
-
67
-
68
-
69
-
70
-
71
-
72
-
73
-
74
-
75
-
76
-
77
-
78
-
79
-
80
-
81
-
82
-
83
-
84
-
85
-
86
-
87
-
88
-
89
-
90
-
91
-
92
-
93
-
94
-
95
-
96
-
97
-
98
-
99
-
100
-
101
-
102
-
103
-
104
-
105
-
106
-
107
-
108
-
109
-
110
-
111
-
112
-
113
-
114
-
115
-
116
-
117
-
118
-
119
-
120
-
121
-
122
-
123
-
124
-
125
-
126
-
127
-
128
-
129
-
130
-
131
-
132
-
133
-
134
-
135
-
136
-
137
-
138
 |
 |
