JVC GY-HMZ1U GY-HMZ1U ProHD 3D Camcorder 138-page user guide - Page 7
Attaching the Audio Unit, Attaching an External Microphone - camcorder
 |
View all JVC GY-HMZ1U manuals
Add to My Manuals
Save this manual to your list of manuals |
Page 7 highlights
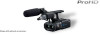
.. . Getting Started Attaching the Audio Unit The audio unit (with handle) is not attached to the camcorder unit when purchased. Attach the audio unit according to the following procedure. Audio Unit Clamp Screw Attaching an External Microphone You can attach a microphone (optional) to the microphone holder. Knob Microphone Clamp Shoe Cable Microphone Holder INPUT1/INPUT2 Connector Microphone Connector Open the cover. Cable 1 Attach the audio unit by sliding it all the way into the shoe on the top of the camcorder. 0 Take care not to slide in too much as it will be impossible to tighten the screws. 2 Turn the screw on the audio unit clockwise to fasten it fully and securely to the camcorder. 0 To fully secure the audio unit, use a coin or the like to fasten the screw completely. 0 If the audio unit is not fully and securely tightened, it will be loose and may drop off from the camcorder during use. 3 Connect the audio unit cable to the microphone connector of the camcorder. Memo : 0 The clamp on the audio unit is for fixing the microphone cable and cannot be used to fix the audio unit cable. 1 Turn the knob on the microphone holder anticlockwise to loosen it and open the microphone holder. 2 Place the microphone in the microphone holder. 3 Turn the knob on the microphone holder clockwise to secure the microphone. 4 Connect the microphone to the INPUT1/ INPUT2 audio input connector, or the microphone connector according to the type of microphone cable terminal you are using. 0 INPUT1/INPUT2 Connector: XLR Connector 0 Microphone Connector: Mini-jack Connector (stereo) 5 Attach the microphone cable to the clamp. 6 Set the CH-2 INPUT switch. 0 INPUT1: Inputs audio from the INPUT1 connector to CH-2. 0 INPUT2: Inputs audio from the INPUT2 connector to CH-2. Memo : 0 Audio from the INPUT1 connector is also input to "CH-1" regardless of the setting. 7
-
 1
1 -
 2
2 -
 3
3 -
 4
4 -
 5
5 -
 6
6 -
 7
7 -
 8
8 -
 9
9 -
 10
10 -
 11
11 -
 12
12 -
13
-
14
-
15
-
16
-
17
-
18
-
19
-
20
-
21
-
22
-
23
-
24
-
25
-
26
-
27
-
28
-
29
-
30
-
31
-
32
-
33
-
34
-
35
-
36
-
37
-
38
-
39
-
40
-
41
-
42
-
43
-
44
-
45
-
46
-
47
-
48
-
49
-
50
-
51
-
52
-
53
-
54
-
55
-
56
-
57
-
58
-
59
-
60
-
61
-
62
-
63
-
64
-
65
-
66
-
67
-
68
-
69
-
70
-
71
-
72
-
73
-
74
-
75
-
76
-
77
-
78
-
79
-
80
-
81
-
82
-
83
-
84
-
85
-
86
-
87
-
88
-
89
-
90
-
91
-
92
-
93
-
94
-
95
-
96
-
97
-
98
-
99
-
100
-
101
-
102
-
103
-
104
-
105
-
106
-
107
-
108
-
109
-
110
-
111
-
112
-
113
-
114
-
115
-
116
-
117
-
118
-
119
-
120
-
121
-
122
-
123
-
124
-
125
-
126
-
127
-
128
-
129
-
130
-
131
-
132
-
133
-
134
-
135
-
136
-
137
-
138
 |
 |
