Konica Minolta PKG-675i PKG-675i User Manual - Page 3
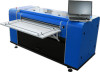
Equipment specifications, Main Features, Equipment setup
 |
View all Konica Minolta PKG-675i manuals
Add to My Manuals
Save this manual to your list of manuals |
Page 3 highlights
1.1.2. Machine plate 2. Equipment specifications 2.1. Dimensions and weight of the standard configurations 2.1.1. PKG 675i 2.1.2. PKG 675i packaged 2.1.3. PKG 675i unpackaged 2.1.4. PKG 675i assembled 2.1.5. PKG 675i packaged basket 2.1.6. PKG 675i unpackaged basket 2.2. Handling 2.2.1. PKG 675i - gravity centre 2.3. Electrical connection requirements 2.4. Electrical safety requirements 2.5. Compressed air connection requirements 2.6. Connections 2.7. Recommended environment 2.8. Installation requirements 2.9. Minimum workspace requirements & workstation 3. Main Features 3.1. PKG 675i main features 4. Equipment setup 4.1. Unpacking procedure 4.2. Assembling PKG 675i with the Take-up 4.2.1. Levelling 4.2.2. Accessories Assembling 4.2.2.1. PSL 675i: Swing arm system and LCD Screen 4.2.3. Plug the power cable 4.3. Installing the ink tanks 4.4. Turn the power on 4.5. Installing total printhead and ink system 4.6. Initial ink prime 4.7. Ripped on CALDERA 4.8. Print process 4.9. Remove and install Printhead and Wiper 4.9.1. Remove and install Printhead DOCUMENT I 18.40V02 - Update: 04.09.2019 OPERATIONAL MANUAL 23 24 24 24 25 26 27 28 29 30 30 32 32 33 33 34 34 35 36 36 37 37 39 39 41 41 42 43 47 48 53 55 60 66 66 Page 3
-
 1
1 -
 2
2 -
 3
3 -
 4
4 -
 5
5 -
 6
6 -
 7
7 -
 8
8 -
 9
9 -
10
-
11
-
12
-
13
-
14
-
15
-
16
-
17
-
18
-
19
-
20
-
21
-
22
-
23
-
24
-
25
-
26
-
27
-
28
-
29
-
30
-
31
-
32
-
33
-
34
-
35
-
36
-
37
-
38
-
39
-
40
-
41
-
42
-
43
-
44
-
45
-
46
-
47
-
48
-
49
-
50
-
51
-
52
-
53
-
54
-
55
-
56
-
57
-
58
-
59
-
60
-
61
-
62
-
63
-
64
-
65
-
66
-
67
-
68
-
69
-
70
-
71
-
72
-
73
-
74
-
75
-
76
-
77
-
78
-
79
-
80
-
81
-
82
-
83
-
84
-
85
-
86
-
87
-
88
-
89
-
90
-
91
-
92
-
93
-
94
-
95
-
96
-
97
-
98
-
99
-
100
-
101
-
102
-
103
-
104
-
105
-
106
-
107
-
108
-
109
-
110
-
111
-
112
-
113
-
114
-
115
-
116
-
117
-
118
 |
 |