Konica Minolta PKG-675i PKG-675i User Manual - Page 52
standing upright
 |
View all Konica Minolta PKG-675i manuals
Add to My Manuals
Save this manual to your list of manuals |
Page 52 highlights
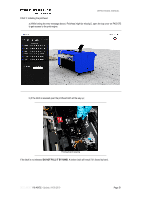
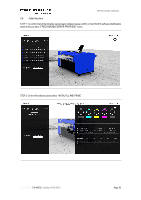
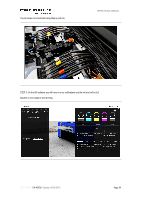
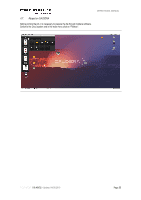
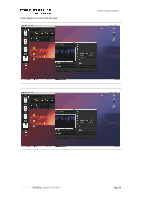
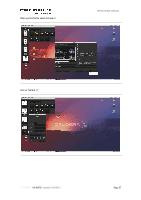
OPERATIONAL MANUAL c) Insert the printhead by the handle into the cradle and pull it backwards until it snaps into the proper place standing upright; d) Close the printhead latch. • This procedure must be repeated for the 5 Printheads; • Follow all the steps above by the order that are shown. If you miss a step or do it in any other order, it may cause damage to various parts such as printhead, motor, structural parts, etc; • DO NOT throw away the printhead packaging. The white box has the serial number, part number and manufacturing date of the printhead. Also, it is recommended to store the printheads which are currently not installed in the original packaging; • In case of doubts of the steps above, be free to contact your supplier before trying; • Notice that the images of the User Interface shown in the steps above could be different from the ones that are shown here. Every User Interface update will be reported directly to the client and all the changes explained. DOCUMENT I 18.40V02 - Update: 04.09.2019 Page 52
-
 1
1 -
2
-
3
-
4
-
5
-
6
-
7
-
8
-
9
-
10
-
11
-
12
-
13
-
14
-
15
-
16
-
17
-
18
-
19
-
20
-
21
-
22
-
23
-
24
-
25
-
26
-
27
-
28
-
29
-
30
-
31
-
32
-
33
-
34
-
35
-
36
-
37
-
38
-
39
-
40
-
41
-
42
-
43
-
44
-
45
-
46
-
 47
47 -
 48
48 -
 49
49 -
 50
50 -
 51
51 -
 52
52 -
 53
53 -
 54
54 -
 55
55 -
 56
56 -
 57
57 -
58
-
59
-
60
-
61
-
62
-
63
-
64
-
65
-
66
-
67
-
68
-
69
-
70
-
71
-
72
-
73
-
74
-
75
-
76
-
77
-
78
-
79
-
80
-
81
-
82
-
83
-
84
-
85
-
86
-
87
-
88
-
89
-
90
-
91
-
92
-
93
-
94
-
95
-
96
-
97
-
98
-
99
-
100
-
101
-
102
-
103
-
104
-
105
-
106
-
107
-
108
-
109
-
110
-
111
-
112
-
113
-
114
-
115
-
116
-
117
-
118
 |
 |
