Konica Minolta bizhub C25 bizhub C25 Printer / Copier / Scanner User Guide - Page 203
Editing/Deleting Group Dial Destinations
 |
View all Konica Minolta bizhub C25 manuals
Add to My Manuals
Save this manual to your list of manuals |
Page 203 highlights
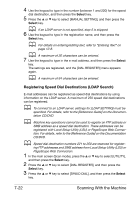
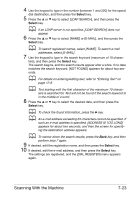
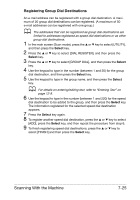
Editing/Deleting Group Dial Destinations Information registered with a group dial destination can be edited or deleted. 1 In the main screen (Scan mode), press the + or , key to select [UTILITY], and then press the Select key. 2 Press the + or , key to select [DIAL REGISTER], and then press the Select key. 3 Press the + or , key to select [GROUP DIAL], and then press the Select key. 4 Use the keypad to type in the number (between 1 and 20) for the group dial destination to be edited/deleted, and then press the Select key. The information currently registered for the group dial destination appears for about two seconds. 5 Press the + or , key to select [EDIT] to edit information or [DELETE] to delete the destination, and then press the Select key. If [DELETE] was selected, the settings are deleted, and the [DIAL REGISTER] menu appears again. 6 If desired, edit the group name, and then press the Select key. d For details on entering/editing text, refer to "Entering Text" on page 12-8. 7 Press the + or , key to select [ADD] to add a speed dial destination, [CHECK/EDIT] to delete the destination or [FINISH] to finish editing, and then press the Select key. If [FINISH] was selected, the edited settings are saved, and the [DIAL REGISTER] menu appears again. If [ADD] was selected, continue with step 6 of "Registering Group Dial Destinations" on page 7-25. If [CHECK/ EDIT] was selected, continue with step 8. 8 Press the + or , key to select the speed dial destination to be deleted, and then press the Stop/Reset key. d To check the settings for the selected speed dial destination, press the Select key. 9 Press the + or , key to select [YES], and then press the Select key. 10 After the speed dial destination is deleted, press the Back key. 11 To delete another speed dial destination, repeat the procedure from step 8. 7-26 Scanning With the Machine
-
 1
1 -
2
-
3
-
4
-
5
-
6
-
7
-
8
-
9
-
10
-
11
-
12
-
13
-
14
-
15
-
16
-
17
-
18
-
19
-
20
-
21
-
22
-
23
-
24
-
25
-
26
-
27
-
28
-
29
-
30
-
31
-
32
-
33
-
34
-
35
-
36
-
37
-
38
-
39
-
40
-
41
-
42
-
43
-
44
-
45
-
46
-
47
-
48
-
49
-
50
-
51
-
52
-
53
-
54
-
55
-
56
-
57
-
58
-
59
-
60
-
61
-
62
-
63
-
64
-
65
-
66
-
67
-
68
-
69
-
70
-
71
-
72
-
73
-
74
-
75
-
76
-
77
-
78
-
79
-
80
-
81
-
82
-
83
-
84
-
85
-
86
-
87
-
88
-
89
-
90
-
91
-
92
-
93
-
94
-
95
-
96
-
97
-
98
-
99
-
100
-
101
-
102
-
103
-
104
-
105
-
106
-
107
-
108
-
109
-
110
-
111
-
112
-
113
-
114
-
115
-
116
-
117
-
118
-
119
-
120
-
121
-
122
-
123
-
124
-
125
-
126
-
127
-
128
-
129
-
130
-
131
-
132
-
133
-
134
-
135
-
136
-
137
-
138
-
139
-
140
-
141
-
142
-
143
-
144
-
145
-
146
-
147
-
148
-
149
-
150
-
151
-
152
-
153
-
154
-
155
-
156
-
157
-
158
-
159
-
160
-
161
-
162
-
163
-
164
-
165
-
166
-
167
-
168
-
169
-
170
-
171
-
172
-
173
-
174
-
175
-
176
-
177
-
178
-
179
-
180
-
181
-
182
-
183
-
184
-
185
-
186
-
187
-
188
-
189
-
190
-
191
-
192
-
193
-
194
-
195
-
196
-
197
-
 198
198 -
 199
199 -
 200
200 -
 201
201 -
 202
202 -
 203
203 -
 204
204 -
 205
205 -
 206
206 -
 207
207 -
 208
208 -
209
-
210
-
211
-
212
-
213
-
214
-
215
-
216
-
217
-
218
-
219
-
220
-
221
-
222
-
223
-
224
-
225
-
226
-
227
-
228
-
229
-
230
-
231
-
232
-
233
-
234
-
235
-
236
-
237
-
238
-
239
-
240
-
241
-
242
-
243
-
244
-
245
-
246
-
247
-
248
-
249
-
250
-
251
-
252
-
253
-
254
-
255
-
256
-
257
-
258
-
259
-
260
-
261
-
262
-
263
-
264
-
265
-
266
-
267
-
268
-
269
-
270
-
271
-
272
-
273
-
274
-
275
-
276
-
277
-
278
-
279
-
280
-
281
-
282
-
283
-
284
-
285
-
286
-
287
-
288
-
289
-
290
-
291
-
292
-
293
-
294
-
295
-
296
-
297
-
298
-
299
-
300
-
301
-
302
-
303
-
304
-
305
-
306
-
307
-
308
-
309
-
310
-
311
-
312
-
313
-
314
-
315
-
316
-
317
-
318
-
319
-
320
-
321
-
322
-
323
-
324
-
325
-
326
-
327
-
328
-
329
-
330
-
331
-
332
-
333
-
334
-
335
-
336
-
337
-
338
-
339
 |
 |