Konica Minolta bizhub C25 bizhub C25 Printer / Copier / Scanner User Guide - Page 240
Replacing the Fuser Unit, There are extremely hot parts within the machine. Before replacing
 |
View all Konica Minolta bizhub C25 manuals
Add to My Manuals
Save this manual to your list of manuals |
Page 240 highlights
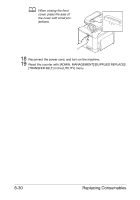
Replacing the Fuser Unit When the time to replace the fuser unit is reached, the message [Fuser Unit Life] appears. Printing can continue even after this message appears; however, since the print quality is reduced, the fuser unit should be replaced immediately 1 Turn off the machine and dis- connect the power cord and interface cover. Note There are extremely hot parts within the machine. Before replacing the fuser unit, wait about 20 minutes after turning off the machine, and then check that the fusing section has reached room temperature, otherwise, you may get burnt. 2 Pull the lever, and then open the right door. d Before opening the right door, fold up Tray 1. Replacing Consumables 8-31
-
 1
1 -
2
-
3
-
4
-
5
-
6
-
7
-
8
-
9
-
10
-
11
-
12
-
13
-
14
-
15
-
16
-
17
-
18
-
19
-
20
-
21
-
22
-
23
-
24
-
25
-
26
-
27
-
28
-
29
-
30
-
31
-
32
-
33
-
34
-
35
-
36
-
37
-
38
-
39
-
40
-
41
-
42
-
43
-
44
-
45
-
46
-
47
-
48
-
49
-
50
-
51
-
52
-
53
-
54
-
55
-
56
-
57
-
58
-
59
-
60
-
61
-
62
-
63
-
64
-
65
-
66
-
67
-
68
-
69
-
70
-
71
-
72
-
73
-
74
-
75
-
76
-
77
-
78
-
79
-
80
-
81
-
82
-
83
-
84
-
85
-
86
-
87
-
88
-
89
-
90
-
91
-
92
-
93
-
94
-
95
-
96
-
97
-
98
-
99
-
100
-
101
-
102
-
103
-
104
-
105
-
106
-
107
-
108
-
109
-
110
-
111
-
112
-
113
-
114
-
115
-
116
-
117
-
118
-
119
-
120
-
121
-
122
-
123
-
124
-
125
-
126
-
127
-
128
-
129
-
130
-
131
-
132
-
133
-
134
-
135
-
136
-
137
-
138
-
139
-
140
-
141
-
142
-
143
-
144
-
145
-
146
-
147
-
148
-
149
-
150
-
151
-
152
-
153
-
154
-
155
-
156
-
157
-
158
-
159
-
160
-
161
-
162
-
163
-
164
-
165
-
166
-
167
-
168
-
169
-
170
-
171
-
172
-
173
-
174
-
175
-
176
-
177
-
178
-
179
-
180
-
181
-
182
-
183
-
184
-
185
-
186
-
187
-
188
-
189
-
190
-
191
-
192
-
193
-
194
-
195
-
196
-
197
-
198
-
199
-
200
-
201
-
202
-
203
-
204
-
205
-
206
-
207
-
208
-
209
-
210
-
211
-
212
-
213
-
214
-
215
-
216
-
217
-
218
-
219
-
220
-
221
-
222
-
223
-
224
-
225
-
226
-
227
-
228
-
229
-
230
-
231
-
232
-
233
-
234
-
 235
235 -
 236
236 -
 237
237 -
 238
238 -
 239
239 -
 240
240 -
 241
241 -
 242
242 -
 243
243 -
 244
244 -
 245
245 -
246
-
247
-
248
-
249
-
250
-
251
-
252
-
253
-
254
-
255
-
256
-
257
-
258
-
259
-
260
-
261
-
262
-
263
-
264
-
265
-
266
-
267
-
268
-
269
-
270
-
271
-
272
-
273
-
274
-
275
-
276
-
277
-
278
-
279
-
280
-
281
-
282
-
283
-
284
-
285
-
286
-
287
-
288
-
289
-
290
-
291
-
292
-
293
-
294
-
295
-
296
-
297
-
298
-
299
-
300
-
301
-
302
-
303
-
304
-
305
-
306
-
307
-
308
-
309
-
310
-
311
-
312
-
313
-
314
-
315
-
316
-
317
-
318
-
319
-
320
-
321
-
322
-
323
-
324
-
325
-
326
-
327
-
328
-
329
-
330
-
331
-
332
-
333
-
334
-
335
-
336
-
337
-
338
-
339
 |
 |

Replacing Consumables
8-31
Replacing the Fuser Unit
When the time to replace the fuser unit is reached, the message [Fuser Unit
Life] appears. Printing can continue even after this message appears; how-
ever, since the print quality is reduced, the fuser unit should be replaced
immediately
1
Turn off the machine and dis-
connect the power cord and
interface cover.
Note
There are extremely hot parts within the machine. Before replacing the
fuser unit, wait about 20 minutes after turning off the machine, and then
check that the fusing section has reached room temperature,
otherwise, you may get burnt.
2
Pull the lever, and then open the
right door.
d
Before opening the right
door, fold up Tray 1.