Konica Minolta bizhub C654 bizhub C654/C754 Fax Operations User Guide - Page 135
[Weekly Timer Settings]
 |
View all Konica Minolta bizhub C654 manuals
Add to My Manuals
Save this manual to your list of manuals |
Page 135 highlights
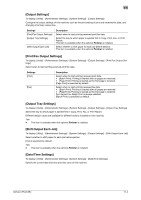
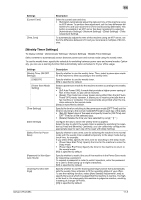
11 Settings [Current Time] [Time Zone] Description Enter the current date and time. • [Set Date]: Automatically adjust the date and time of this machine using an NTP server. To perform time adjustment, set the time difference between UTC and your local time in [Time Zone] and tap [Set Date]. This button is available if an NTP server has been registered by selecting [Administrator Settings] - [Network Settings] - [Detail Settings] - [Time Adjustment Setting]. To automatically adjust the time of this machine using an NTP server, set the time difference between UTC and your local area in multiples of 30 minutes. [Weekly Timer Settings] To display: [Utility] - [Administrator Settings] - [System Settings] - [Weekly Timer Settings] Select whether to automatically switch between power save and normal mode using the weekly timer. To use the weekly timer, specify the schedule for switching between power save and normal modes. Optionally, you can use a learning function that automatically sets a schedule to fit your office usage. Settings [Weekly Timer ON/OFF Settings] [ON]/[OFF] [Power Save Mode Setting] [Time Settings] [Date Settings] [Select Time for Power Save] [Password for Non-Business Hours] [Tracking Function Settings] Description Specify whether to use the weekly timer. Then, select a power save mode for the machine to enter according to the weekly timer. Specify whether to use the weekly timer. [ON] is specified by default. Select a power save mode for the machine to enter according to the weekly timer. • [ErP Auto Power OFF]: A mode that provides a higher power saving ef- fect. In this mode, no job can be received. • [Sleep]: This mode has a lower power saving effect than the [ErP Auto Power OFF] mode; however, it allows you to receive print jobs from a fax machine or computer. The received jobs are printed when the machine returns to the normal mode. [Sleep] is specified by default. Specify the time for switching to the power save mode ([OFF Time]) and the time for returning to the normal mode ([ON Time]) for each day of the week. • [Set All]: Select days of the week and specify times for [ON Time] and [OFF Time] for all the selected days. • [Delete]: Deletes the time you have selected by using[ ][ ] Configure the day to which the weekly timer is applied. Select the day to which the weekly timer is applied by switching the calendar by [Year] and [Monthly]. Optionally, you can collectively configure the appropriate days for each day of the week with [Daily Setting]. Specify whether to set a time zone for switching the machine in the normal mode with the weekly timer enabled temporarily to the sleep mode during lunch time, for example. If you select [Yes], specify the time zone for switching to the sleep mode. • [Power Save Start Time]: Specify the time for the machine to enter the sleep mode. • [Power Save End Time]: Specify the time for the machine to return to the normal mode. [NO] is specified by default. Specify whether to restrict the use of this machine in the Power Save mode by requesting a password. To request a password in order to restrict operation, enter the password for a user to enter (using up to eight characters). [NO] is specified by default. Specify whether to use the tracking (learning) function that automatically sets the weekly timer schedule to fit the operating status of your office. To use the tracking function, select [Auto Standby Adjustment Level] to specify the level at which it is judged that this machine is inactive. The higher the level is, the more easily this machine is judged as inactive, resulting in setting of a longer OFF time. [ON] is specified by default. bizhub C754/C654 11-5
-
 1
1 -
2
-
3
-
4
-
5
-
6
-
7
-
8
-
9
-
10
-
11
-
12
-
13
-
14
-
15
-
16
-
17
-
18
-
19
-
20
-
21
-
22
-
23
-
24
-
25
-
26
-
27
-
28
-
29
-
30
-
31
-
32
-
33
-
34
-
35
-
36
-
37
-
38
-
39
-
40
-
41
-
42
-
43
-
44
-
45
-
46
-
47
-
48
-
49
-
50
-
51
-
52
-
53
-
54
-
55
-
56
-
57
-
58
-
59
-
60
-
61
-
62
-
63
-
64
-
65
-
66
-
67
-
68
-
69
-
70
-
71
-
72
-
73
-
74
-
75
-
76
-
77
-
78
-
79
-
80
-
81
-
82
-
83
-
84
-
85
-
86
-
87
-
88
-
89
-
90
-
91
-
92
-
93
-
94
-
95
-
96
-
97
-
98
-
99
-
100
-
101
-
102
-
103
-
104
-
105
-
106
-
107
-
108
-
109
-
110
-
111
-
112
-
113
-
114
-
115
-
116
-
117
-
118
-
119
-
120
-
121
-
122
-
123
-
124
-
125
-
126
-
127
-
128
-
129
-
 130
130 -
 131
131 -
 132
132 -
 133
133 -
 134
134 -
 135
135 -
 136
136 -
 137
137 -
 138
138 -
 139
139 -
 140
140 -
141
-
142
-
143
-
144
-
145
-
146
-
147
-
148
-
149
-
150
-
151
-
152
-
153
-
154
-
155
-
156
-
157
-
158
-
159
-
160
-
161
-
162
-
163
 |
 |
