Konica Minolta bizhub C654 bizhub C654/C754 Fax Operations User Guide - Page 95
Registering directly entered destinations in Address Book, Settings, Description, Touch Panel
 |
View all Konica Minolta bizhub C654 manuals
Add to My Manuals
Save this manual to your list of manuals |
Page 95 highlights
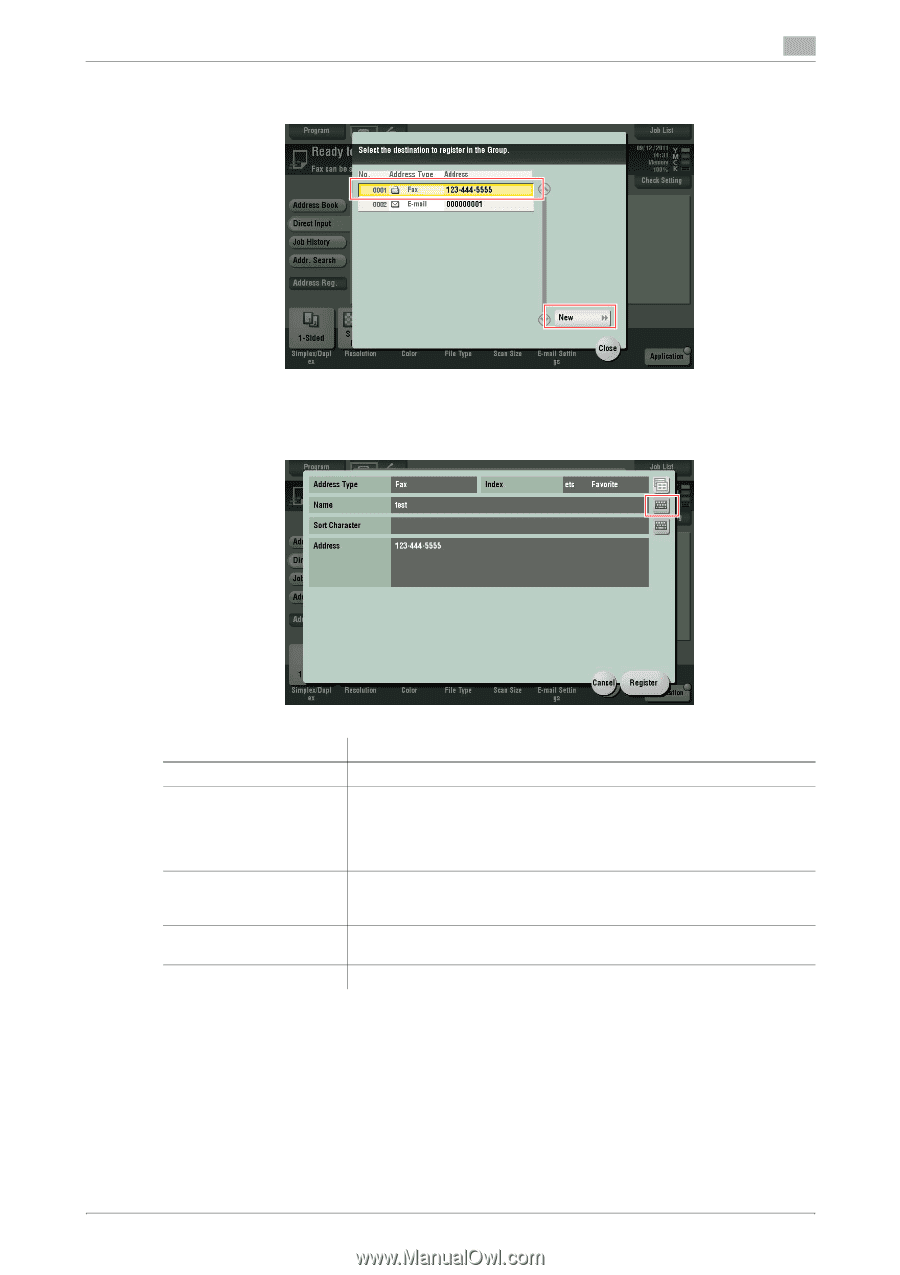
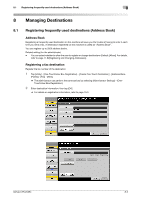
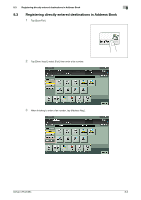
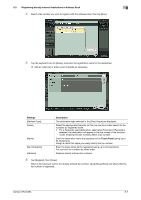
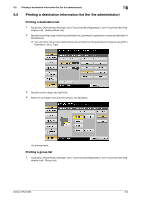
8.3 Registering directly entered destinations in Address Book 8 4 Select a fax number you want to register with the address book, then tap [New]. 5 Tap the keyboard icon for [Name], and enter the registration name for the destination. % Add an index key or enter a sort character as necessary. Settings [Address Type] [Index] [Name] [Sort Character] [Address] Description The destination type selected in the [Direct Input] are displayed. Select the appropriate character so that you can do an index search for fax numbers by registered name. • For a frequently used destination, select also [Favorite]. If [Favorite] is selected, the destination will appear in the top screen of the fax/scan mode, enabling the user to easily select a fax number. Enter the destination name that appears on the Touch Panel (using up to 24 characters). Assign a name that helps you easily identify the fax number. Enter the same name as the registered (using up to 24 characters). You can sort fax numbers by name order. Displays directly entered fax numbers. 6 Tap [Register], then [Close]. When a fax has been sent to the directly entered fax number, tap [Address Book] and check that the fax number is registered. bizhub C754/C654 8-7
-
 1
1 -
2
-
3
-
4
-
5
-
6
-
7
-
8
-
9
-
10
-
11
-
12
-
13
-
14
-
15
-
16
-
17
-
18
-
19
-
20
-
21
-
22
-
23
-
24
-
25
-
26
-
27
-
28
-
29
-
30
-
31
-
32
-
33
-
34
-
35
-
36
-
37
-
38
-
39
-
40
-
41
-
42
-
43
-
44
-
45
-
46
-
47
-
48
-
49
-
50
-
51
-
52
-
53
-
54
-
55
-
56
-
57
-
58
-
59
-
60
-
61
-
62
-
63
-
64
-
65
-
66
-
67
-
68
-
69
-
70
-
71
-
72
-
73
-
74
-
75
-
76
-
77
-
78
-
79
-
80
-
81
-
82
-
83
-
84
-
85
-
86
-
87
-
88
-
89
-
 90
90 -
 91
91 -
 92
92 -
 93
93 -
 94
94 -
 95
95 -
 96
96 -
 97
97 -
 98
98 -
 99
99 -
 100
100 -
101
-
102
-
103
-
104
-
105
-
106
-
107
-
108
-
109
-
110
-
111
-
112
-
113
-
114
-
115
-
116
-
117
-
118
-
119
-
120
-
121
-
122
-
123
-
124
-
125
-
126
-
127
-
128
-
129
-
130
-
131
-
132
-
133
-
134
-
135
-
136
-
137
-
138
-
139
-
140
-
141
-
142
-
143
-
144
-
145
-
146
-
147
-
148
-
149
-
150
-
151
-
152
-
153
-
154
-
155
-
156
-
157
-
158
-
159
-
160
-
161
-
162
-
163
 |
 |