Konica Minolta magicolor 4690MF magicolor 4690 Printer/Copier/Scanner User Gui - Page 173
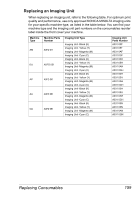
Press down the area marked, toner cartridge K.
 |
View all Konica Minolta magicolor 4690MF manuals
Add to My Manuals
Save this manual to your list of manuals |
Page 173 highlights
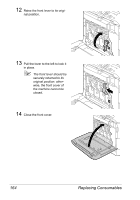
3 Pull the front lever of the color toner cartridge indicated to the right. The replacement procedure for the imaging unit is the same for all colors (yellow: Y, magenta: M, cyan: C, and black: K). The following instructions show the procedure to replace the toner cartridge (K). 4 Lower the lever to release the lock. YMC K K K K 5 Press down the area marked "Push" on the imaging unit to be replaced, and then slide the unit all the way out of the machine. K The following instructions show K the procedure to replace the imaging unit (K). Replacing Consumables 161
-
 1
1 -
2
-
3
-
4
-
5
-
6
-
7
-
8
-
9
-
10
-
11
-
12
-
13
-
14
-
15
-
16
-
17
-
18
-
19
-
20
-
21
-
22
-
23
-
24
-
25
-
26
-
27
-
28
-
29
-
30
-
31
-
32
-
33
-
34
-
35
-
36
-
37
-
38
-
39
-
40
-
41
-
42
-
43
-
44
-
45
-
46
-
47
-
48
-
49
-
50
-
51
-
52
-
53
-
54
-
55
-
56
-
57
-
58
-
59
-
60
-
61
-
62
-
63
-
64
-
65
-
66
-
67
-
68
-
69
-
70
-
71
-
72
-
73
-
74
-
75
-
76
-
77
-
78
-
79
-
80
-
81
-
82
-
83
-
84
-
85
-
86
-
87
-
88
-
89
-
90
-
91
-
92
-
93
-
94
-
95
-
96
-
97
-
98
-
99
-
100
-
101
-
102
-
103
-
104
-
105
-
106
-
107
-
108
-
109
-
110
-
111
-
112
-
113
-
114
-
115
-
116
-
117
-
118
-
119
-
120
-
121
-
122
-
123
-
124
-
125
-
126
-
127
-
128
-
129
-
130
-
131
-
132
-
133
-
134
-
135
-
136
-
137
-
138
-
139
-
140
-
141
-
142
-
143
-
144
-
145
-
146
-
147
-
148
-
149
-
150
-
151
-
152
-
153
-
154
-
155
-
156
-
157
-
158
-
159
-
160
-
161
-
162
-
163
-
164
-
165
-
166
-
167
-
 168
168 -
 169
169 -
 170
170 -
 171
171 -
 172
172 -
 173
173 -
 174
174 -
 175
175 -
 176
176 -
 177
177 -
 178
178 -
179
-
180
-
181
-
182
-
183
-
184
-
185
-
186
-
187
-
188
-
189
-
190
-
191
-
192
-
193
-
194
-
195
-
196
-
197
-
198
-
199
-
200
-
201
-
202
-
203
-
204
-
205
-
206
-
207
-
208
-
209
-
210
-
211
-
212
-
213
-
214
-
215
-
216
-
217
-
218
-
219
-
220
-
221
-
222
-
223
-
224
-
225
-
226
-
227
-
228
-
229
-
230
-
231
-
232
-
233
-
234
-
235
-
236
-
237
-
238
-
239
-
240
-
241
-
242
-
243
-
244
-
245
-
246
-
247
-
248
-
249
-
250
-
251
-
252
-
253
-
254
-
255
-
256
-
257
-
258
-
259
-
260
-
261
-
262
-
263
-
264
-
265
-
266
-
267
-
268
-
269
-
270
-
271
-
272
-
273
-
274
-
275
-
276
-
277
-
278
-
279
-
280
-
281
-
282
-
283
-
284
-
285
-
286
 |
 |
Replacing Consumables
161
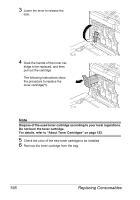
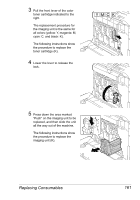
3
Pull the front lever of the color
toner cartridge indicated to the
right.
The replacement procedure for
the imaging unit is the same for
all colors (yellow: Y, magenta: M,
cyan: C, and black: K).
The following instructions show
the procedure to replace the
toner cartridge (K).
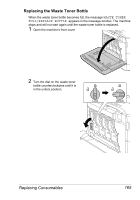
4
Lower the lever to release the
lock.
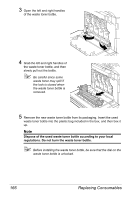
5
Press down the area marked
“Push” on the imaging unit to be
replaced, and then slide the unit
all the way out of the machine.
The following instructions show
the procedure to replace the
imaging unit (K).
K
Y
M
C
K
K
K
K
K