Lantronix XPress-DR-IAP XPress-DR / XPress-DR-IAP - User Guide - Page 56
Configuring via the Setup Mode Window, 4.1 Using a Telnet Connection
 |
View all Lantronix XPress-DR-IAP manuals
Add to My Manuals
Save this manual to your list of manuals |
Page 56 highlights
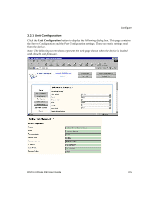
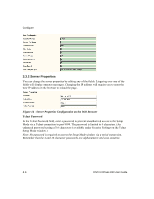
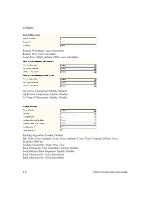
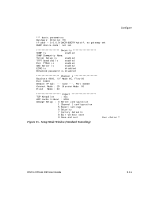
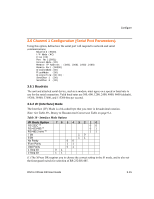
Configure 3.4 Configuring via the Setup Mode Window 3.4.1 Using a Telnet Connection To configure the unit over the network, establish a Telnet connection to port 9999. Note: If you use the Telnet to Device icon on the Device Installer Device Management window OR a serial port login to establish the connection, skip steps 1and 2. 1. From the Windows Start menu, click Run and type the following command, where x.x.x.x is the IP address and 9999 is the unit's fixed network configuration port number. telnet x.x.x.x 9999 Note: Be sure to include a space between the IP address and 9999. 2. Click OK. 3. The Lantronix Universal Device Server window displays. *** Lantronix Universal Device Server *** Serial Number 2D000054 MAC address 00204A2D0036 Software version 05.1b6 (020919) DLX Press Enter to go into Setup Mode 4. To enter the Setup Mode, you must press Enter within 5 seconds. The configuration settings will appear. See Figure 15 - Setup Mode Window on page 3-11. Note: The following line appears only with a Telnet connection. Model: Device Server Plus+! (Firmware Code: AQ) (see note below) 5. Select an option on the menu by entering the number of the option in the Your choice ? field and pressing Enter. 6. To enter a value for a parameter, type the value and press Enter, or to confirm a current value, just press Enter. 7. When you are finished, save the new configurations (option 9). The unit will reboot. Note: The Firmware Code AQ represents Standard Tunneling firmware. 3-10 DSTni-XPress DR User Guide
-
 1
1 -
2
-
3
-
4
-
5
-
6
-
7
-
8
-
9
-
10
-
11
-
12
-
13
-
14
-
15
-
16
-
17
-
18
-
19
-
20
-
21
-
22
-
23
-
24
-
25
-
26
-
27
-
28
-
29
-
30
-
31
-
32
-
33
-
34
-
35
-
36
-
37
-
38
-
39
-
40
-
41
-
42
-
43
-
44
-
45
-
46
-
47
-
48
-
49
-
50
-
 51
51 -
 52
52 -
 53
53 -
 54
54 -
 55
55 -
 56
56 -
 57
57 -
 58
58 -
 59
59 -
 60
60 -
 61
61 -
62
-
63
-
64
-
65
-
66
-
67
-
68
-
69
-
70
-
71
-
72
-
73
-
74
-
75
-
76
-
77
-
78
-
79
-
80
-
81
-
82
-
83
-
84
-
85
-
86
-
87
-
88
-
89
-
90
-
91
-
92
-
93
-
94
-
95
-
96
-
97
-
98
-
99
-
100
-
101
-
102
-
103
-
104
-
105
-
106
-
107
-
108
-
109
-
110
-
111
-
112
-
113
-
114
-
115
-
116
-
117
-
118
-
119
-
120
-
121
-
122
-
123
-
124
-
125
-
126
-
127
-
128
-
129
-
130
-
131
-
132
-
133
-
134
-
135
-
136
-
137
-
138
-
139
-
140
-
141
-
142
-
143
-
144
-
145
-
146
-
147
-
148
-
149
 |
 |