Lexmark E352DN User's Guide
Lexmark E352DN - E 352dn B/W Laser Printer Manual
 |
View all Lexmark E352DN manuals
Add to My Manuals
Save this manual to your list of manuals |
Lexmark E352DN manual content summary:
- Lexmark E352DN | User's Guide - Page 1
E350d and E352dn User's Guide June 2006 www.lexmark.com Lexmark and Lexmark with diamond design are trademarks of Lexmark International, Inc., registered in the United States and/or other countries. © 2006 Lexmark International, Inc. All rights reserved. 740 West New Circle Road Lexington, - Lexmark E352DN | User's Guide - Page 2
described in the operating instructions, to a professional service person. • This product is designed, tested, and approved to meet strict global safety standards with the use of specificLexmark components. The safety features of some parts may not always be obvious. Lexmark is not responsible for - Lexmark E352DN | User's Guide - Page 3
about the printer 5 Printer overview ...5 Understanding 3: Printing ...18 Loading the 250-sheet tray ...18 Loading the manual feeder ...23 Linking trays ...24 Sending a job to print installed options ...34 Chapter 5: Maintaining the printer 35 Storing supplies ...35 Conserving supplies ...35 - Lexmark E352DN | User's Guide - Page 4
Contents Chapter 7: Troubleshooting 50 Online customer support ...50 Calling for service ...50 Checking an unresponsive printer ...50 Printing multiple-language PDFs ...51 Solving printing problems ...51 Turning on Reduced Curl mode ...52 Solving option problems ...53 Solving service message issues - Lexmark E352DN | User's Guide - Page 5
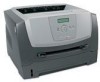
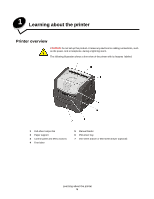
or telephone, during a lightning storm. The following illustration shows a front view of the printer with its features labeled. 1 150-sheet output bin 2 Paper support 3 Control panel and Menu buttons 4 Front door 5 Manual feeder 6 250-sheet tray 7 250-sheet drawer or 550-sheet drawer (optional - Lexmark E352DN | User's Guide - Page 6
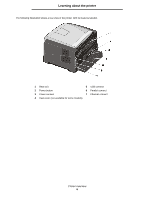
Learning about the printer The following illustration shows a rear view of the printer with its features labeled. 1 Rear exit 5 USB connect 2 Power button 6 Parallel connect 3 Power connect 7 Ethernet connect 4 Dust cover (not available for some models) Printer overview 6 - Lexmark E352DN | User's Guide - Page 7
available to make it easy for you to change printer settings. The diagram shows the menu index on the control panel and the menus and items available under each menu. For more information about menus and menu items, see the Menus and Messages guide on the Software and Documentation CD. Paper Menu - Lexmark E352DN | User's Guide - Page 8
Learning about the printer Understanding the control panel The control panel consists of these items: • A 2-line liquid crystal display (LCD) that shows the control panel buttons in your language. An additional translated label is included in the printer box. Understanding the control panel 8 - Lexmark E352DN | User's Guide - Page 9
table. Button or control panel item Display Indicator light Function The display shows messages describing the current state of the printer and indicating possible printer problems as Manual Feeder is displayed, then saves the selection as the new default setting for Paper Source. The printer will - Lexmark E352DN | User's Guide - Page 10
printer supports, see the Card Stock & Label Guide available on our Lexmark Web site at www.lexmark.com. Selecting the right paper or other print media reduces printing problems /m2 (16-24lb) • 550 paper • 50 labels • 50 transparencies Manual feeder A4, A5, A6 (grain long Plain paper, 60-163g/m 2 - Lexmark E352DN | User's Guide - Page 11
these guidelines are followed when evaluating new paper stock. For detailed information, see the Card Stock & Label Guide available on the Lexmark Web site at www.lexmark.com/ publications. Weight The printer can automatically feed paper weights from 60 to 9 0 g/m2 (16 to 2 4 lb bond) grain long in - Lexmark E352DN | User's Guide - Page 12
"Paper Menu" in the Menus and Messages guide on the Software and Documentation CD. Moisture store it in the same environment as the printer for 24 to 48 hours before printing to resulting in fewer paper feeding problems and better print quality. Recycled paper Lexmark supportsUS executive order - Lexmark E352DN | User's Guide - Page 13
prevent jams and ensures trouble-free printing. To Paper Menu" in the Menus and Messages Guide located on the Software and Documentation CD.) preprinted forms and letterhead paper for the printer: • Use grain long papers for best resistant inks designed for use in xerographic copiers. The ink must - Lexmark E352DN | User's Guide - Page 14
acceptable for laser printers. Page orientation is important when printing on letterhead. Use the following table for help when loading Guide, available on the Lexmark Web site at www.lexmark.com/ publications. Transparencies can be fed automatically from the paper trays or manually from the manual - Lexmark E352DN | User's Guide - Page 15
print media guidelines Envelopes Try a sample of any envelope you are considering using with the printer before buying large quantities. For instructions on loading envelopes, see Loading the manual feeder on page23 . When printing on envelopes: • To achieve the best possible print quality, use - Lexmark E352DN | User's Guide - Page 16
, and design, see the Card Stock & Label Guide available on the Lexmark Web site at www.lexmark.com/publications. Card stock Card stock is single ply printed from the Manual Feeder. • Set the Paper Type menu item in the Paper Menu to Card Stock from the control panel, from the printer driver, or from - Lexmark E352DN | User's Guide - Page 17
trouble- printer before purchasing large quantities. By selecting the appropriate print media and loading it properly, you can avoid most jams. For detailed tray loading instructions, see the following: • Loading the 250-sheet tray on page18 • Loading the manual guides in the trays are properly positioned - Lexmark E352DN | User's Guide - Page 18
Avoiding jams on page17 or Storing print media on page16. Loading the 250-sheet tray Your printer has a 250-sheet tray. You may have also purchased an optional 250-sheet drawer 250-sheet paper tray. For instructions, see Extending the tray for legal-size or folio-size paper on page21 . Printing 18 - Lexmark E352DN | User's Guide - Page 19
the correct position for the size print media you are loading. Note: There should be a slight gap between the rear paper guide and the paper stack. 3 Flex the sheets back and forth to loosen them, then fan them. Do not fold or crease the print media. Straighten - Lexmark E352DN | User's Guide - Page 20
Printing 5 Adjust the two side paper guides to touch lightly against the sides of the paper stack. 6 Insert the 250-sheet tray. Loading the 250-sheet tray 20 - Lexmark E352DN | User's Guide - Page 21
Printing 7 Extend the paper support on the output bin. Extending the tray for legal-size or folio-size paper To load legal-size or folio-size paper, extend the paper tray. You may also attach a dust cover (if available) on the back of the printer to protect the tray while it is extended - Lexmark E352DN | User's Guide - Page 22
from being knocked out of position while it is extended. Attach the dust cover to the back of the printer by aligning the tabs on the cover to the holes on the printer, then snap the cover into place. Note: This feature may not be available for some models. Loading the 250 - Lexmark E352DN | User's Guide - Page 23
media, print side facing up, at the center of the manual feeder, but only to the point where its leading edge can contact the paper guides. Otherwise, the printer will engage the print media too soon and likely skew the print job. 2 Adjust the guides to the print media width. 3 Hold both sides of - Lexmark E352DN | User's Guide - Page 24
online Help for more information. To support all the printer features, use the Lexmark custom printer drivers supplied with your printer. Updated drivers, as well as a complete description of the driver packages and Lexmark driver support, are available from the Lexmark Web site. You can also use - Lexmark E352DN | User's Guide - Page 25
computer - Canceling a job from a Macintosh computer running Mac OS 9.x - Canceling a job from a Macintosh computer running Mac OS X Canceling a job from the printer control panel Note: For more information about the control panel, see Understanding the control panel on page8. If the job you want - Lexmark E352DN | User's Guide - Page 26
a job from a Macintosh computer running Mac OS X 1 Open Applications à Utilities, and then double-click Print Center or Printer Setup. 2 Double-click the printer you are printing to. 3 In the printer window, select the print job you want to cancel. 4 Press Delete. Printing the menu settings page You - Lexmark E352DN | User's Guide - Page 27
" the LAN drop may not be active, or the network cable may be malfunctioning. Consult a system support person for a solution, and print another network setup page to verify that the printer is connected to the network. Printing a font sample list To print samples of the fonts currently available - Lexmark E352DN | User's Guide - Page 28
4 Installing options Accessing the system board CAUTION: To install memory, you must access the printer system board. Turn the printer off, and unplug the power cord from the wall outlet before continuing. 1 Remove the 250-sheet paper tray. Installing options 28 - Lexmark E352DN | User's Guide - Page 29
Installing options 2 Press the button on the left side of the printer to release and lower the front door. 3 Open the rear exit door. Accessing the system board 29 - Lexmark E352DN | User's Guide - Page 30
Installing options 4 Press both buttons on the front right side of the machine to release the side access door. 5 Loosen the four screws on the cover, but do not remove them completely. 6 Slide the cover to the left until the screws fit into the keyholes on the cover. 7 Remove the cover and set it - Lexmark E352DN | User's Guide - Page 31
, and unplug the power cord from the wall outlet before continuing. Note: Memory options designed for other Lexmark printers may not work with your printer. 1 Access the system board (see Accessing the system board on page28 ). 2 Push open the latches on both ends of the memory connector. 3 Unpack - Lexmark E352DN | User's Guide - Page 32
off, and unplug the power cord from the wall outlet before continuing. Note: Flash memory card options designed for other Lexmark printers may not work with your printer. 1 Access the system board (see Accessing the system board on page28 ). 2 Unpack the flash memory card. Note: There are two - Lexmark E352DN | User's Guide - Page 33
Installing options Installing an optional 250-sheet drawer or 550-sheet drawer CAUTION: Turn the printer off, and unplug the power cord from the wall outlet before continuing. Place the printer unit directly on top of the 250-sheet drawer or 550-sheet drawer. Installing an optional 250-sheet drawer - Lexmark E352DN | User's Guide - Page 34
manually. Note: If you have not installed your printer driver yet, follow the appropriate instructions on the Setup sheet supplied with your printer. After you have installed a printer driver, return here to complete these instructions. 1 Click Start à Settings à Printers. 2 Select the printer - Lexmark E352DN | User's Guide - Page 35
printer. Refer printing problems and maintenance tasks to this key operator. In the U.S., contact Lexmark at 1-800-539-6275 for information about Lexmark more information on changing these settings, see the Menus and Messages Guide. Supply Toner Print media Menu selection item Toner Darkness in the - Lexmark E352DN | User's Guide - Page 36
specifically designed for the printer are: Part number Description Average cartridge yield* World Wide E250X22G Photoconductor kit 30,000 standard pages† For the USA and Canada1 E250A21A Toner Cartridge 3,500 standard pages1 E250A11A Return Program Toner Cartridge 3,500 standard pages1 - Lexmark E352DN | User's Guide - Page 37
the 88 Toner low message appears. You need to have a new toner cartridge available when the current one no longer prints satisfactorily. Changing a toner cartridge 1 Turn the printer off. 2 Press the button on the left side of the printer to release and lower the front door. Ordering supplies 37 - Lexmark E352DN | User's Guide - Page 38
. Note: You can use the packing material from the new toner cartridge to ship the old toner cartridge back to Lexmark for recycling. For more information, see Recycling Lexmark products on page42. 5 Firmly shake the toner cartridge in all directions to distribute the toner. Ordering supplies 38 - Lexmark E352DN | User's Guide - Page 39
toner cartridge in as far as it will go. The toner cartridge clicks into place when correctly installed. 7 Close the front door. 8 Turn the printer back the counter has been reset, normal printer operation resumes. For more information, see the instruction sheet that came with your photoconductor - Lexmark E352DN | User's Guide - Page 40
kit exposed to direct light for an extended period of time. Extended light exposure can cause print quality problems. 1 Turn the printer off. 2 Remove the print cartridge assembly. a Press the button on the left side of the printer to release the front door. b Lower the front door. c Grasp the toner - Lexmark E352DN | User's Guide - Page 41
arrows on the guides of the print cartridge assembly with the green arrows on the tracks in the printer and pushing the print cartridge assembly in as far as it will go. 7 Close the front door. 8 Turn the printer back on. 9 Reset the photoconductor counter (see the instruction sheet that shipped - Lexmark E352DN | User's Guide - Page 42
table for the maintenance kit part number for your specific printer. Machine voltage 110 V 220 V 100 V Part numbers 40X2847 40X2848 40X2849 Recycling Lexmark products To return Lexmark products to Lexmark for recycling: 1 Visit our Web site: www.lexmark.com/recycle Follow the instructions - Lexmark E352DN | User's Guide - Page 43
the printer jams, the appropriate jam message appears on the printer control panel. Understanding jam messages The following table lists you have cleared all possible jams. Message 200 Paper Jam - Remove Cartridge 201 Paper Jam - Remove Cartridge 202 Paper Jam - Open Rear Door 231 Paper Jam - Open - Lexmark E352DN | User's Guide - Page 44
Clearing jams Clearing a jam We recommend clearing the entire paper path when a paper jam occurs. 1 Open the 250-sheet tray. If necessary, remove the tray from the printer. 2 Remove the jammed media. Clearing a jam 44 - Lexmark E352DN | User's Guide - Page 45
Clearing jams 3 Press down on the green duplex flap to release jammed pages from the duplex area, and then remove any crumpled paper. 4 Install the 250-sheet tray. Clearing a jam 45 - Lexmark E352DN | User's Guide - Page 46
Clearing jams 5 Open the front door, and remove the print cartridge assembly. CAUTION: The fuser or fuser area may be hot. 6 Lift the green flap at the front of the printer, and then remove the jammed pages beneath it. Clearing a jam 46 - Lexmark E352DN | User's Guide - Page 47
Clearing jams 7 Open the rear exit, and remove the jammed pages. 8 After you have cleared the jams, reinstall the print cartridge assembly, and make sure all printer doors are closed. 9 Press . Note: Jam recovery is set to Auto by default. When jam recovery is set to Auto, the memory that holds the - Lexmark E352DN | User's Guide - Page 48
Clearing jams Clearing a jam in the manual feeder 1 Remove the paper from the manual feeder. 2 Open the front door, and remove the print cartridge assembly. Clearing a jam 48 - Lexmark E352DN | User's Guide - Page 49
. 5 After you have cleared the jams, reinstall the print cartridge assembly, and make sure all printer doors are closed. 6 Press . Note: Jam recovery is reprinted, depending on the overall memory usage in the printer . 7 Slide the side paper guide toward the inside of the tray until it lightly rests - Lexmark E352DN | User's Guide - Page 50
Online customer support Customer support is available on the Lexmark Web site at www.lexmark.com. Calling for service When you call for printer service, describe the problem you are experiencing, the message on the display, and the troubleshooting steps you have already taken to find a solution - Lexmark E352DN | User's Guide - Page 51
you have properly configured the printer for network printing. For more information, see the drivers CD or the Lexmark Web site. You are and Messages Guide. The printer Operating Set the Operating Mode to Normal. For more information, see Mode is set to Quiet Selecting printer operating mode on - Lexmark E352DN | User's Guide - Page 52
Curl mode If the print media is curled once it exits the printer, Reduced Curl mode can be turned on to help reduce the problem. However, before turning this mode on, you should try the possible solutions offered in Troubleshooting. For more information, see The paper is curled once it exits the - Lexmark E352DN | User's Guide - Page 53
. For Macintosh computer users: Make sure the printer is set up in the Chooser. The following table lists printer options and suggested corrective actions for related problems. If the suggested corrective action does not fix the problem, call your service representative. Option 250-sheet drawer 550 - Lexmark E352DN | User's Guide - Page 54
Troubleshooting Solving service message issues Problem Service messages Solution A service message indicates printer failure that may require service. Turn the printer off, wait about 10 seconds, and then turn the printer on. If the error recurs, write down the error number, the problem, and a - Lexmark E352DN | User's Guide - Page 55
Troubleshooting Solving print quality problems The information in the following table may help you solve print quality problems. If these suggestions do not correct the problem, call for service. You may have a printer part that requires adjustment or replacement. Problem Print is too light. - Lexmark E352DN | User's Guide - Page 56
Troubleshooting Problem Entire page is white. Action • Make sure the packaging material is removed from the photoconductor kit. • Check the photoconductor kit and toner cartridge the fonts are supported by the printer, the host computer, and the application. Solving print quality problems 56 - Lexmark E352DN | User's Guide - Page 57
Troubleshooting Problem Action sides, top, or bottom of the print media. Adjust the paper guides to the proper positions for the loaded print media size. Print is quality is poor. • Use only transparencies recommended by the printer manufacturer. • Make sure the Paper Type setting in the - Lexmark E352DN | User's Guide - Page 58
can be enabled to improve print quality. These settings are available on the driver and on the printer Embedded Web Server (EWS) interface. For more information about these options, see the driver Help. Driver option Purpose Values† Enhance Fine Lines Enable a print mode preferable for On - Lexmark E352DN | User's Guide - Page 59
Troubleshooting Cleaning the printhead lens Some print quality problems can be solved by cleaning the printhead lens. 1 Turn the printer off. 2 Press the button on the left side of the printer to release and lower the front door. 3 Remove the print cartridge assembly by pulling on the toner - Lexmark E352DN | User's Guide - Page 60
Troubleshooting 5 Gently wipe the printhead lens with a clean, dry, lint-free cloth. Warning: Not using a clean, dry, lint-free cloth may result in damage to the printhead lens. 6 Install the print cartridge assembly into the printer by aligning the arrows on the guides of the print cartridge - Lexmark E352DN | User's Guide - Page 61
8 Administrative support Disabling control panel menus Since many people could be using the printer, an administrator may choose to lock the control panel menus to keep others from changing menu settings from the control panel. Note: Disabling the control - Lexmark E352DN | User's Guide - Page 62
Administrative support Restoring factory default settings When you first enter the printer menus from the control panel, you may notice an asterisk (*) to the left of a value in the menus. This asterisk indicates the factory default setting. These settings are the original printer settings. ( - Lexmark E352DN | User's Guide - Page 63
SSL port: Open your Web browser. In the address line, enter the IP address of the printer you want to configure using the format: https: //ip_address/. Supporting SNMPv3 (Simple Network Management Protocol version 3) SNMPv3 protocol allows for encrypted and authenticated network communications. It - Lexmark E352DN | User's Guide - Page 64
Administrative support Locking the control panel menus Control panel Menu Lockout lets you panel menus: 1 Open your Web browser. In the address line, enter the IP address of the printer you want to configure using the format: http://ip_address/. 2 Click Configuration. 3 Under Other Settings, click - Lexmark E352DN | User's Guide - Page 65
and, if not installed and used in accordance with the instructions, may cause harmful interference to radio communications. However, there compliance information statement should be directed to: Director of Lexmark Technology & Services Lexmark International, Inc. 740 West New Circle Road Lexington, - Lexmark E352DN | User's Guide - Page 66
has been signed by the Director of Manufacturing and Technic al Support, Lexmark International, S.A., Boigny, France. This product satisfies the Class sources. If you plan to operate your printer at a voltage exceeding the voltage range(s) in the following table, you must attach a suitably rated and - Lexmark E352DN | User's Guide - Page 67
power consumption levels listed in the previous table represent time-averaged measurements. Instantaneous power Saver mode can be modified from the printer control panel. The default time out to For more information, see the Menus and Messages guide on the Software and Documentation CD. Off mode - Lexmark E352DN | User's Guide - Page 68
. The laser system and printer are designed so there is never any human access to laser radiation above a Class I level during normal operation, user maintenance, or prescribed service condition. Statement of Limited Warranty for Lexmark E350d and E352dn Lexmark International, Inc. Lexington, KY - Lexmark E352DN | User's Guide - Page 69
attachments • Accidents, misuse, abuse or use inconsistent with Lexmark user's guides, manuals, instructions or guidance • Unsuitable physical or operating environment • Maintenance by anyone other than Lexmark or a Lexmark authorized servicer • Operation of a product beyond the limit of its - Lexmark E352DN | User's Guide - Page 70
. This limited warranty gives you specific legal rights. You may also have other rights that vary from state to state. Statement of Limited Warranty for Lexmark E350d and E352dn 70 - Lexmark E352DN | User's Guide - Page 71
page orientation 14 printing 14 letterhead guidelines 13 loading print media 250-sheet tray 18 manual feeder 23 lock feature, security 64 M maintaining the printer 35 cleaning the printhead lens 59 maintenance kit 42 manual feeder 5, 14 maximum paper fill indicators 13, 19 memory card adding 31 menu - Lexmark E352DN | User's Guide - Page 72
unsatisfactory types 12 paper guide 19 paper support 5 paper tray adjustment 19 photoconductor kit changing 40 end-of-life 39 ordering 39 recycling 42 preprinted forms 13 print cartridge See toner cartridge print media jams avoiding 17 print media specifications 11 printer settings 7 printhead lens
-
 1
1 -
 2
2 -
 3
3 -
 4
4 -
 5
5 -
 6
6 -
 7
7 -
8
-
9
-
10
-
11
-
12
-
13
-
14
-
15
-
16
-
17
-
18
-
19
-
20
-
21
-
22
-
23
-
24
-
25
-
26
-
27
-
28
-
29
-
30
-
31
-
32
-
33
-
34
-
35
-
36
-
37
-
38
-
39
-
40
-
41
-
42
-
43
-
44
-
45
-
46
-
47
-
48
-
49
-
50
-
51
-
52
-
53
-
54
-
55
-
56
-
57
-
58
-
59
-
60
-
61
-
62
-
63
-
64
-
65
-
66
-
67
-
68
-
69
-
70
-
71
-
72
 |
 |
www.lexmark.com
User’s Guide
June 2006
Lexmark and Lexmark with diamond design are trademarks of Lexmark International, Inc.,
registered in the United States and/or other countries.
© 2006 Lexmark International, Inc. All rights reserved.
740 West New Circle Road
Lexington, Kentucky 40550
E350d and E352dn