Lexmark Pro4000c User's Guide - Page 11
Use the, About your printer
 |
View all Lexmark Pro4000c manuals
Add to My Manuals
Save this manual to your list of manuals |
Page 11 highlights
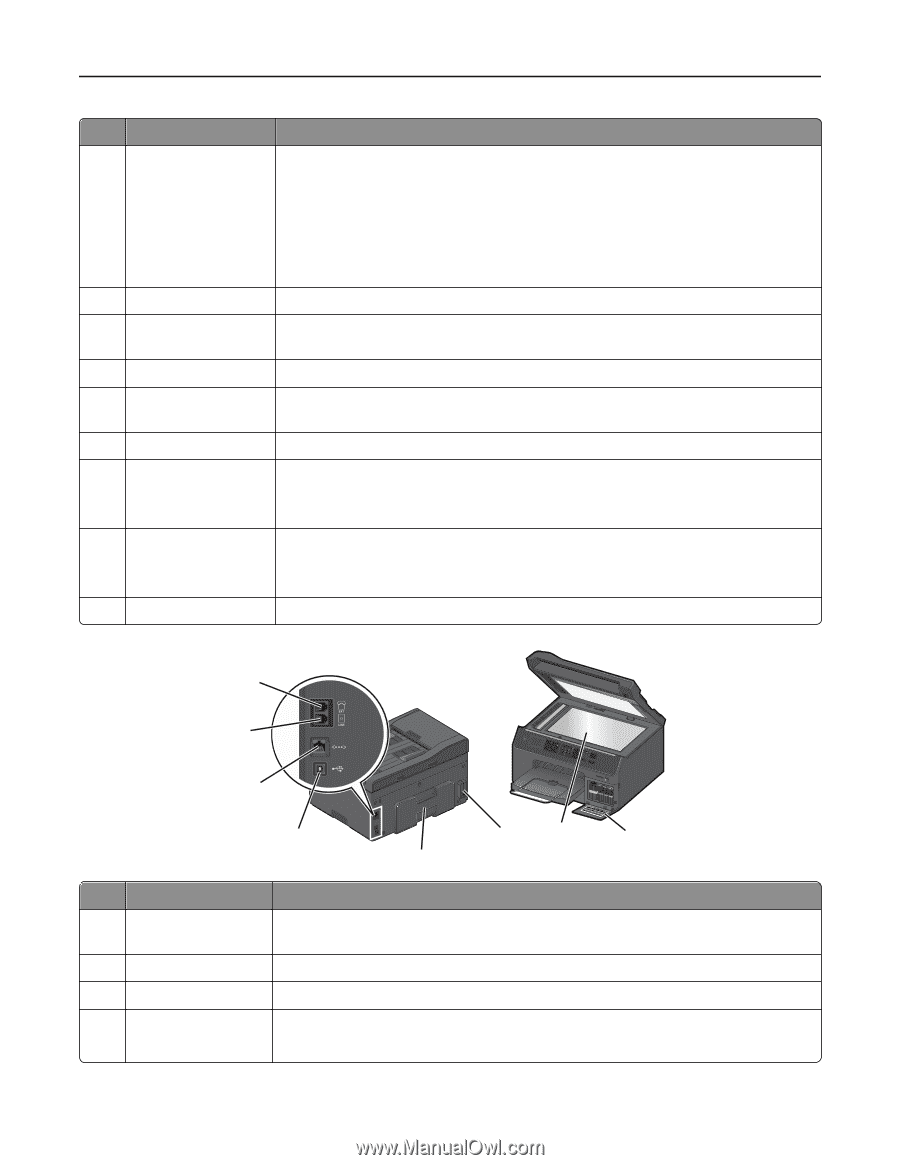
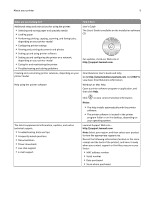
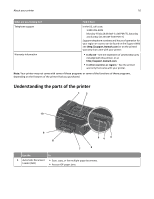
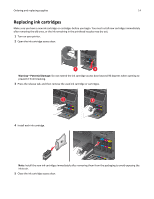
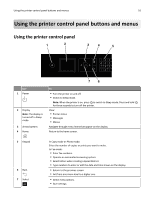
About your printer 11 Use the To 2 ADF input tray Load original documents into the ADF. Notes: • Do not load postcards, photos, small items, or thin media (such as magazine clippings) into the ADF. Place these items on the scanner glass. • After scanning, copying, or faxing, you can lift the right end of the input tray to retrieve the original documents easily. 3 PictBridge and USB port Connect a PictBridge-enabled digital camera or a flash drive to the printer. 4 Card reader light Check the card reader status. The light comes on when a memory card is inserted and blinks when a memory card is being accessed. 5 Memory card slot Insert a memory card. 6 Ink cartridge access door Install, remove, or replace ink cartridges. 7 Paper tray Load paper. 8 Exit bin Hold paper as it exits. Note: For the printer to be ready for any print job, make sure to fully extend the exit bin and to flip out the bin extender. 9 Bin extender Catch the paper as it exits. Note: For the printer to be ready for any print job, make sure to fully extend the exit bin and to flip out the bin extender. 10 Printer control panel Operate the printer. 18 17 16 Address Boko Dial Toen Pause Redial SD/MS/xD/MMC 15 13 12 11 14 Use the To 11 Customer support label Identify the model number of the printer, the customer support hot line, and the ink cartridge information. 12 Scanner glass Scan, copy, or fax photos and documents. 13 Power supply with port Connect the printer to the power cord. 14 Duplex unit • Print on both sides of a sheet of paper. • Access paper jams.
-
 1
1 -
2
-
3
-
4
-
5
-
 6
6 -
 7
7 -
 8
8 -
 9
9 -
 10
10 -
 11
11 -
 12
12 -
 13
13 -
 14
14 -
 15
15 -
 16
16 -
17
-
18
-
19
-
20
-
21
-
22
-
23
-
24
-
25
-
26
-
27
-
28
-
29
-
30
-
31
-
32
-
33
-
34
-
35
-
36
-
37
-
38
-
39
-
40
-
41
-
42
-
43
-
44
-
45
-
46
-
47
-
48
-
49
-
50
-
51
-
52
-
53
-
54
-
55
-
56
-
57
-
58
-
59
-
60
-
61
-
62
-
63
-
64
-
65
-
66
-
67
-
68
-
69
-
70
-
71
-
72
-
73
-
74
-
75
-
76
-
77
-
78
-
79
-
80
-
81
-
82
-
83
-
84
-
85
-
86
-
87
-
88
-
89
-
90
-
91
-
92
-
93
-
94
-
95
-
96
-
97
-
98
-
99
-
100
-
101
-
102
-
103
-
104
-
105
-
106
-
107
-
108
-
109
-
110
-
111
-
112
-
113
-
114
-
115
-
116
-
117
-
118
-
119
-
120
-
121
-
122
-
123
-
124
-
125
-
126
-
127
-
128
-
129
-
130
-
131
-
132
-
133
-
134
-
135
-
136
-
137
-
138
-
139
-
140
-
141
-
142
-
143
-
144
-
145
-
146
-
147
-
148
-
149
-
150
-
151
-
152
-
153
-
154
-
155
-
156
-
157
-
158
-
159
-
160
-
161
-
162
-
163
-
164
-
165
-
166
-
167
-
168
-
169
-
170
-
171
-
172
-
173
-
174
-
175
-
176
-
177
-
178
-
179
-
180
-
181
-
182
-
183
-
184
-
185
-
186
-
187
-
188
-
189
 |
 |