Lexmark Pro4000c User's Guide - Page 114
Networking FAQ, What is Wi-Fi Protected Setup?, What is Wi, Fi Protected Setup?
 |
View all Lexmark Pro4000c manuals
Add to My Manuals
Save this manual to your list of manuals |
Page 114 highlights
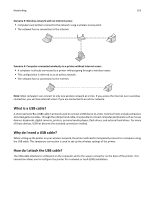
Networking 114 For Windows users 1 Close all open software programs. 2 Insert the installation software CD. If the installation dialog does not appear after a minute, then launch the CD manually: a Click , or click Start and then click Run. b In the Start Search or Run box, type D:\setup.exe, where D is the letter of your CD or DVD drive. c Press Enter, or click OK. 3 Follow the instructions on the computer screen. Note: Select Ethernet connection when prompted to select a connection type. For Macintosh users 1 Close all open applications. 2 Insert the installation software CD. If the installation dialog does not appear after a minute, then click the CD icon on the desktop. 3 Double-click the software installer package. 4 Follow the instructions on the computer screen. Note: Select Ethernet connection when prompted to select a connection type. Networking FAQ What is Wi‑Fi Protected Setup? Wi‑Fi Protected Setup (WPS) is a simple and secure configuration that allows you to establish a wireless home network and enable network security without requiring prior knowledge of Wi‑Fi technology. It is no longer necessary to configure the network name (SSID) and WEP key or WPA passphrase for network devices. Note: WPS supports only networks that communicate through access points (wireless routers). The printer supports the following methods in connecting to a wireless network: • Personal Identification Number (PIN)-A PIN on the printer is entered into the wireless settings of the access point. • Push Button Configuration (PBC)-Buttons on both the printer and the access point are pushed within a given period of time. Look for any of these identifier marks to check if your access point is WPS certified: You can find these WPS logos on the side, back, or top of your access point.
-
 1
1 -
2
-
3
-
4
-
5
-
6
-
7
-
8
-
9
-
10
-
11
-
12
-
13
-
14
-
15
-
16
-
17
-
18
-
19
-
20
-
21
-
22
-
23
-
24
-
25
-
26
-
27
-
28
-
29
-
30
-
31
-
32
-
33
-
34
-
35
-
36
-
37
-
38
-
39
-
40
-
41
-
42
-
43
-
44
-
45
-
46
-
47
-
48
-
49
-
50
-
51
-
52
-
53
-
54
-
55
-
56
-
57
-
58
-
59
-
60
-
61
-
62
-
63
-
64
-
65
-
66
-
67
-
68
-
69
-
70
-
71
-
72
-
73
-
74
-
75
-
76
-
77
-
78
-
79
-
80
-
81
-
82
-
83
-
84
-
85
-
86
-
87
-
88
-
89
-
90
-
91
-
92
-
93
-
94
-
95
-
96
-
97
-
98
-
99
-
100
-
101
-
102
-
103
-
104
-
105
-
106
-
107
-
108
-
 109
109 -
 110
110 -
 111
111 -
 112
112 -
 113
113 -
 114
114 -
 115
115 -
 116
116 -
 117
117 -
 118
118 -
 119
119 -
120
-
121
-
122
-
123
-
124
-
125
-
126
-
127
-
128
-
129
-
130
-
131
-
132
-
133
-
134
-
135
-
136
-
137
-
138
-
139
-
140
-
141
-
142
-
143
-
144
-
145
-
146
-
147
-
148
-
149
-
150
-
151
-
152
-
153
-
154
-
155
-
156
-
157
-
158
-
159
-
160
-
161
-
162
-
163
-
164
-
165
-
166
-
167
-
168
-
169
-
170
-
171
-
172
-
173
-
174
-
175
-
176
-
177
-
178
-
179
-
180
-
181
-
182
-
183
-
184
-
185
-
186
-
187
-
188
-
189
 |
 |
