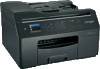
Lexmark Pro4000c User's Guide - Page 50
Setting the duplex printing dry time, Using the control panel, Using the printer software
 |
View all Lexmark Pro4000c manuals
Add to My Manuals
Save this manual to your list of manuals |
Page 50 highlights
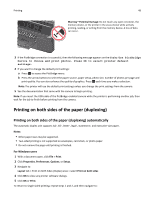
Printing 50 Setting the duplex printing dry time Using the control panel 1 From the printer control panel, navigate to: > Setup > OK > Print Mode Setup > OK > Page Dry Time > OK 2 Press the up or down arrow button to scroll to the dry time setting you want, and then press . OK Note: The dry time varies depending on the print quality selected for the print job. Select Extended to extend the dry time for your prints. Using the printer software For Windows users 1 Click File > Print. 2 Click Properties, Preferences, Options, or Setup. 3 Navigate to: Layout tab > Print on Both Sides (Duplex) area > select a dry time setting Note: Under conditions of high humidity, or if the normal drying time does not allow the ink to dry completely, select Extended. 4 Click OK. For Macintosh users 1 From the Apple menu, navigate to: System Preferences > Print & Fax > select your printer 2 Navigate to: Open Print Queue > Printer Setup > Driver tab or Printer Setup > Installable Options 3 From the Two‑Sided Printing Dry Time pop‑up menu, choose a dry time setting. Note: Under conditions of high humidity, or if the normal drying time does not allow the ink to dry completely, choose Extended. 4 Click OK or Apply Changes.
-
 1
1 -
2
-
3
-
4
-
5
-
6
-
7
-
8
-
9
-
10
-
11
-
12
-
13
-
14
-
15
-
16
-
17
-
18
-
19
-
20
-
21
-
22
-
23
-
24
-
25
-
26
-
27
-
28
-
29
-
30
-
31
-
32
-
33
-
34
-
35
-
36
-
37
-
38
-
39
-
40
-
41
-
42
-
43
-
44
-
 45
45 -
 46
46 -
 47
47 -
 48
48 -
 49
49 -
 50
50 -
 51
51 -
 52
52 -
 53
53 -
 54
54 -
 55
55 -
56
-
57
-
58
-
59
-
60
-
61
-
62
-
63
-
64
-
65
-
66
-
67
-
68
-
69
-
70
-
71
-
72
-
73
-
74
-
75
-
76
-
77
-
78
-
79
-
80
-
81
-
82
-
83
-
84
-
85
-
86
-
87
-
88
-
89
-
90
-
91
-
92
-
93
-
94
-
95
-
96
-
97
-
98
-
99
-
100
-
101
-
102
-
103
-
104
-
105
-
106
-
107
-
108
-
109
-
110
-
111
-
112
-
113
-
114
-
115
-
116
-
117
-
118
-
119
-
120
-
121
-
122
-
123
-
124
-
125
-
126
-
127
-
128
-
129
-
130
-
131
-
132
-
133
-
134
-
135
-
136
-
137
-
138
-
139
-
140
-
141
-
142
-
143
-
144
-
145
-
146
-
147
-
148
-
149
-
150
-
151
-
152
-
153
-
154
-
155
-
156
-
157
-
158
-
159
-
160
-
161
-
162
-
163
-
164
-
165
-
166
-
167
-
168
-
169
-
170
-
171
-
172
-
173
-
174
-
175
-
176
-
177
-
178
-
179
-
180
-
181
-
182
-
183
-
184
-
185
-
186
-
187
-
188
-
189
 |
 |