Maytag MED5800TW Technical Education - Page 57
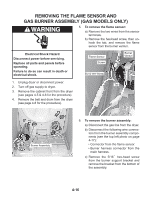
To remove the coils from the burner, assembly, To remove the ignitor from the burner
 |
View all Maytag MED5800TW manuals
Add to My Manuals
Save this manual to your list of manuals |
Page 57 highlights
Flame Sensor Connector 7. To remove the coils from the burner assembly: a) Remove the burner assembly (see step 6). b) Disconnect the 2-pin and 3-pin connectors from the coil terminals. c) Remove the two screws from the bracket, and lift the two coils off their cores. Coil Screws Burner Harness Connector Support Bracket Screw d) Remove the two 5/16˝ hex-head screws from the burner bracket. e) Pull the burner assembly forward, unhook the bracket tabs from the chassis slots, and remove the assembly. 2-Pin 3-Pin Coil Connectors Coil Assembly Burner Bracket Screws Coils Ignitor Burner Assembly 2 Coils 8. To remove the ignitor from the burner assembly: a) Remove the burner assembly (see step 6). b) Disconnect the 2-wire connector from the ignitor harness. c) Loosen the 5/16˝ hex-head ignitor screw, and remove the ignitor from the bracket. Bracket Ignitor Screw 4-17 Connector
-
 1
1 -
2
-
3
-
4
-
5
-
6
-
7
-
8
-
9
-
10
-
11
-
12
-
13
-
14
-
15
-
16
-
17
-
18
-
19
-
20
-
21
-
22
-
23
-
24
-
25
-
26
-
27
-
28
-
29
-
30
-
31
-
32
-
33
-
34
-
35
-
36
-
37
-
38
-
39
-
40
-
41
-
42
-
43
-
44
-
45
-
46
-
47
-
48
-
49
-
50
-
51
-
 52
52 -
 53
53 -
 54
54 -
 55
55 -
 56
56 -
 57
57 -
 58
58 -
 59
59 -
 60
60 -
 61
61 -
 62
62 -
63
-
64
-
65
-
66
-
67
-
68
-
69
-
70
-
71
-
72
-
73
-
74
-
75
-
76
-
77
-
78
-
79
-
80
-
81
-
82
-
83
-
84
-
85
-
86
-
87
-
88
 |
 |
