Maytag MED5800TW Technical Education - Page 69
Component Tests
 |
View all Maytag MED5800TW manuals
Add to My Manuals
Save this manual to your list of manuals |
Page 69 highlights
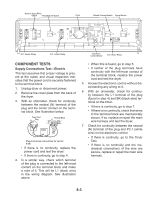
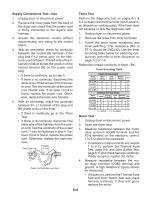
Push to Start (PTS) Switch Temperature Switch Timer Wrinkle Prevent Switch Signal Switch A.C. Heater Relay D.C. Heater Relay Electronic Control Board D.C. Motor Relay COMPONENT TESTS Supply Connections Test-Electric This test assumes that proper voltage is present at the outlet, and visual inspection indicates that the power cord is securely fastened to the terminal block. 1. Unplug dryer or disconnect power. 2. Remove the cover plate from the back of the dryer. 3. With an ohmmeter, check for continuity between the neutral (N) terminal of the plug and the center contact on the terminal block. See illustration below. Power Cord N Plug Terminal Block L1 COM Plug-to-terminal connections for electric dryer. • If there is no continuity, replace the power cord and test the dryer. • If there is continuity, go to step 4. 4. In a similar way, check which terminal of the plug is connected to the left-most contact on the terminal block and make a note of it. This will be L1 (black wire) in the wiring diagram. See illustration above. • When this is found, go to step 5. • If neither of the plug terminals have continuity with the left-most contact of the terminal block, replace the power cord and test the dryer. 5. Access the electronic control without disconnecting any wiring to it. 6. With an ohmmeter, check for continuity between the L1 terminal of the plug (found in step 4) and BK (black wire) terminal on the timer. • If there is continuity, go to step 7. • If there is no continuity, check that wires to the terminal block are mechanically secure. If so, replace or repair the main wire harness and test the dryer. 7. Check for continuity between the neutral (N) terminal of the plug and P2-1 (white wire) on the electronic control. • If there is continuity, go to the Timer Test. • If there is no continuity and the mechanical connections of the wire are secure, replace or repair the main wire harness. 6-3
-
 1
1 -
2
-
3
-
4
-
5
-
6
-
7
-
8
-
9
-
10
-
11
-
12
-
13
-
14
-
15
-
16
-
17
-
18
-
19
-
20
-
21
-
22
-
23
-
24
-
25
-
26
-
27
-
28
-
29
-
30
-
31
-
32
-
33
-
34
-
35
-
36
-
37
-
38
-
39
-
40
-
41
-
42
-
43
-
44
-
45
-
46
-
47
-
48
-
49
-
50
-
51
-
52
-
53
-
54
-
55
-
56
-
57
-
58
-
59
-
60
-
61
-
62
-
63
-
 64
64 -
 65
65 -
 66
66 -
 67
67 -
 68
68 -
 69
69 -
 70
70 -
 71
71 -
 72
72 -
 73
73 -
 74
74 -
75
-
76
-
77
-
78
-
79
-
80
-
81
-
82
-
83
-
84
-
85
-
86
-
87
-
88
 |
 |
