Maytag MED5800TW Technical Education - Page 58
Removing The Moisture Sensor And, Metal Oxide Varistors Movs
 |
View all Maytag MED5800TW manuals
Add to My Manuals
Save this manual to your list of manuals |
Page 58 highlights
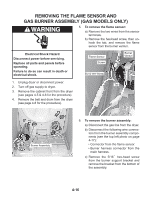
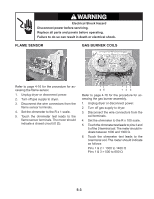
REMOVING THE MOISTURE SENSOR AND METAL OXIDE VARISTORS (MOVS) WARNING 5. To remove the metal oxide varistors (MOVs): a) Pull out and remove the lint screen. b) Remove the two cabinet top screws from the lint screen air duct. Electrical Shock Hazard Disconnect power before servicing. Replace all parts and panels before operating. Failure to do so can result in death or electrical shock. 1. Unplug dryer or disconnect power. 2. Turn off gas supply to dryer. 3. Open the dryer door. 4. To remove the moisture sensor: a) Remove the screw and unhook the sensor from the drum. b) Disconnect the two wire connectors from the moisture sensor. Lint Screen Cabinet Top Screws c) Remove the rear panel (see page 4-13 for the procedure). d) Remove the four screws from the air duct and pull the duct toward you just far enough to access the moisture sensor wiring harness. Moisture Sensor Strips Holder Air Duct Screw Moisture Sensor Wire Connectors Air Duct Screws 4-18
-
 1
1 -
2
-
3
-
4
-
5
-
6
-
7
-
8
-
9
-
10
-
11
-
12
-
13
-
14
-
15
-
16
-
17
-
18
-
19
-
20
-
21
-
22
-
23
-
24
-
25
-
26
-
27
-
28
-
29
-
30
-
31
-
32
-
33
-
34
-
35
-
36
-
37
-
38
-
39
-
40
-
41
-
42
-
43
-
44
-
45
-
46
-
47
-
48
-
49
-
50
-
51
-
52
-
 53
53 -
 54
54 -
 55
55 -
 56
56 -
 57
57 -
 58
58 -
 59
59 -
 60
60 -
 61
61 -
 62
62 -
 63
63 -
64
-
65
-
66
-
67
-
68
-
69
-
70
-
71
-
72
-
73
-
74
-
75
-
76
-
77
-
78
-
79
-
80
-
81
-
82
-
83
-
84
-
85
-
86
-
87
-
88
 |
 |
