Miele Scout RX3 Operating instructions/Installation instructions - Page 16
en-US
 |
View all Miele Scout RX3 manuals
Add to My Manuals
Save this manual to your list of manuals |
Page 16 highlights
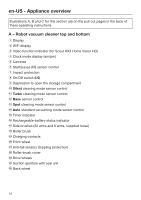
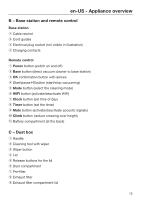
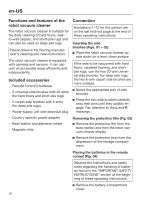
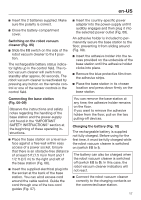
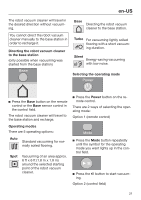
en-US Functions and features of the robot vacuum cleaner The robot vacuum cleaner is suitable for the daily cleaning of hard floors, wallto-wall carpets, and short-pile rugs and can also be used on deep-pile rugs. Please observe the flooring manufacturer's cleaning and care instructions. The robot vacuum cleaner is equipped with cameras and sensors. It can vacuum all accessible areas efficiently and independently. Included accessories - Remote control/2 batteries - 2 universal side brushes with 20 arms (for hard floors and short-pile rugs) - 2 carpet side brushes with 6 arms (for deep-pile rugs) - Power-supply unit with electrical plug Connection Illustrations 1-12 for this section are on the last fold-out page at the end of these operating instructions. Inserting the side brushes (Figs. 01 + 02) Place the robot vacuum cleaner upside down on a level, clean surface. If the area to be vacuumed with hard floors, carpeted flooring, and shortpile rugs, use the two 20-arm universal side brushes. For deep-pile rugs, the two 6-arm carpet side brushes are more suitable. Select the appropriate pair of side brushes. Press the two side brushes carefully onto their pins until they audibly engage. Pay attention to the L and R markings. - Country-specific power adapter - Base station and adhesive holder - Magnetic strip Removing the protective film (Fig. 03) Remove the protective film from the base station and from the robot vacuum cleaner display. Remove the protective strip from the depression of the storage compartment. Placing the batteries in the remote control (Fig. 04) Observe the instructions and safety notes regarding the handling of batteries found in the "IMPORTANT SAFETY INSTRUCTIONS" section at the beginning of these operating instructions. Remove the battery-compartment cover. 16
-
 1
1 -
2
-
3
-
4
-
5
-
6
-
7
-
8
-
9
-
10
-
 11
11 -
 12
12 -
 13
13 -
 14
14 -
 15
15 -
 16
16 -
 17
17 -
 18
18 -
 19
19 -
 20
20 -
 21
21 -
22
-
23
-
24
-
25
-
26
-
27
-
28
-
29
-
30
-
31
-
32
-
33
-
34
-
35
-
36
-
37
-
38
-
39
-
40
-
41
-
42
-
43
-
44
-
45
-
46
-
47
-
48
-
49
-
50
-
51
-
52
-
53
-
54
-
55
-
56
-
57
-
58
-
59
-
60
-
61
-
62
-
63
-
64
-
65
-
66
-
67
-
68
-
69
-
70
-
71
-
72
-
73
-
74
-
75
-
76
-
77
-
78
-
79
-
80
-
81
-
82
-
83
-
84
-
85
-
86
-
87
-
88
-
89
-
90
-
91
-
92
-
93
-
94
-
95
-
96
-
97
-
98
-
99
-
100
-
101
-
102
-
103
-
104
-
105
-
106
-
107
-
108
-
109
-
110
-
111
-
112
-
113
-
114
-
115
-
116
-
117
-
118
-
119
-
120
-
121
-
122
-
123
-
124
-
125
-
126
-
127
-
128
-
129
-
130
-
131
-
132
 |
 |
