Miele Scout RX3 Operating instructions/Installation instructions - Page 18
ner and Scout RX3 Home Vision HD.
 |
View all Miele Scout RX3 manuals
Add to My Manuals
Save this manual to your list of manuals |
Page 18 highlights
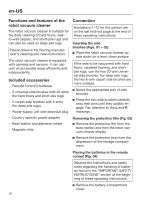
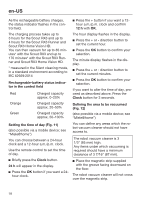
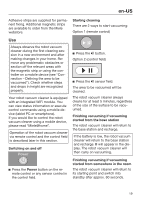
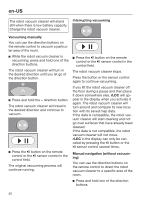
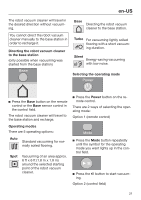
en-US As the rechargeable battery charges, the status indicator flashes in the control field. The charging process takes up to 3 hours for the Scout RX3 and up to 4 hours for the Scout RX3 Runner and Scout RX3 Home Vision HD. You can then vacuum for up to 85 minutes* with the Scout RX3 and up to 170 minutes* with the Scout RX3 Runner and Scout RX3 Home Vision HD. * measured in the Silent cleaning mode, in a standard environment according to IEC 62929:2014 Rechargeable-battery status indicator in the control field Red Orange Green Charged capacity approx. 0-20% Charged capacity approx. 20-50% Charged capacity approx. 50-100% Setting the time of day (Fig. 11) (also possible via a mobile device; see "Miele@home") You can choose between a 24-hour clock and a 12-hour a.m./p.m. clock. Use the remote control to set the time of day. Briefly press the Clock button. 24 h will appear in the display. Press the OK button if you want a 24hour clock. Press the + button if you want a 12hour a.m./p.m. clock and confirm 12 h with OK. The hour display flashes in the display. Press the + or - direction button to set the current hour. Press the OK button to confirm your selection. The minute display flashes in the display. Press the + or - direction button to set the current minutes. Press the OK button to confirm your selection. If you want to alter the time of day, proceed as described above. Press the Clock button for 3 seconds. Defining the area to be vacuumed (Fig. 12) (also possible via a mobile device; see "Miele@home") You can define any areas which the robot vacuum cleaner should not have access to. The robot vacuum cleaner is 3 1/3" (85 mm) high. Any items under which vacuuming is required should have a minimum clearance of 3 7/16" (87 mm). Place the magnetic strip supplied with the groove facing downward on the floor. The robot vacuum cleaner will not cross over the magnetic strip. 18
-
 1
1 -
2
-
3
-
4
-
5
-
6
-
7
-
8
-
9
-
10
-
11
-
12
-
 13
13 -
 14
14 -
 15
15 -
 16
16 -
 17
17 -
 18
18 -
 19
19 -
 20
20 -
 21
21 -
 22
22 -
 23
23 -
24
-
25
-
26
-
27
-
28
-
29
-
30
-
31
-
32
-
33
-
34
-
35
-
36
-
37
-
38
-
39
-
40
-
41
-
42
-
43
-
44
-
45
-
46
-
47
-
48
-
49
-
50
-
51
-
52
-
53
-
54
-
55
-
56
-
57
-
58
-
59
-
60
-
61
-
62
-
63
-
64
-
65
-
66
-
67
-
68
-
69
-
70
-
71
-
72
-
73
-
74
-
75
-
76
-
77
-
78
-
79
-
80
-
81
-
82
-
83
-
84
-
85
-
86
-
87
-
88
-
89
-
90
-
91
-
92
-
93
-
94
-
95
-
96
-
97
-
98
-
99
-
100
-
101
-
102
-
103
-
104
-
105
-
106
-
107
-
108
-
109
-
110
-
111
-
112
-
113
-
114
-
115
-
116
-
117
-
118
-
119
-
120
-
121
-
122
-
123
-
124
-
125
-
126
-
127
-
128
-
129
-
130
-
131
-
132
 |
 |