Motorola ELECTRIFY 2 ELECTRIFY 2 - User Guide - Page 5
Let’s go, Assemble & charge, Set up & go - battery life
 |
View all Motorola ELECTRIFY 2 manuals
Add to My Manuals
Save this manual to your list of manuals |
Page 5 highlights
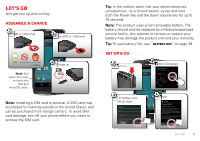
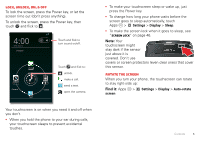
Let's go let's get you up and running Assemble & charge 1 SIM in. (Optional) 2 microSD in. (Optional) 4:00 SIM micro SIM micro SGIoMogle + Adapter 3 Charge up. U.S. Cellular Note: Pull down the cover to insert the SIM and microSD cards. Email Calendar Browser Play Store 3H Phone People Text Camera Note: Installing a SIM card is optional. A SIM card may be needed for roaming outside of the United States, and can be purchased from foreign carriers. To avoid SIM card damage, turn off your phone before you insert or remove the SIM card. Tip: In the unlikely event that your device becomes unresponsive, try a forced reboot-press and hold both the Power key and the down volume key for up to 10 seconds. Note: This product uses a non-removable battery. The battery should only be replaced by a Motorola-approved service facility. Any attempt to remove or replace your battery may damage the product and void your warranty. Tip: To save battery life, see "Battery tips" on page 38. Set up & go 1 Turn on. 2 Select a language. We4l:c00ome English Start Google U.S. Cellular 3 Complete initial Email setup steps. Calendar Browser 4 Finish. Play Store Setup Sign inSetup Connection failed Email Phone People Password by signing in you agree to the Google and Additional Privacy Policies. Text Congratulations! Your setup is now complete! Camera If you have setup any accounts, we will now import your content, such as contacts and email. This may take up to 30 minutes but you can start using your phone right away. We recommend setting a Security Lock for this phone by going into Settings > Location & security. Back Sign in Done Let's go 3
-
 1
1 -
 2
2 -
 3
3 -
 4
4 -
 5
5 -
 6
6 -
 7
7 -
 8
8 -
 9
9 -
 10
10 -
 11
11 -
12
-
13
-
14
-
15
-
16
-
17
-
18
-
19
-
20
-
21
-
22
-
23
-
24
-
25
-
26
-
27
-
28
-
29
-
30
-
31
-
32
-
33
-
34
-
35
-
36
-
37
-
38
-
39
-
40
-
41
-
42
-
43
-
44
-
45
-
46
-
47
-
48
-
49
-
50
-
51
-
52
-
53
-
54
-
55
-
56
-
57
-
58
-
59
-
60
-
61
-
62
-
63
-
64
 |
 |
