Netgear R6900P User Manual - Page 17
Connect to the Router, Connect to the Router Through an Ethernet Cable - setup
 |
View all Netgear R6900P manuals
Add to My Manuals
Save this manual to your list of manuals |
Page 17 highlights
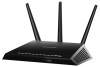
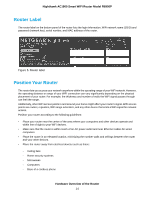
Nighthawk AC1900 Smart WiFi Router Model R6900P Connect to the Router During and after installation, you can connect to the router's network through a wired or WiFi connection. If you set up your computer to use a static IP address, change the settings of your computer so that it uses Dynamic Host Configuration Protocol (DHCP). Connect to the Router Through an Ethernet Cable You can connect your computer to the router using an Ethernet cable and join the router's local area network (LAN). To connect your computer to the router with an Ethernet cable: 1. Make sure that the router is receiving power (its Power LED is lit). 2. Connect an Ethernet cable to an Ethernet port on your computer. 3. Connect the other end of the Ethernet cable to one of the numbered Ethernet ports. Your computer connects to the local area network (LAN). A message might display on your computer screen to notify you that an Ethernet cable is connected. Join the WiFi Network of the Router Choose either the manual or the WPS method to add a WiFi device such as a WiFi-enabled computer, an iPhone, an iPad, another mobile device, or a gaming device to the WiFi network of the router. Manual Method On the WiFi device that you want to connect to the router, you can use the software application that manages your WiFi connections. To connect a device manually to the WiFi network of the router: 1. Make sure that the router is receiving power (its Power LED is lit). 2. On the WiFi device that you want to connect to your router, open the software application that manages your WiFi connections. This software scans for all WiFi networks in your area. 3. Look for the router's network and select it. If you did not change the name of the network during the setup process, look for the default WiFi network name (SSID) and select it. The default SSID is on the router label. Connect to the Network and Access the Router 17
-
 1
1 -
2
-
3
-
4
-
5
-
6
-
7
-
8
-
9
-
10
-
11
-
 12
12 -
 13
13 -
 14
14 -
 15
15 -
 16
16 -
 17
17 -
 18
18 -
 19
19 -
 20
20 -
 21
21 -
 22
22 -
23
-
24
-
25
-
26
-
27
-
28
-
29
-
30
-
31
-
32
-
33
-
34
-
35
-
36
-
37
-
38
-
39
-
40
-
41
-
42
-
43
-
44
-
45
-
46
-
47
-
48
-
49
-
50
-
51
-
52
-
53
-
54
-
55
-
56
-
57
-
58
-
59
-
60
-
61
-
62
-
63
-
64
-
65
-
66
-
67
-
68
-
69
-
70
-
71
-
72
-
73
-
74
-
75
-
76
-
77
-
78
-
79
-
80
-
81
-
82
-
83
-
84
-
85
-
86
-
87
-
88
-
89
-
90
-
91
-
92
-
93
-
94
-
95
-
96
-
97
-
98
-
99
-
100
-
101
-
102
-
103
-
104
-
105
-
106
-
107
-
108
-
109
-
110
-
111
-
112
-
113
-
114
-
115
-
116
-
117
-
118
-
119
-
120
-
121
-
122
-
123
-
124
-
125
-
126
-
127
-
128
-
129
-
130
-
131
-
132
-
133
-
134
-
135
-
136
-
137
-
138
-
139
-
140
-
141
-
142
-
143
-
144
-
145
-
146
-
147
-
148
-
149
-
150
-
151
-
152
-
153
-
154
-
155
-
156
-
157
-
158
-
159
-
160
-
161
-
162
-
163
-
164
-
165
-
166
-
167
-
168
-
169
-
170
-
171
-
172
-
173
-
174
-
175
-
176
-
177
-
178
-
179
-
180
-
181
-
182
-
183
-
184
-
185
-
186
-
187
-
188
-
189
-
190
-
191
-
192
-
193
-
194
-
195
-
196
-
197
-
198
-
199
-
200
-
201
-
202
-
203
-
204
-
205
-
206
-
207
-
208
-
209
-
210
-
211
-
212
-
213
-
214
-
215
 |
 |
