Netgear R6900P User Manual - Page 172
Manage the Router and Monitor the Traffic, Nighthawk AC1900 Smart WiFi Router Model R6900P
 |
View all Netgear R6900P manuals
Add to My Manuals
Save this manual to your list of manuals |
Page 172 highlights
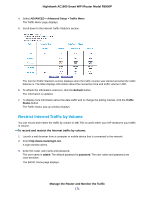
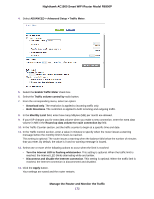
Nighthawk AC1900 Smart WiFi Router Model R6900P 4. Select ADVANCED > Advanced Setup > Traffic Meter. 5. Select the Enable Traffic Meter check box. 6. Select the Traffic volume control by radio button. 7. From the corresponding menu, select an option: • Download only. The restriction is applied to incoming traffic only. • Both Directions. The restriction is applied to both incoming and outgoing traffic. 8. In the Monthly Limit field, enter how many MBytes (MB) per month are allowed. 9. If your ISP charges you for extra data volume when you make a new connection, enter the extra data volume in MB in the Round up data volume for each connection by field. 10. In the Traffic Counter section, set the traffic counter to begin at a specific time and date. 11. In the Traffic Control section, enter a value in minutes to specify when the router issues a warning message before the monthly limit in hours is reached. This setting is optional. The router issues a warning when the balance falls below the number of minutes that you enter. By default, the value is 0 and no warning message is issued. 12. Select one or more of the following actions to occur when the limit is reached: • Turn the Internet LED to flashing white/amber. This setting is optional. When the traffic limit is reached, the Internet LED blinks alternating white and amber. • Disconnect and disable the Internet connection. This setting is optional. When the traffic limit is reached, the Internet connection is disconnected and disabled. 13. Click the Apply button. Your settings are saved and the router restarts. Manage the Router and Monitor the Traffic 172
-
 1
1 -
2
-
3
-
4
-
5
-
6
-
7
-
8
-
9
-
10
-
11
-
12
-
13
-
14
-
15
-
16
-
17
-
18
-
19
-
20
-
21
-
22
-
23
-
24
-
25
-
26
-
27
-
28
-
29
-
30
-
31
-
32
-
33
-
34
-
35
-
36
-
37
-
38
-
39
-
40
-
41
-
42
-
43
-
44
-
45
-
46
-
47
-
48
-
49
-
50
-
51
-
52
-
53
-
54
-
55
-
56
-
57
-
58
-
59
-
60
-
61
-
62
-
63
-
64
-
65
-
66
-
67
-
68
-
69
-
70
-
71
-
72
-
73
-
74
-
75
-
76
-
77
-
78
-
79
-
80
-
81
-
82
-
83
-
84
-
85
-
86
-
87
-
88
-
89
-
90
-
91
-
92
-
93
-
94
-
95
-
96
-
97
-
98
-
99
-
100
-
101
-
102
-
103
-
104
-
105
-
106
-
107
-
108
-
109
-
110
-
111
-
112
-
113
-
114
-
115
-
116
-
117
-
118
-
119
-
120
-
121
-
122
-
123
-
124
-
125
-
126
-
127
-
128
-
129
-
130
-
131
-
132
-
133
-
134
-
135
-
136
-
137
-
138
-
139
-
140
-
141
-
142
-
143
-
144
-
145
-
146
-
147
-
148
-
149
-
150
-
151
-
152
-
153
-
154
-
155
-
156
-
157
-
158
-
159
-
160
-
161
-
162
-
163
-
164
-
165
-
166
-
 167
167 -
 168
168 -
 169
169 -
 170
170 -
 171
171 -
 172
172 -
 173
173 -
 174
174 -
 175
175 -
 176
176 -
 177
177 -
178
-
179
-
180
-
181
-
182
-
183
-
184
-
185
-
186
-
187
-
188
-
189
-
190
-
191
-
192
-
193
-
194
-
195
-
196
-
197
-
198
-
199
-
200
-
201
-
202
-
203
-
204
-
205
-
206
-
207
-
208
-
209
-
210
-
211
-
212
-
213
-
214
-
215
 |
 |
