Netgear RN3138 Software Manual - Page 67
Enable WebDAV, To enable WebDAV on an individual shared folder, Shared Folders, ReadyNAS OS 6.4
 |
View all Netgear RN3138 manuals
Add to My Manuals
Save this manual to your list of manuals |
Page 67 highlights
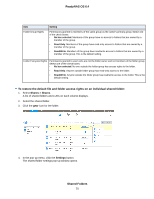
ReadyNAS OS 6.4 10. Click the Apply button. 11. Click the OK button. Your settings are saved and the pop-up window closes. Enable WebDAV This feature is available only for HTTP and HTTPS. WebDAV is an extension of the HTTP and HTTPS protocols that facilitates document management and editing. Features of WebDAV include maintenance of document properties such as author, creation date, and modification date, and it provides overwrite protection. Access is to a shared folder and the contained files. After you enable WebDAV access, you can access the files in the shared folder over the Internet from a computer or mobile device in a manner similar to accessing the files over a LAN or through a VPN. The specifics depend on the device and application using WebDAV. To enable WebDAV on an individual shared folder: 1. Log in to your ReadyNAS. 2. Select Shares > Shares. A list of shared folders and LUNs on each volume displays. 3. Select the shared folder that you want to configure. 4. Click the gear icon for the folder. 5. Click the Settings button in the pop-up menu. The shared folder settings display in a pop-up window. Shared Folders 67
-
 1
1 -
2
-
3
-
4
-
5
-
6
-
7
-
8
-
9
-
10
-
11
-
12
-
13
-
14
-
15
-
16
-
17
-
18
-
19
-
20
-
21
-
22
-
23
-
24
-
25
-
26
-
27
-
28
-
29
-
30
-
31
-
32
-
33
-
34
-
35
-
36
-
37
-
38
-
39
-
40
-
41
-
42
-
43
-
44
-
45
-
46
-
47
-
48
-
49
-
50
-
51
-
52
-
53
-
54
-
55
-
56
-
57
-
58
-
59
-
60
-
61
-
 62
62 -
 63
63 -
 64
64 -
 65
65 -
 66
66 -
 67
67 -
 68
68 -
 69
69 -
 70
70 -
 71
71 -
 72
72 -
73
-
74
-
75
-
76
-
77
-
78
-
79
-
80
-
81
-
82
-
83
-
84
-
85
-
86
-
87
-
88
-
89
-
90
-
91
-
92
-
93
-
94
-
95
-
96
-
97
-
98
-
99
-
100
-
101
-
102
-
103
-
104
-
105
-
106
-
107
-
108
-
109
-
110
-
111
-
112
-
113
-
114
-
115
-
116
-
117
-
118
-
119
-
120
-
121
-
122
-
123
-
124
-
125
-
126
-
127
-
128
-
129
-
130
-
131
-
132
-
133
-
134
-
135
-
136
-
137
-
138
-
139
-
140
-
141
-
142
-
143
-
144
-
145
-
146
-
147
-
148
-
149
-
150
-
151
-
152
-
153
-
154
-
155
-
156
-
157
-
158
-
159
-
160
-
161
-
162
-
163
-
164
-
165
-
166
-
167
-
168
-
169
-
170
-
171
-
172
-
173
-
174
-
175
-
176
-
177
-
178
-
179
-
180
-
181
-
182
-
183
-
184
-
185
-
186
-
187
-
188
-
189
-
190
-
191
-
192
-
193
-
194
-
195
-
196
-
197
-
198
-
199
-
200
-
201
-
202
-
203
-
204
-
205
-
206
-
207
-
208
-
209
-
210
-
211
-
212
-
213
-
214
-
215
-
216
-
217
-
218
-
219
-
220
-
221
-
222
-
223
-
224
-
225
-
226
-
227
-
228
-
229
-
230
-
231
-
232
-
233
-
234
-
235
-
236
-
237
-
238
-
239
-
240
-
241
-
242
-
243
-
244
-
245
 |
 |
