Netgear WAG102 WAG102 Reference Manual - Page 43
Setting Up and Testing Basic Wireless Connectivity, Data Rate, Output Power, Apply
 |
UPC - 606449028799
View all Netgear WAG102 manuals
Add to My Manuals
Save this manual to your list of manuals |
Page 43 highlights
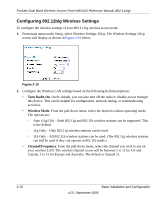
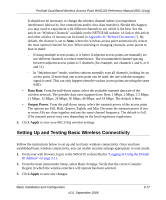
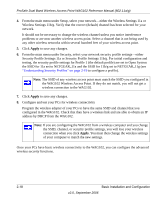
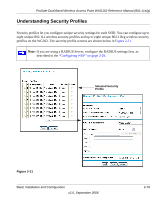
ProSafe Dual Band Wireless Access Point WAG102 Reference Manual (802.11a/g) It should not be necessary to change the wireless channel unless you experience interference (shown by lost connections and/or slow data transfers). Should this happen, you may need to experiment with different channels to see which is the best. See the article on "Wireless Channels" available on the NETGEAR website. (A link to this article and other articles of interest can be found in Appendix B, "Related Documents."). By default, the channel is set to Auto, where the wireless access point automatically selects the most optimal channel for you. When selecting or changing channels, some points to bear in mind: - If using multiple access points, it is better if adjacent access points are manually set use different channels to reduce interference. The recommended channel spacing between adjacent access points is 5 channels (for example, use channels 1 and 6, or 6 and 11). - In "Infrastructure" mode, wireless stations normally scan all channels, looking for an access point. If more than one access point can be used, the one with the strongest signal is used. This can only happen when the various access points are using the same SSID. • Data Rate. From the pull-down menu, select the available transmit data rate of the wireless network. The possible data rates supported are: Best, 1 Mbps, 2 Mbps, 5.5 Mbps, 11 Mbps, 12 Mbps, 24 Mbps, 36 Mbps, 48 Mbps, and 54 Mbps. The default is Best. • Output Power. From the pull-down menu, select the transmit power of the access point. The options are Full, Half, Quarter, Eighth, and Min. Decrease the transmit power if two or more APs are close together and use the same channel frequency. The default is Full. (The transmit power may vary depending on the local regulatory regulations. 3. Click Apply to save your 802.11b/g wireless settings. Setting Up and Testing Basic Wireless Connectivity Follow the instructions below to set up and test basic wireless connectivity. Once you have established basic wireless connectivity, you can enable security settings appropriate to your needs. 1. From your web browser, log in to the WAG102 as described in "Logging In Using the Default IP Address" on page 2-11. 2. From the main menu under Setup, select Basic Settings. Verify that the correct Country/ Region in which the wireless interface will operate has been selected. 3. Click Apply to save any changes. Basic Installation and Configuration v2.0, September 2006 2-17
-
 1
1 -
2
-
3
-
4
-
5
-
6
-
7
-
8
-
9
-
10
-
11
-
12
-
13
-
14
-
15
-
16
-
17
-
18
-
19
-
20
-
21
-
22
-
23
-
24
-
25
-
26
-
27
-
28
-
29
-
30
-
31
-
32
-
33
-
34
-
35
-
36
-
37
-
 38
38 -
 39
39 -
 40
40 -
 41
41 -
 42
42 -
 43
43 -
 44
44 -
 45
45 -
 46
46 -
 47
47 -
 48
48 -
49
-
50
-
51
-
52
-
53
-
54
-
55
-
56
-
57
-
58
-
59
-
60
-
61
-
62
-
63
-
64
-
65
-
66
-
67
-
68
-
69
-
70
-
71
-
72
-
73
-
74
-
75
-
76
-
77
-
78
-
79
-
80
-
81
-
82
-
83
-
84
-
85
-
86
-
87
-
88
-
89
-
90
-
91
-
92
-
93
-
94
-
95
-
96
-
97
-
98
-
99
-
100
-
101
-
102
 |
 |
