Netgear XSM4324FS Hardware Installation Guide - Page 62
Optional Step 10: Connect a console to the switch
 |
View all Netgear XSM4324FS manuals
Add to My Manuals
Save this manual to your list of manuals |
Page 62 highlights
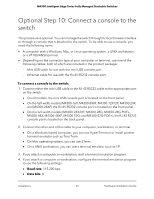
M4300 Intelligent Edge Series Fully Managed Stackable Switches Optional Step 10: Connect a console to the switch This procedure is optional. You can manage the switch through its local browser interface or through a console that is attached to the switch. To be able to use a console, you need the following items: • A computer with a Windows, Mac, or Linux operating system, a UNIX workstation, or a VT100/ANSI terminal. • Depending on the connector type at your computer or terminal, use one of the following cables, both of which are included in the product package: - Mini USB cable for use with the mini USB console port - Ethernet cable for use with the RJ-45 RS232 console port To connect a console to the switch: 1. Connect either the mini USB cable or the RJ-45 RS232 cable to the appropriate port on the switch. • On all models, the mini USB console port is located on the front panel. • On the half-width models (M4300-16X, M4300-8X8F, M4300-12X12F, M4300-24X, and M4300-24XF) the RJ-45 RS232 console port is located on the front panel. • On the full-width models (M4300-24X24F, M4300-28G, M4300-28G-POE+, M4300-48X, M4300-48XF, M4300-52G, and M4300-52G-POE+), the RJ-45 RS232 console port is located on the back panel. 2. Connect the other end of the cable to your computer, workstation, or terminal. • On a Windows-based computer, you can use HyperTerminal or install another terminal emulator such as Tera Term. • On Mac operating system, you can use ZTerm. • On a UNIX workstation, you can use a terminal emulator such as TIP. 3. If you attach a computer or workstation, start a terminal emulation program. 4. If you attach a computer or workstation, configure the terminal emulation program to use the following settings: • Baud rate. 115,200 bps • Data bits. 8 Installation 62 Hardware Installation Guide
-
 1
1 -
2
-
3
-
4
-
5
-
6
-
7
-
8
-
9
-
10
-
11
-
12
-
13
-
14
-
15
-
16
-
17
-
18
-
19
-
20
-
21
-
22
-
23
-
24
-
25
-
26
-
27
-
28
-
29
-
30
-
31
-
32
-
33
-
34
-
35
-
36
-
37
-
38
-
39
-
40
-
41
-
42
-
43
-
44
-
45
-
46
-
47
-
48
-
49
-
50
-
51
-
52
-
53
-
54
-
55
-
56
-
 57
57 -
 58
58 -
 59
59 -
 60
60 -
 61
61 -
 62
62 -
 63
63 -
 64
64 -
 65
65 -
 66
66 -
 67
67 -
68
-
69
 |
 |