Netgear XSM4324FS Hardware Installation Guide - Page 67
To replace a half-width switch, WARNING
 |
View all Netgear XSM4324FS manuals
Add to My Manuals
Save this manual to your list of manuals |
Page 67 highlights
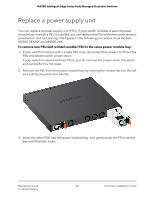
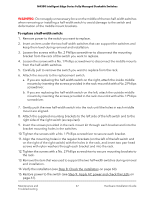
M4300 Intelligent Edge Series Fully Managed Stackable Switches WARNING: Do not apply unnecessary force on the middle of the two half-width switches when removing or installing a half-width switch to avoid damage to the switch and deformation of the middle mount brackets. To replace a half-width switch: 1. Remove power to the switch you want to replace. 2. Insert an item under the two half-width switches that can support the switches and keep them level during removal and installation. 3. Loosen the screws with a No. 2 Phillips screwdriver to disconnect the mounting bracket from the rack of the switch you want to replace. 4. Loosen the screws with a No. 1 Phillips screwdriver to disconnect the middle mounts from the half-width switches. 5. Carefully pull to remove the switch you want to replace from the rack. 6. Attach the mounts to the replacement switch. a. If you are replacing the half-width switch on the right, attach the inside middle mounts by inserting the screws provided in the rack-mount kit with a No. 2 Philips screwdriver. b. If you are replacing the half-width switch on the left, attach the outside middle mounts by inserting the screws provided in the rack-mount kit with a No. 1 Philips screwdriver. 7. Gently push the new half-width switch into the rack until the holes in each middle mount are aligned. 8. Attach the supplied mounting brackets to the left side of the left switch and to the right side of the right switch (as required). 9. Insert the screws provided in the rack-mount kit through each bracket and into the bracket mounting holes in the switches. 10. Tighten the screws with a No. 1 Phillips screwdriver to secure each bracket. 11. Align the mounting holes in the regular brackets (on the left of the left switch and on the right of the right switch) with the holes in the rack, and insert two pan-head screws with nylon washers through each bracket and into the rack. 12. Tighten the screws with a No. 2 Phillips screwdriver to secure mounting brackets to the rack. 13. Remove the item that was used to support the two half-width switches during removal and installation. 14. Verify the installation (see Step 8: Check the installation on page 60). 15. Restore power to the switch (see Step 9: Apply AC power and check the LEDs on page 61). Maintenance and Troubleshooting 67 Hardware Installation Guide
-
 1
1 -
2
-
3
-
4
-
5
-
6
-
7
-
8
-
9
-
10
-
11
-
12
-
13
-
14
-
15
-
16
-
17
-
18
-
19
-
20
-
21
-
22
-
23
-
24
-
25
-
26
-
27
-
28
-
29
-
30
-
31
-
32
-
33
-
34
-
35
-
36
-
37
-
38
-
39
-
40
-
41
-
42
-
43
-
44
-
45
-
46
-
47
-
48
-
49
-
50
-
51
-
52
-
53
-
54
-
55
-
56
-
57
-
58
-
59
-
60
-
61
-
 62
62 -
 63
63 -
 64
64 -
 65
65 -
 66
66 -
 67
67 -
 68
68 -
 69
69
 |
 |