Nikon 25515 User Manual - Page 136
Folders, Monitor Options, Release Speed
 |
View all Nikon 25515 manuals
Add to My Manuals
Save this manual to your list of manuals |
Page 136 highlights
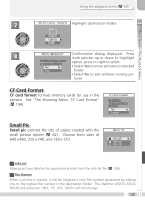
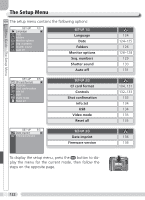
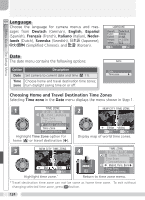
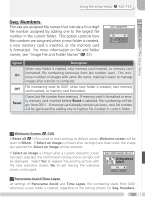
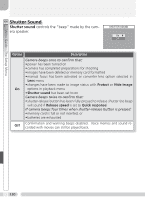
Menu Guide-The Setup Menu Folders In addition to creating, renaming, and deleting folders ( 108), the folders option in the setup menu can be used to select the folder in which subsequent pictures will be stored. Press the multi selector up or down to highlight a folder and then press the multi selector to the right to select. Until a new folder is chosen, all new pictures will be stored in the selected folder. FOLDERS Folders Folders NIKON TOKYO Monitor Options The options in this menu control the quality of the preview displayed in the monitor, whether pictures are displayed after shooting (picture review), monitor brightness and hue, and the welcome screen displayed when the camera is turned on. MONITOR OPTIONS Release speed Review Options Brightness Hue Start-up Display Welcome screen Release Speed In shooting modes (Custom 1) and (Custom 2), this option can be used to minimize the delay between the shutter-release button being pressed and the picture being taken, at the cost of a slight drop in the quality of the preview image displayed in the monitor. SHUTTER RELEASE SPEED Normal Quick response Option Description Normal Priority given to quality of preview image displayed in monitor. Reduces lag between shutter-release button being pressed and shutter Quick being released when shooting stills (movies are not affected).* Horizonresponse tal lines may appear in preview image; final picture is not affected. * If a picture is taken during picture review ( 127), the focus, exposure, and auto white-balance settings used in the previous shot will apply to the new picture. To ensure a quick response, the built-in Speedlight may not fire if a picture is taken during picture review; optional Speedlights may not fire if Continuous is set to Single. Panorama Assist/Ultra HS/Time lapse Folders created with the Panorama assist ( 27), Ultra HS ( ( 80) options can not be used to store additional pictures. 126 80), and Time lapse
-
 1
1 -
2
-
3
-
4
-
5
-
6
-
7
-
8
-
9
-
10
-
11
-
12
-
13
-
14
-
15
-
16
-
17
-
18
-
19
-
20
-
21
-
22
-
23
-
24
-
25
-
26
-
27
-
28
-
29
-
30
-
31
-
32
-
33
-
34
-
35
-
36
-
37
-
38
-
39
-
40
-
41
-
42
-
43
-
44
-
45
-
46
-
47
-
48
-
49
-
50
-
51
-
52
-
53
-
54
-
55
-
56
-
57
-
58
-
59
-
60
-
61
-
62
-
63
-
64
-
65
-
66
-
67
-
68
-
69
-
70
-
71
-
72
-
73
-
74
-
75
-
76
-
77
-
78
-
79
-
80
-
81
-
82
-
83
-
84
-
85
-
86
-
87
-
88
-
89
-
90
-
91
-
92
-
93
-
94
-
95
-
96
-
97
-
98
-
99
-
100
-
101
-
102
-
103
-
104
-
105
-
106
-
107
-
108
-
109
-
110
-
111
-
112
-
113
-
114
-
115
-
116
-
117
-
118
-
119
-
120
-
121
-
122
-
123
-
124
-
125
-
126
-
127
-
128
-
129
-
130
-
 131
131 -
 132
132 -
 133
133 -
 134
134 -
 135
135 -
 136
136 -
 137
137 -
 138
138 -
 139
139 -
 140
140 -
 141
141 -
142
-
143
-
144
-
145
-
146
-
147
-
148
-
149
-
150
-
151
-
152
-
153
-
154
-
155
-
156
-
157
-
158
-
159
-
160
-
161
-
162
-
163
-
164
 |
 |
