Oki MC361MFP MC361, MC561 Setup Guide (English, Fran栩s, Espa?ol, Po - Page 14
menu. See Configuring the Tray Settings on, English
 |
View all Oki MC361MFP manuals
Add to My Manuals
Save this manual to your list of manuals |
Page 14 highlights
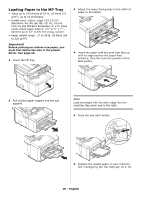
3 Adjust the paper stopper (1) for the paper length: press down lightly on the blue release lever (2), then slide the paper stopper to the length of paper to be loaded. The length selected will show in the view window (3). 5 Load the paper with the print side face down. Keep the stack below the fill line (1). 6 Fine tune the paper width guides and the paper stopper to be snug, but not tight, against the paper. 7 Push the paper tray into the printer until it stops. Note If you are loading legal paper, you must slide the paper stopper out beyond the end of the tray. For Legal 14 paper, slide it as far out as it will go (about 2.5 inches, 64 mm). Settings for Legal 13, Legal 13.5 and Legal 14 will appear in the stopper window when it is properly positioned. 4 Flex the paper back and forth, and then fan it. Straighten the edges of the paper stack on a level surface. 8 Configure the tray settings in your machine's menu. See "Configuring the Tray Settings" on page 16. 14 - English
-
 1
1 -
2
-
3
-
4
-
5
-
6
-
7
-
8
-
 9
9 -
 10
10 -
 11
11 -
 12
12 -
 13
13 -
 14
14 -
 15
15 -
 16
16 -
 17
17 -
 18
18 -
 19
19 -
20
-
21
-
22
-
23
-
24
-
25
-
26
-
27
-
28
-
29
-
30
-
31
-
32
-
33
-
34
-
35
-
36
-
37
-
38
-
39
-
40
-
41
-
42
-
43
-
44
-
45
-
46
-
47
-
48
-
49
-
50
-
51
-
52
-
53
-
54
-
55
-
56
-
57
-
58
-
59
-
60
-
61
-
62
-
63
-
64
-
65
-
66
-
67
-
68
-
69
-
70
-
71
-
72
-
73
-
74
-
75
-
76
-
77
-
78
-
79
-
80
-
81
-
82
-
83
-
84
-
85
-
86
-
87
-
88
-
89
-
90
-
91
-
92
-
93
-
94
-
95
-
96
-
97
-
98
-
99
-
100
-
101
-
102
-
103
-
104
-
105
-
106
-
107
-
108
-
109
-
110
-
111
-
112
-
113
-
114
-
115
-
116
-
117
-
118
-
119
-
120
-
121
-
122
-
123
-
124
-
125
-
126
-
127
-
128
-
129
-
130
-
131
-
132
-
133
-
134
-
135
-
136
-
137
-
138
-
139
-
140
-
141
-
142
-
143
-
144
-
145
-
146
-
147
-
148
-
149
-
150
-
151
-
152
-
153
-
154
-
155
-
156
-
157
-
158
-
159
-
160
-
161
-
162
-
163
-
164
-
165
-
166
-
167
-
168
-
169
-
170
-
171
-
172
-
173
-
174
-
175
-
176
-
177
-
178
-
179
-
180
-
181
-
182
-
183
-
184
-
185
-
186
-
187
-
188
-
189
-
190
-
191
-
192
-
193
-
194
-
195
-
196
-
197
-
198
-
199
-
200
-
201
-
202
-
203
-
204
-
205
-
206
-
207
-
208
-
209
-
210
-
211
-
212
-
213
-
214
-
215
-
216
 |
 |
